As long-time readers will know, I have used “bucket traps” with fermenting liquid bait for many years to collect Cerambycidae. In fact, I discovered my first new species (Purpuricenus paraxillaris) soon after I began using these traps back in the mid-1980s. The traps are simple—a bucket (2-L in my case) filled to about 1/3 with diluted molasses/beer (MB) or sweet red wine (SRW). When placed in the field, the bait ferments, releasing ethanol and other volatiles that attract a variety of longhorned beetles (as well as some other groups of beetles and insects). Beetles attracted to the trap drown in the bait and are retrieved by pouring the bait through a kitchen strainer. The bait, thus, acts as both an attractant and a killing agent. Other collectors of Cerambycidae have used these traps as well for many years, and in fact Marlin Rice and I have just completed a manuscript on a 4-year study comparing the efficacy and relative attractiveness of bucket traps baited with MB vs. SRW in Missouri, Iowa, and Florida—look for that paper to appear (hopefully) later this year in The Coleopterists Bulletin.
More recently, however, I have switched from bucket traps to “jug traps.” These differ obviously in that they are jugs with “windows” cut into them rather than open-top buckets. More importantly, however, instead of fermenting bait, the bottom of the jug (i.e., “reservoir”) is filled with dilute propylene glycol. Like fermenting liquid bait, propylene glycol forms a trap from which the beetles cannot escape, but it plays no role in attracting the beetles to the trap. Instead, it acts as a preservative to prevent deterioration of the trapped beetles after even prolonged submersion. Attraction to the trap is still accomplished with bait, but in this case it is isolated inside a bottle that is suspended inside the jug above the reservoir. A wick inserted into the bait and extending above the top of the bottle enables the release of ethanol and other volatiles from the bait to serve to attract beetles to the trap. A variety of baits can be used—I have been comparing the relative efficacy of three: pure ethanol, sweet red wine, and a 50:50 mixture of the two (look for a manuscript on the results after this season).
The advantages of jug traps are several-fold. First, beetles trapped in propylene glycol do not deteriorate (beetles trapped in fermenting bucket traps will deteriorate if not removed within about a week). Second, wicked bottles of ethanol-based baits last much longer (several weeks) than fermenting liquid baits in open buckets (10–12 days). These features drastically reduce the frequency with which traps must be serviced, allowing placement of traps at much more distant locations and enabling sampling of more distinct faunas. In all the years that I used bucket traps (1984–2021), the vast majority were restricted to east-central Missouri (within about an hour’s drive from my home). On the other hand, in the past three years of using jug traps, I have been able to place them across southern Missouri (2022), the Oklahoma panhandle (last year), and throughout eastern New Mexico (this year)!
I mentioned above my plans to publish the results of my first three seasons using these traps and comparing relative efficacy of the different baits (in fact Marlin Rice and I will be combining again to publish data collected not only in Missouri, Oklahoma, and New Mexico, but also Iowa and south Texas). Each time I’ve mentioned using these traps, however, I’ve received questions about how to make and deploy them. This will, of course, be fully detailed in the eventual publication, but since “a picture is with a thousand words,” I’m posting some of the details with photographs here to allow folks to begin using them without waiting for my published paper.
Trap construction
Almost any plastic jug will do, but a minimum size of 1-G is suggested. The finished jug shown below is from the cheapest drinking water I could find (99¢ per gallon). I will note that these jugs are made of low density polyethylene (LDPE), and after a couple of seasons of use in the field, those that were exposed to full sun eventually became brittle and cracked. For this reason, I’ve been replacing them with jugs made of high density polyethylene (HDPE) (of which you will have plenty after purchasing ethanol and propylene glycol!). Either way, I used a utility knife to cut a “window” into each side of the jug. The windows should be large enough to allow free access to the jug interior, but take care to keep the bottom edges of the windows high enough above the bottom of the jug to accommodate at least one liter of propylene glycol in the reservoir. You may also notice two additional modifications that I made: 1) the presence of a nylon cord loop at the top of the jug (allows the trap to be hung in the field), and 2) a metal S-hook inserted into the cap (allows hanging of the bait bottle inside the trap). The cord loop is simple—a 6-inch length of nylon cord threaded through two holes drilled below the mouth of the jug and tied to form a loop. The S-hook hanger installation is described further below.

I used 250-ml water bottles for the bait bottles, which, in the conditions I’ve experienced, is enough bait to last 4–5 weeks. I will be trying larger (500-ml) bottles this season to see if they will last longer (hoping for two months). I drilled a hole into the center of the bottle cap that was large enough to accommodate a 5.9-inch long by 0.3-inch wide cotton humidifier stick. The stick acts as a wick that provides a continuous releases of ethanol and other volatiles from the bait. I also fashioned a hanger for the bottle using an ~10-inch length of plastic-coated copper wire (it’s what I had sitting around) to suspend the bottle inside the trap.

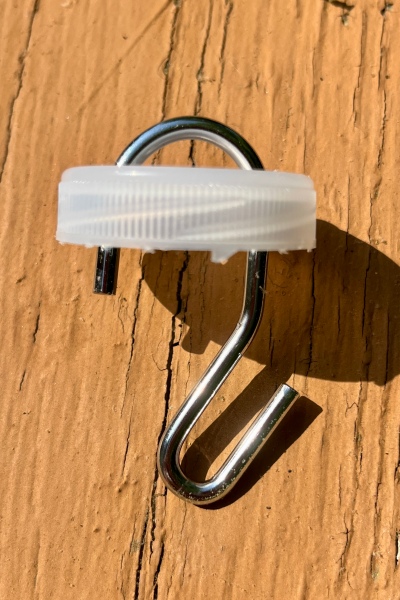
To suspend the bait bottle inside the trap, I installed an S-hook in the cap of the jug by drilling two small holes in the cap and threading the S-hook through them. If you make the holes slightly closer together and squeeze the S-hook with pliers while threading, the S-hook will end up being held more securely in the cap with little likelihood of popping out.
Deploying the trap
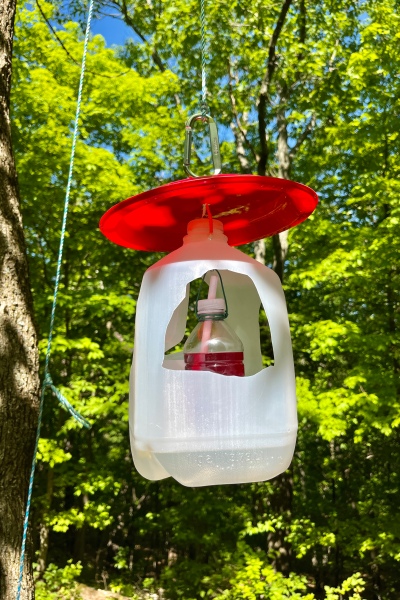
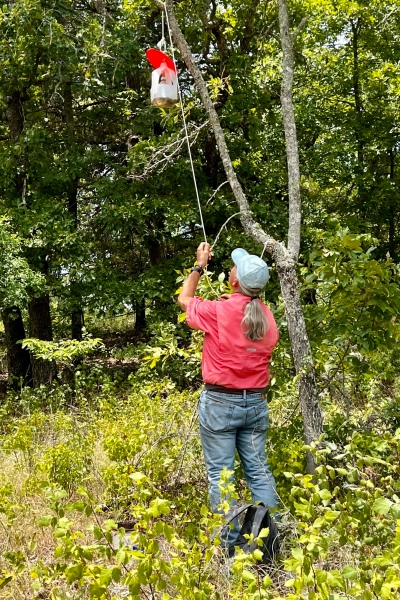
In the field, find a suitable spot to deploy the trap. The “perfect” spot will depend upon the habitat, but I always look for a tree in relatively open (i.e., accessible) habitat with an unobstructed branch around 8–12 feet above the ground. Tie a rock or heavy stick to one end of a long nylon rope and throw it over the branch. Tie the other end of the rope to a carabiner, which is then clipped to the cord loop at the top of the trap. Hoist the trap to eye-level and keep it in place by tying the cord to a nearby trunk or branch. Fill a bait bottle with your choice of bait (right now, the 50:50 mixture of ethanol and wine seems to be the most effective) and hang it from the S-hook inside the trap (see photo below). I also like to give the bottle a twist or two so the wire wraps around the S-hook, securing the bait bottle and reducing the likelihood it will be dislodged by high winds. The photo shows a red plastic plate above the trap to act as a rain shield; however, I have found this unnecessary and no longer use them.

Once the bait bottle is in place, fill the jug reservoir with 50:50 diluted propylene glycol. I have been using about 750–1000 ml per trap, which usually is enough to last for about a month. Areas with low humidity, high temperatures, or heavy beetle populations may require a higher volume to last that long, so adjust accordingly.
Once the bait bottle is in place and the reservoir filled, hoist the trap up until there is about a foot of rope between the branch and the trap (closer makes the trap more vulnerable to spillage from high winds and also provides easier access for “raiding” by raccoons). Secure the rope again to keep the trap in its fully hoisted position, then stand back and admire your handiwork!
Servicing the trap
You can check the traps at any time, but as mentioned the advantage of this trap is its ability to not only attract beetles, but preserve them over an extended period of time so that remote or difficult to access habitats can be sampled. Servicing the trap is similar to servicing bucket traps in that the reservoir contents are poured over a kitchen strainer placed on top of another bucket to catch the liquid. The liquid can be reused and the volume topped off, but I like to replace it completely if it has become diluted due to rain or discolored due to large numbers of insects attracted to the trap.

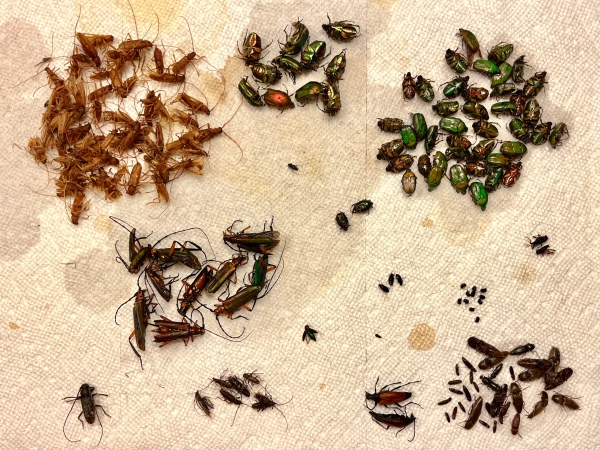
If the catch is not overwhelming, it can be sorted in the field, but in many cases the number of insects—not just the target beetles (in my case, Cerambycidae), but other beetles (especially Elateridae and cetoniine scarabs) and even other insects (e.g., noctuid moths, flies, wasps, etc.) can be so high that it is easier to simply transfer the entire catch to a ziplock bag (1-qt bags are usually sufficiently large, but if the trap catch is overwhelming a 1-G bag may be necessary) and sort the catch at a more convenient time and place. Either way, I start out by overdrenching with water to rinse the specimens and then pick out the target specimens. If the catch is large, it is easier to spread it out on a white fiberglass or plastic tray and add water to help separate the specimens. In this case, I drop the specimens that I pick out into paper toweling to blot off the excess.
Once the target specimens are segregated from the bycatch, I place them in glass vials and add a few drops of ethyl acetate to tissue in the vial (for larger quantities, I use plastic specimen cups and a few ml of ethyl acetate) to prevent spoilage until the specimens can be further processed at a later date. Further processing involves washing the specimens to remove remaining traces of propylene glycol and other contaminants. This is done by soaking the specimens overnight in soapy water, rinsing thoroughly, and then blotting the specimens dry on paper towels before returning them to storage as above or pinning them directly. Unlike specimens trapped in fermenting MB or SRW baits, specimens trapped in propylene glycol tend to be stiff, which makes arranging the legs and antennae during pinning more of a challenge. I have found that prolonging the wash soak before pinning helps to soften the specimens—the longer the better (even specimens soaked for two months did not deteriorate). Apparently the initial period of submersion in propylene glycol provides some preservative benefit.
As with any new trap, the potential for optimization is great. I’ve mentioned some of the optimizations that I have tried or am currently trying such as the bait itself. Other potential improvements include the size of the bait bottle and the amount of propylene glycol used in the reservoir to allow trap placement for even longer periods of time before it needs to be serviced; the type of wine used—perhaps one with the highest possible sugar content to prolong or increase the intensity of fermentation; and a more secure method of hanging/attaching the bait bottle inside the trap (zip ties?). I’m sure a readership as erudite as mine will be able to come up with any number of other possible improvements, both to the trap itself and to the methods I’ve outlined for deploying the traps and processing the catch.

©️ Ted C. MacRae 2024

Thanks! This is great info! I’m using 6mm cotton wicks (24 ply) pulled out 30mm in single-hole drilled blue caped 50mL screw tubes, containing denatured SDA 200 proof Ethanol & Alpha-pinene, mixed 80:20 vol. These 50mL tubes are affixed with twist ties to the underside of inverted 2L green Canada Dry bottles with a 6 inch square window cut out. The inverted bottle cup holds PEG pink antifreeze with a drop of dishsoap as the killing agent / preservative. I staple-gun the green bottles to trees at 5 feet height. The 50mL dual lure with a 6mm wick pulled out 30mm can last a good two weeks. My targets are primarily Scolytidae. I’m also using home made LED UV light trapping on pin-type timers (for automatic timed UV operation) as well as typical bush meeting / pooters for foliage Curculionids. I’m a retired microbiology teacher working out of NJ. Am an avid fan of your blog!