Because space is such a premium in my insect collection, I like to mount specimens with the legs and antennae positioned closely against the body. This enables the most efficient use of space and minimizes the chance of breakage when positioning specimens next to each other in the collection. This can be a challenge, however, with specimens that have unusually long legs and/or antennae, and large, gangly longhorned beetles—like Plinthocoelium suaveolens—present the biggest challenge of all. For those interested in knowing how I deal with such species, I find the following technique to be most effective:
- Start with a fully relaxed specimen. Hold it with one hand and use the other to gently “work” all the legs and antennae, ensuring they are loose and pliable enough to move into the desired position for mounting. (For smaller species, grabbing the tibiae with fine-tipped forceps [FTFs] is helpful, but don’t pull too hard as this risks pulling the tarsus off the leg.)
- Pull the middle legs so that they extend out perpendicular to the body, then grasp the specimen by the metathorax (behind the middle pair of legs).
- If the hind wings are sticking out from under the elytra, use FTFs to grab the costal area of the wing and “stuff” it back under the elytron. If the wing tips protrude from under the tips of the elytra, stuff them back underneath with FTFs. If the elytra don’t lay flat over the abdomen, work them back in place using the FTFs, then squeeze squeeze the metathorax to keep the elytra in place.
- While still holding by the metathorax, push a #2 insect pin through the right elytron so that it exits the body through the middle of the right metasternum (i.e., halfway between the right meso- and metacoxa, and halfway between the central midline and right side of the specimen—be careful to move your finger out of the way as the pin pushes through!). It may take some practice to get good at inserting the pin so that it is positioned perfectly vertical.
- Push the pin into a styrofoam block until the ventral surface of the specimen rests on the surface of the block. If the left elytron does not lay flat over the abdomen, insert brace pins into the styrofoam next to the body on each side of the body just behind the hind femora and angle them inwards and forward until both elytra lay flat and meet along the midline. This also braces the specimen itself to keep it from moving while attempting to position the legs and antennae.
- Position the legs, starting at the front. This can often be done using a brace pin, but sometimes FTFs will be necessary if the leg resists moving into the desired position. In such cases, grab the base of the tarsus with the FTFs and position the leg in the desired position, then, while still holding the leg in position, push a brace pin into the styrofoam right next to the leg to keep it into position. A single brace pin on the outer side at the base of the tarsus and angled towards the body is usually sufficient to hold the leg in position, but additional pins on the inside of the tarsus angled away from the body (to keep the tarsus in place) or against the backside of the femur and angled towards it (to “lift” the femur) may be needed.
- After all legs are positioned, gently pull on the distal portion of the antennae with FTFs to straighten them out, then use brace pins to hold them in place close to the body (and, for males, arrange the portion extending beyond the body). I generally place one brace pin near the base of each antennae and one near the middle (in front of the hind legs). For males with highly elongated antennae, I use a brace pin to wrap the portion extending beyond the body around the hind leg on the opposite side of the body. If this is not sufficient to hold them in place, another brace pin can be placed behind both antennae just beyond the tips of the elytra.
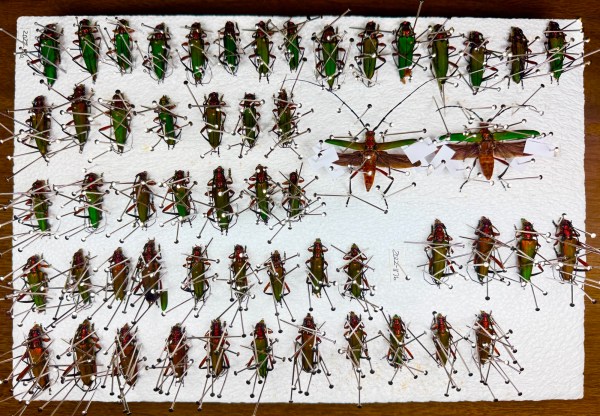
- You can position the legs and antennae in a more life-like position if desired. This generally requires more brace pins, especially for the male antennae. Posing the elytra and wings outstretched also requires not only more brace pins, but strips of thick paper to support the wings from beneath and clamp down on them from above (see photo).
In the end, around 15–20 brace pins will be needed for each specimen (twice that if the antennae and wings are posed outstretched). It generally takes up to a week for the specimens to dry sufficiently. Note: resist the temptation to remove the pins too soon, as even though the legs and antennae may appear to hold position, they will still gradually sag out of position if they are not completely dry (for those of you who are in a hurry, low heat from an incandescent bulb positioned immediately above the specimens can help speed the drying process!).
©️ Ted C. MacRae 2024
