Most of my insect photography is done up close using fast shutter speeds (to prevent motion blur) and small apertures (to maximize depth of field). This necessitates the use of full flash – the amount of light reaching the camera sensor at f/16 and 1/250 sec is not enough to show any image at all, much less one properly exposed. Full flash photography has its own set of challenges, but for the most part it can be used to produce excellent closeup photographs of insects, even very small ones. One thing that has always bothered me about full flash photography, however, is the “black background” effect when photographing an insect sitting up on a plant without something else in the immediate background to reflect light. Not that I don’t like black backgrounds—they can be used to stunning effect with the right subject. I just don’t want it to be my only option for insects that I photograph up off the ground. Of course, it is rather a simple matter to place something in the background that is close enough to reflect light but far enough away to remain out of focus, but what I really want to be able to do sometimes is have a blue sky. I always thought this meant natural light, with its low f stops, slow shutter speeds, and the resulting motion blur and loss of depth of field.
Of the many things I learned today, how to include a blue sky background in a closeup photograph at f/16 was my favorite. This is accomplished by bumping up the ISO to 400 (to make the camera sensor more receptive to light) and decreasing the shutter speed to 1/60 sec. Keeping the f stop high maintains the depth of field, but the increased ISO and decreased shutter speed allows sufficient light from a sky background to register on the sensor. By themselves, however, these setting will still result in an underexposed subject, which is illuminated instead by fill flash. Despite the slower shutter speed, there is no motion blur because the “effective” shutter speed for the subject is the duration of the flash pulse rather than the camera shutter speed—it’s like combining two exposure speeds in a single photograph, one for the background and another for the subject.
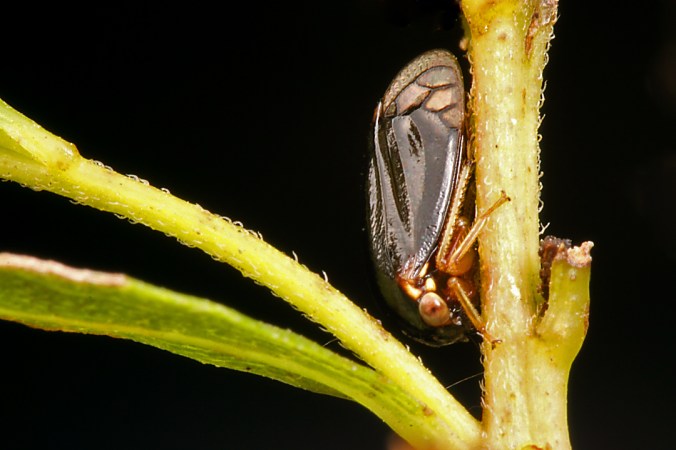
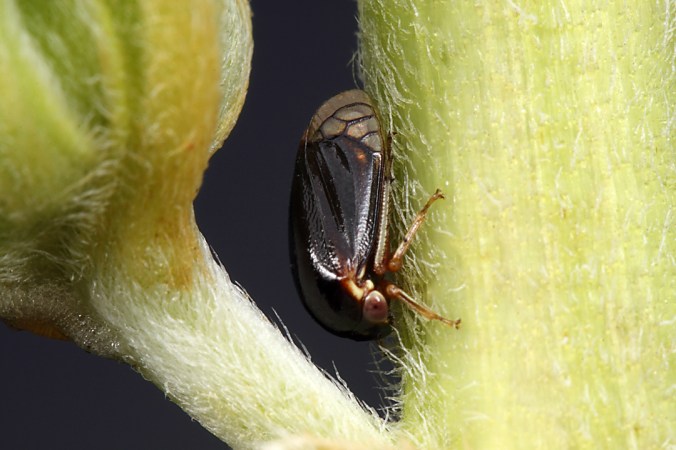
The following three photographs illustrate this principle—again, they are not technically perfect photos, but rather the result of quick experimentation to understand the principles involved. Photo 1 is from yesterday’s post and illustrates what my typical settings have always been: ISO 160, f/16, and 1/250 sec. It’s a decent photo of the treehopper, Acutalis tartarea; however, black is perhaps the least appropriate background to choose for this black species. Until now, it would have been my only option unless I tried arranging foliage in its background. Photos 2 and 3 are of another individual of this species that I found today (fortunately in similar orientation to the individual photographed yesterday). In both photos I kept the flash unit set to ETTL (adjusting FEC as appropriate for the shots). In Photo 2 I bumped up the ISO to 400 but kept the shutter speed fast (1/200 sec)—you can see some effect in that the background is not truly black, having received some light from the blue sky. It’s not enough, however, because the shutter speed was still too fast. In Photo 3 the ISO remained at 400 but the shutter speed was also decreased to 1/60 sec. The shutter staying open that long allows enough light from the sky to register on the sensor and, Voila!, we have a blue sky background that creates nice value contrast with the black subject. The subject these photos is not terribly sharp, but that is just lack of focus—not motion blur from a slow shutter (sorry, I was just practicing settings rather than going for a perfect shot). All three photos were shot with the Canon 100mm macro lens + 68 mm of extension tube (total magnification ~2X).
Copyright © Ted C. MacRae 2011


This is an informative series. You might try opening the f-stop up a bit more. I usually shoot the 100mm macro at f11 for real close work, and the depth-of-field is usually adequate. (I feel like it actually gets a bit sharper in the plane of focus, as I think you get some loss due to diffraction at f16.) For many subjects, f8 or f6.3 is pretty good, and then you can start to get good exposure of the background with natural light. An added benefit is that the wider aperture starts to give a pleasing “bokeh” on the background. Linked is a shot of a caterpillar shot at f5.6 with flash fill. That gave a pretty good balance between subject focus and background blur.
Of course, this is at the cost of less depth-of-field around the subject, and this all depends on the relationship of the background to the subject–it may be hard to get a good blurred background behind a tiger beetle perched on flat sand, as the background is just too close to the subject. Like you, I’m still learning, and it is interesting to share the experience of others.
Hi Patrick – those are great ideas. I’ve got a lot more confidence now to try experimenting more with exposure, aperture, etc. now that I have some better understanding of how they interact.
I agree it will be hard to soften the surrounding sand on top down shots (and I’m not sure I’d want that anyway), but what I would like to try is lighting from different directions to create some selective shadowing – most tiger beetle shots from above look so flat. I got a lot of insight into the more creative elements of composition during some great discussions with Thomas Shahan (super nice guy!).
Thanks for sharing these Ted – I’m super-jealous of everyone at bug shoot so it’s to be able to get something out of it! (Even if just piles on to me camera envy 🙂
Hi David, it was a great event – I’m sure I speak for just about everybody who was there as well. Hopefully I’ll be able to apply some of those learnings to my future photographs and pass on some of the insights I gained.
Great post! I really liked your illustration of how the photograph changes between the ISO and shutterspeed settings. This is great info for me as I’m planning to go for a DSLR soon, for insect & macro photography.
Currently I use a Canon G11, which is a high-end point-and-shoot camera, which lets me shoot at larger aperture values (compared to an APSC format camera,) but gives me limited metering options while using flash. I’ll certainly try out what you’ve mentioned though!
Hi PS – thanks for the nice comments. Personally, I wish more people would do these kind of comparative posts on more basic techniques – most of the ones out there that I’ve seen are far too advanced for me to understand.
It’s good that you have some aperture control. Despite your limited metering options, you could do some great flash photographs if you got a radio control for a remote unit and hand held it over the subject.
Great series of shots to illustrate your point. I, too, like the dark background but sometimes shoot to have the back in the image. Gonna tag this link so I can refresh when I get ready to go out again
Thanks, Mac. I think of the many things I learned this weekend this was the most valuable.
Pingback: BugShot 2011: the aftermath – MYRMECOS - Insect Photography - Insect Pictures
Pingback: Hands… Touching Hands | My First 10,000 Pictures.
Pingback: Frank Sinatra was a Guru | My First 10,000 Pictures.