A jewel of a beetle

I really wish I had a photomicrography setup like the one that Sam Heads has at the University of Illinois for imaging preserved specimens. Alas, insect taxonomy is “just a hobby” for me, and any specimen photography I wish to do must be done with my field camera equipment. Of course, poverty prompts creativity (not that I consider a Canon 50D with an MP-E 65mm macro lens and MT-24EX twin flash unit a sign of poverty), and after a bit of tinkering and fiddling I’ve figured out a way to setup the specimen and flash units to create images of pinned specimens that I think are more than adequate for publication in taxonomic papers.

Here is one I did recently of the jewel beetle Actenodes calcaratus (family Buprestidae). This species is broadly distributed from the southwestern U.S. through Mexico and into Central America, where it breeds in dead branches of a variety of mostly fabaceous trees such as Acacia and Prosopis. During several trips to southern Mexico in recent years, Chuck Bellamy and I collected two new species of Actenodes that look very similar to A. calcaratus but differ in several important characters, primarily surface sculpture, the form and male coloration of the face, and male genitalia. A manuscript describing these two species and containing this and similar images of the new species was recently submitted for publication. Though not quite as razor-sharp as images created through focus-stacking processes, it still shows good detail and even lighting. What do you think?¹

¹ For those who find the pin head distracting, I am not a proponent of cloning out pin heads, debris, or other imperfections on images of preserved specimens in taxonomic papers. Other enhancements such as levels, sharpness, contrast, etc. are fine since these are all influenced greatly by lighting, but otherwise I believe the specimen needs to be presented exactly as it appears. A possible alternative is to remove the pin for imaging, but this presents a risk of damage to the specimen that is of questionable benefit in the case of non-type specimens—and downright irresponsible for primary types. Another alternative is to thoroughly clean and image the specimen prior to mounting, but this is rarely feasible as in most cases it is only after the specimen is mounted and studied further that its status as a new species is realized.

Actenodes calcaratus | MEXICO: Guerrero, Hwy 95, 5 km S Milpillas, 7.vii.1992, "big dead tree", G. H. Nelson [FSCA]. Male plesiotype.

Actenodes calcaratus | MEXICO: Guerrero, Hwy 95, 5 km S Milpillas, 7.vii.1992, “big dead tree”, G. H. Nelson [FSCA]. Male plesiotype.

Copyright © Ted C. MacRae 2013

Backyard gems

I’ve been fortunate to have the chance to travel far and wide in my searches for insects—from the Gypsum Hills of the Great Plains and Sky Islands of the desert southwest to the subtropical riparian woodlands of the Lower Rio Grande Valley, tropical thorn forests of southern Mexico and veld of southern Africa. No matter how far I travel, however, I’m always happy to return to the Missouri Ozarks. It is here where I cut my entomological teeth so many years ago, and though I’ve now scrabbled around these ancient hills for more than three decades it continues to satisfy my thirst for natural history. Though not nearly as expansive as the Great Plains, there are nevertheless innumerable nooks and crannies nestled in the Ozarks, and I find myself constantly torn between looking for new spots (it would take several lifetimes to find them all) and going back to old favorites. Living in the northeastern “foothills” in the outskirts of St. Louis provides an ideal vantage for exploration; however, sometimes I am truly amazed at the natural history gems that can be found within a stone’s throw from my house. Some examples I’ve featured previously include Shaw Nature Reserve, home to a hotspot of the one-spotted tiger beetle, Castlewood State Park, where I found a gorgeously reddish population of the eastern big sand tiger beetle, and Victoria Glades Natural Area, site of the very first new species (and perhaps also the most beautiful) that I ever collected.

Englemann Woods Natural Area | Franklin Co., Missouri

Today I found another such area—Englemann Woods Natural Area, and at only 5 miles from my doorstep it is the closest natural gem that I have yet encountered. One of the last old-growth forests in the state, its deep loess deposits on dolomite bedrock overlooking the Missouri River valley support rich, mesic forests on the moister north and east facing slopes and dry-mesic forests on the drier west-facing slopes dissected by rich, wet-mesic forests with their hundreds-of-years-old trees. A remarkable forest of white oak, ash, basswood and maple in an area dominated by monotonous second-growth oak/hickory forests.

Englemann Woods Natural Area

Steep north-facing slopes border the Missouri River valley.

It is not, however, the 200-year-old trees that will bring me back to this spot, but rather the understory on the north and east-facing slopes. Here occur some of the richest stands of eastern hornbean (Ostrya virginiana) that I have ever seen. This diminutive forest understory inhabitant is not particularly rare in Missouri, but as it prefers rather moist upland situations it is not commonly encountered in the dry-mesic forests that dominate much of the Ozarks. Stands of this tree, a member of the birch family (Betulaceae) are easy to spot in winter due to their habit of holding onto their dried canopy of tawny-brown leaves (see photo below).

Englemann Woods Natural Area

Rich stands of eastern hornbeam (Ostrya virginiana) dominate the north- and east-slope understory.

Why am I so interested in this plant? It is the primary host of the jewel beetle species Agrilus champlaini. Unlike most other members of the genus, this species breeds in living trees rather than dead wood, their larvae creating characteristic swellings (galls, if you will) on the twigs and stems as they spiral around under the bark feeding on the cambium tissues before entering the wood to pupate and emerge as adults in spring. This species is known in Missouri from just two specimens, both collected by me way back in the 1980s as they emerged from galls that I had collected during the winter at two locations much further away from St. Louis. The presence of this rich stand of hornbeam just 5 miles from my home gives me the opportunity to not only search the area more thoroughly to look for the presence of galls from which I might rear additional specimens, but also to look for adults on their hosts during spring and (possibly, hopefully) succeed in photographing them alive.

Englemann Woods Natural Area

Inside the “hornbeam forest.”

Another “draw” for me is the restoration work that has begun on some of the west-facing slopes in the areas. Pre-settlement Missouri was a far less wooded place than it is today, as evidenced by the richly descriptive writings penned by Henry Schoolcraft during his horseback journey through the Ozarks in the early 1800’s. At the interface between the great deciduous forests to the east and the expansive grasslands to the west, the forests of Missouri were historically a shifting mosaic of savanna and woodland mediated by fire. Relatively drier west-facing slopes were more prone to the occurrence of these fires, resulting in open woodlands with more diverse herbaceous and shrub layers. At the far extreme these habitats are most properly called “xeric dolomite/limestone prairie” but nearly universally referred to by Missourians as “glades”—islands of prairie in a sea of forest! I have sampled glades extensively in Missouri over the years, and they are perhaps my favorite of all Missouri habitats. However, it is not future glades or savannas that have me excited about Englemann Woods but rather the availability of freshly dead wood for jewel beetles and longhorned beetles resulting from the selective logging that has taken place as a first step towards restoration of such habitats on these west-slopes. The downed trees on these slopes and subsequent mortality of some still standing trees that is likely to result from the sudden exposure of their shade adapted trunks to full sun are likely to serve as a sink for these beetles for several years to come. I will want to use all the tools at my disposal for sampling them while I have this opportunity—beating, attraction to ultraviolet lights, and fermenting bait traps being the primary ones. It looks like I’d better stock up on molasses and cheap beer!

Englemann Woods Natural Area

Restoration efforts on the west-facing slopes begins with selective logging.

Eastern red-cedar (Juniperus virginiana) is native to Missouri, but in our time it has become a major, invasive pest tree. The suppression of fire that came with settlement also freed this tree from a major constraining influence on its establishment in various habitats around the state, primarily dolomite/limestone glades. Nowadays most former glade habitats, unless actively managed to prevent it, have become choked with stands of this tree, resulting in shading out of the sun-loving plants that historically occurred much more commonly in the state. Untold dollars are spent each year by landscape managers on mechanical removal and controlled burns to remove red-cedar and prevent its reestablishment in these habitats. There is one habitat in Missouri, however, in which eastern red-cedar has reigned supreme for centuries or possibly millenia—dolomite/limestone bluff faces.

Juniperus virginiana

Craggly, old Eastern red-cedars (Juniperus virginiana) cling tenaciously to the towering dolomite bluffs.

With little more than a crack in the rock to serve as a toehold, red-cedars thrive where no other tree can, growing slowly, their gnarled trunks contorted and branches twisted by exposure to sun and wind and chronic lack of moisture. Some of the oldest trees in Missouri are red-cedars living on bluffs, with the oldest example reported coming from Missouri at an incredible 750–800 years old. There is something awe-inspiring about seeing a living organism that existed in my home state before there were roads and cars and guns. These ancient trees are now an easy drive from my house (though a rather strenuous 300-ft bushwhacking ascent to reach the bluff tops)—they seem ironically vulnerable now after having endured for so long against the forces of nature. For me, they will serve as a spiritual draw—a reason to return to this place again regardless of what success I might have at finding insects in the coming months.

Juniperus virginiana

This tree may pre-date Eurpoean settlement.

Aplectrum hyemale

Adam-and-Eve orchid (Aplectrum hyemale).

Copyright © Ted C. MacRae 2013

Diffusion versus post-processing, or perhaps something even better?

One of the comments on my post Diffuser comparisons for 100mm macro lens was by Stephen Barlow, one of the original “concave diffuser” advocates, who claimed that the “dead” appearance of Photo #4 was an artifact of post-processing and not really a problem with the diffusion method itself. Heeding this comment, I reprocessed Photo #4 to see if this was really all that was needed to give it a “livelier” look by rather aggressively bumping up the brightness and contrast by 30% each (to correct for underexposure), then reducing the saturation by 10% (to correct for the effect on color caused by increased brightness and contrast), adjusted levels to a set point of 240 to add some more “high end,” and reduced highlights and shadows just a bit (10% each). Following is the original and then the reprocessed version of Photo #4:

IMG_2095_enh_1080x720

Original post-processing

IMG_2095_enh2_1080x720

Additional post-processing.

There is no question that this additional reprocessing has greatly improved the photo. However, after I did this I got to thinking—why not try combining the two diffusers that gave the best results? Recall that the diffusion method in Photo #5 (SoftBoxes on flexible arm extenders) easily “won the vote” over Photo #4 (open concave diffuser) by a 2:1 margin (35 to 17). This may have been at least partly a result of the less than flattering post-processing of the original version of #4, but still the overall lighting effect on Photo #5 caused by the diffusion method used was quite dramatic. The only downside of the #5 method was the persistence of hot spots (albeit muted) from the flash heads and a dark background with lots of shadowing caused by light drop off (since the flash heads were mounted on the lens rather than extenders). Double diffusers are nothing new, the idea being that the first diffuser spreads the light out more before it hits the second diffuser than does a bare flash head, allowing even further diffusion of the light the reaches the subject (and background) for truly even lighting. I reasoned that using SoftBoxes on flexible arm extenders plus the concave diffuser would not only accomplish double diffusion but also allow controlled placement of the flash heads close to the specimen to maximize apparent light size and minimize light drop off. To test this I re-shot the same beetle with the same camera settings, and here is the result:

Flash heads mounted on flexible arms, diffused by SoftBoxes + open concave diffuser

Flash heads mounted on flexible arms, diffused by SoftBoxes + open concave diffuser

My personal opinion is that this photo combines the best of both methods. While loss of light can be a problem with double diffusion, my use of extenders to place the flash heads close to the subject minimizes, or perhaps even completely negates this problem. Additionally, while subtle hot spots are still apparent, they are not nearly as apparent as in Photo #5 (SoftBox diffusers on extenders w/o concave diffuser—refresh your memory here) due to the additional diffusion, which also dramatically reduces shadowing as a result of better light throw. The hot spots are also more subtle than in #4 because of the larger apparent light size (a combination of closer flash head placement and the SoftBoxes), and is it just me or are the colors more vibrant and life-like in this photo compared to #4 (even reprocessed)? The flat colors were my biggest criticism of Photo #4, and even heavy-handed reprocessing, while helpful, didn’t completely bring it “back to life.” In contrast, the double-diffused photo required only typical post-processing to achieve a more than acceptable result—I have to believe that, all other things being equal, a photo that requires less post-processing is better than one that requires more.

Of course, using a setup like this in the studio is one thing—using it in the field is another. Both the extenders and the oversized concave diffuser are likely to make things a little clumsier in the field, and the two combined may be more clumsiness than I care to deal with. Nevertheless, the results from my test shots are certainly promising enough to give it an honest effort. Have I finally found a viable solution to diffusion in long-lens, full-flash macrophotography? We’ll find out this summer!

Copyright © Ted C. MacRae 2013

The Texas Prick

Recently my friend Kent Fothergill launched a series of posts ranting about discussing the difficulties associated with common names. The inaugural post featured the insect I show here, Dectes texanus, a member of the family Cerambycidae (longhorned beetles) that has gained attention in recent years as an occasional pest of soybeans, especially in the upper Mississippi Delta (Tindall et al. 2010). As is usual, when an otherwise obscure little insect suddenly begins costing somebody money people feel compelled to give it a common name. Rather than the uninspired “soybean stem borer” or ironically Latin-ish “Dectes stem borer” monikers that seem to have taken hold for this species, Kent jokingly suggested that if people were serious about common names, this insect should actually be called the “Texas prick” as a direct translation of the scientific name.¹

¹ Actually, I couldn’t find any reference to the word “Dectes” as a Latin word or “prick” as its English translation. Rather, my copy of Brown (1956) lists dectes as a Greek word meaning “biter.” I think this must be what LeConte (1852) had in mind when he first coined the genus name, since he mentions among the characters that define the genus several features of the mandibles. If that is the case, then to be accurate the alternate common name for this beetle should be the “Texas biter.” However, that name causes nothing like the snicker that “Texas prick” elicits, and since common names are bound by no rules whatsoever, I choose levity over accuracy and stick with Kent’s proposed name.

Dectes texanus (dectes stem borer) | Washington Co., Mississippi

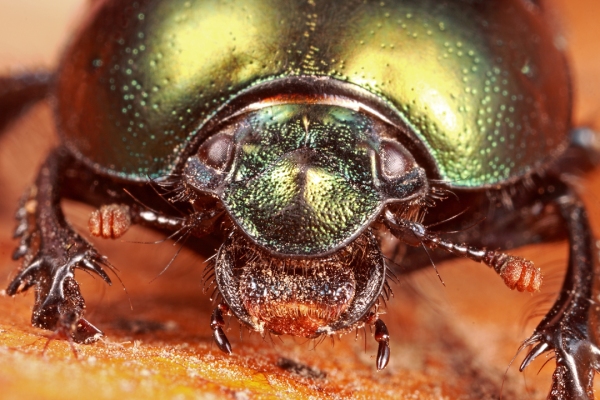
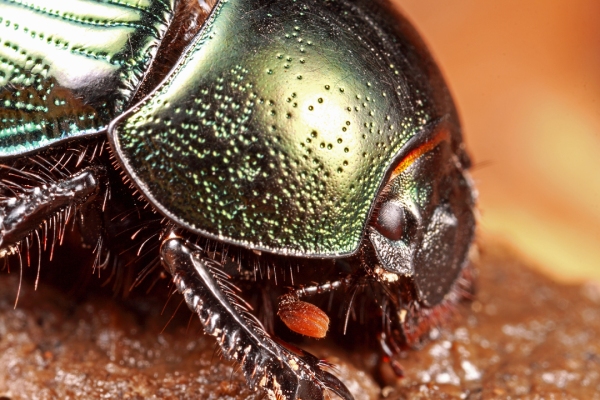
Dectes texanus | Washington Co., Mississippi

Being the pedantic, anal retentive, taxonomist-type that I am, it may surprise you to learn that I actually don’t have a problem with common names. To be honest, however, I will admit that this is a fairly recent change-of-mind for me—for many years I was a die-hard “scientific-names-only” type of guy. I not only thought common names were useless (for all the reasons listed by everybody who opposes them), but I even refused to learn them—my geek passive aggression, I guess. In the years since I started this blog, however, I’ve not only grown less oppositional in my stance, but have actually learned to embrace common names for what they are—comfortable names that don’t intimidate the taxonomically disinclined. Labels is all they are, and if one common name can refer to several species or several common names refer to one species, it’s not the end of the world. Common names aren’t meant to replace scientific names—how could they? Scientific names fulfill a special set of needs for a select group of people (i.e., to reflect phylogeny), and despite its flaws the Linnaean system of nomenclature that has been in use for the past several hundred years has served this purpose better than any other system devised. The reason for this is because genus and species names also provide a convenient and relatively easily memorizable system of labels that allow scientists to actually talk about organisms in a way that makes sense. This is an advantage that the Linnaean system has over any numerical phylogenetic system, no matter how much more precisely the latter can indicate phylogeny. For scientists, scientific names, in effect, serve a dual purpose. Non-taxonomists, however, don’t need dual purpose names—they just want easy-to-say and easy-to-remember labels, and if common names engage more people in a discussion about nature and its inhabitants then I’m all for it.

a.k.a. ''The Texas Prick''

Accepted common name: Dectes stem borer; BitB common name: ”Texas Prick”

This is not to say that I will ever give up scientific names. I love scientific names, and it is my goal in life to know as many of them as possible—even synonyms (I know, sick!). I also think that scientific names are not as scary as some people believe. Boa constrictor, for example (yes, that is both its common and scientific name), or gorilla (Gorilla gorilla)… or Dectes stem borer! To help bridge the gap, I have taken to mentioning, as a matter of practice, both the scientific name and—when one exists—the common name for the insects and other organisms featured on this blog. This applies not only at the species level, but families and other higher taxa also (e.g., “jewel beetles, family Buprestidae”). It is my way of talking science in a way that welcomes the interested lay person. Considering the increasingly anti-science din in our country by creationists, climate change denialists, knee-jerk GM critics, etc., I think the more we can get scientists and non-scientists comfortable talking to each other the better off we will be.

The insect featured in this post was found and photographed in a field of cultivated soybeans in northeastern Mississippi. It’s identification as Dectes texanus (other than its association with soybean) is based on the face being only slightly protruding and the relatively large lower lobe of the eye. There is one other species in the genus, D. sayi, also broadly distributed in the U.S. but distinguished from D. texanus by its distinctly more protruding face and small lower eye lobe (giving the impression of “tall cheeks”). This species, too, is known to bore in the stems of soybean but is much happier doing so in common ragweed (Ambrosia artemisiifolia) (Piper 1978). The species name—sayi—was given to honor the 19th century entomologist Thomas Say, regarded by many as the ‘Father of American entomology.’ This species also has been called “soybean stem borer” by some, which doesn’t do much to alleviate concerns about common names referring to multiple species. I am reluctant, however, for reasons of respect, to use the common name for D. sayi that results if one uses the same rationale used by Kent in coining his common name for D. texanus

REFERENCES:

Brown, R. W. 1956. Composition of Scientific Words. Smithsonian Institution Press, Washington, D.C., 882 pp.

LeConte, J. L. 1852. An attempt to classify the longicorn Coleoptera of the part of America north of Mexico. Journal of the Academy of Natural Sciences Philadelphia (series 2) 2(1):99–112.

Piper, G. L. 1978. Biology and immature stages of Dectes sayi Dillon and Dillon (Coleoptera: Cerambycidae). The Coleopterists Bulletin 32(4):299–306.

Tindall K. V., S. Stewart, F. Musser, G. Lorenz, W. Bailey, J. House, R. Henry, D. Hastings, M. Wallace & K. Fothergill. 2010. Distribution of the long-horned beetle, Dectes texanus, in soybeans of Missouri, Western Tennessee, Mississippi, and Arkansas. Journal of Insect Science 10:178 available online: insectscience.org/10.178.

Copyright © Ted C. MacRae 2013

How to collect larvae of Amblycheila cylindriformis

Amblycheila cylindriformis larval burrow | Major Co., Oklahoma

Amblycheila cylindriformis larval burrow | Major Co., Oklahoma

Step 1. Go to your favorite grassland habitat in the western half of the Great Plains anywhere from Texas north to South Dakota and look for barren soil amongst the vegetation. Clay banks near streams or in ravines and even vertical clay bluff faces are also good (although I have not myself observed the latter). “My” spot is in the Glass Mountains of northwestern Oklahoma, where talus slopes in mixed-grass prairie beneath flat-topped mesas and the ravines that cut through them provide just enough slope for this species’ liking.

Burrow diameter of ~8mm identifies this as a 3rd instar larva.

Burrow diameter of ~8mm identifies this as a 3rd instar larva.

Step 2. Look for large, almost perfectly round burrow entrances that go straight down from the surface. By large, I mean approximately 6–8 mm in diameter—as large a burrow as any tiger beetle in North America will make. Many other insects create burrows, but tiger beetle burrows are generally recognizable by their almost perfectly circular shape and clean, beveled edge. Look closely, and the burrow will be seen to actually be slightly D-shaped to match the shape of the tiger beetle larva’s head—the large, sickle-shaped, upward-facing jaws resting against the flat part of the D. In the case of this species, they tend to be found in clusters of several burrows in close proximity to each other. The burrow in these photos was found at the upper edge of a drainage ravine on the upper part of the talus slopes (see diagram in this post).

Dig around the burrow, carefully excavating along the grass stem, until the larva is reached.

Dig around the burrow, carefully excavating along the grass stem, until the larva is reached.

Step 3. Try this first—chew the end of a long, narrow grass stem (frayed and sticky will be easier for the larva to grab hold of) and stick it down the burrow until it hits bottom, tap lightly a few times to entice a bite, then yank (and I mean yank!) the stem out. With luck, the larva will come flying out of the burrow and land somewhere on the ground in front of you. (By the way, if you have never done this, you are missing one of the greatest treats that insect collecting has to offer. If you have done it, you owe it to yourself to show this to somebody else who has not ever seen it—their shocked reaction at the sight of the flying larva is beyond priceless!) Larvae are not always in the mood to bite, however, so if the so-called “fishing” technique does not work then you will have to dig. Stick the grass stem back down the burrow and begin excavating around the burrow, carefully prying away the soil adjacent to the burrow to prevent it from falling into and obscuring the burrow. Keep excavating as you follow the grass stem down until, at least, you reach the larva. In the photo above you can see in the lower right-center area the burrow with the grass stem protruding from it and the larva placed on a clump of soil in front of the shovel (for sense of scale). It seems I had an easy time of it with this larva, as literature sources report larval burrows extending down to depths of a meter or more.

Amblycheila cylindriformis 3rd instar larva.

Amblycheila cylindriformis 3rd instar larva.

Step 4. Behold the beast! There is nothing more that can be said—these larvae are ginormous! This particular larva measured a full 62 mm from the tips of its mandibles to the tip of its abdomen—that’s 2½ inches! No other tiger beetle larva in North America reaches this size, except perhaps the related A. hoversoni (South Texas Giant Tiger Beetle).

The distinctly smaller 2nd pair of eyes confirm this is not Tetracha or Cicindela (sensu lato)...

The distinctly smaller 2nd pair of eyes confirm this is not Tetracha or Cicindela (sensu lato)…

Step 5. If size alone isn’t enough, you can confirm that the larvae does indeed belong to the genus Amblycheila by looking at its eyes—their are two pairs, and the 1st pair (closest to the mandibles) are distinctly larger than the 2nd pair. This isn’t clearly visible in the photo above because I doused the larva with water to remove the mud and dirt that encrusted it upon removal from its burrow.

...and the well-separated hooks on the 5th abdominal segment confirm it is Amblycheila.

…and the distinctly separated hooks on the 5th abdominal segment confirm it is Amblycheila.

Step 6. Another way to distinguish larvae of the genus Amblycheila is by looking at the hooks on the hump of the 5th abdominal segment, best done with a hand lens (or, even better, with an MP-E65 lens!). All tiger beetle larvae have several pairs of large hooks that the larva uses to brace itself against the wall of its burrow when capturing prey to prevent the struggling prey from pulling the tiger beetle larva out of its burrow. Larvae in the genus Omus, restricted to the Pacific region of North America, have three pairs of hooks (referred to as the outer, middle, and inner hooks), while all other North American tiger beetle genera have two (having lost the outer pair). In Amblycheila and Tetracha the hooks are simple and thornlike, while larvae of all other North American genera have much longer middle hooks that are curved and sickle-shaped (e.g., Cylindera celeripes in this post). Amblycheila larvae can be distinguished from Tetracha larvae by the middle and inner hooks on each side being distinctly separated rather than touching at the base (e.g., Tetracha floridana in this post). There is also a cluster of short, stout hairs around the base of each hook in Amblycheila that is missing in Tetracha (e.g., Tetracha virginica in this post).

The numerous stout setae are also characteristic of the genus.

The numerous stout setae are also characteristic of the genus.

Step 7. Lastly, don’t forget to look at the hump in lateral profile—it is as alien a structure as any in the insect world. In the case of Amblycheila larvae, the bed of hairs posterior to the hooks is comprised of much shorter, stouter, and more densely placed hairs than larvae of Tetracha.

Copyright © Ted C. MacRae 2013

You know what bugs me about dung beetles?…

...Their silly little shit-eating grins!

…Their silly little shit-eating grins!

Okay, I know this isn’t a true dung beetle, but this earth-boring scarab (family Geotrupidae) is close enough that I’ll take the opportunity to use one of my favorite dung beetle jokes.¹ This is one of several individuals that I saw on a late October hike along the North Fork Section of the Ozark Trail in extreme south-central Missouri (just a few miles north of the Arkansas border). I regard these beetles to represent the species Geotrupes splendidus based on the punctured elytral striae, sutural striae ending at the scutellum, bright green coloration, and obvious punctures in the lateral areas of the pronotum. Of the half dozen adults that I saw during the day, all were found singly on animal dung or on the ground nearby.  This was the most abundantly I’ve ever seen this species—up to that point I’d accumulated only a handful of specimens, always on mild days in late fall or early winter in association with animal dung on trails through high quality woodlands. The timing and circumstance is also true for Geotrupes blackburnii, the only other species in the genus that I have collected in Missouri—albeit much more commonly and abundantly than G. splendidus and easily distinguished from that species by its slightly smaller size, nearly impunctate pronotum and all black coloration.

¹ By the way, I don’t recall the provenance of that joke, other than I saw it as a one-frame cartoon, featuring two entomologists talking to each other, posted on a Department of Entomology door while I was in graduate school—way back in the early 1980s. If you know please tell me!

IMG_4000_enh_1080x720

Geotrupes splendidus miarophagus | Ozark Co., Missouri—yes, it’s sitting on shit!

An interesting contrast between this species and true dung beetles (scarabs in the subfamily Scarabaeinae and representing such genera as Copris, Phanaeus, Canthon, Onthophagus, etc.) is the fact that while this species can and does utilize dung for both larval development and adult feeding, it is not the preferred food. Rather, adults are more often found feeding on fungus, and leaf litter—tightly packed by the adult at the end of a burrow in the soil, is most often used for larval development (Howden 1055). This does not seem to be a universal feature of the genus, as the common Missouri species, G. blackburnii, does seem to prefer dung for larval development. This is not to say that either species is exclusive in its preference—both seem to be more flexible in food choice than the true dung beetles, but in reality the larval biology of a great many species in this and other genera of the family remain unknown.

IMG_3996_enh_1080x720

The opinion of scarab expert would be most helpful at this point. This species is broadly distributed across eastern North America, with eastern populations generally brighter green and western populations (e.g., here in Missouri) more often yellow-green with golden or reddish hints but ranging to dark purple. In fact, all but one of the Missouri specimens in my collection are dark purple, the other being green similar to the six beetles I saw on this date. Howden (1955) recognized the western forms as a separate subspecies, G. splendidus miarophagus (originally described as the species G. miarophagus by Thomas Say). These two subspecies are listed as valid in the recent checklist of Nearctic Scarabaeoidea (Smith 2003), and the specimens in my collection from Missouri are labeled as such by scarab expert Bill Warner. Despite this, most other sources I’ve checked—including BugGuide—list G. miarophagus as a synonym of G. splendidus. Color alone—especially when it is as variable as in this species—seems weak justification for subspecific distinction. Howden (1955) mentions a curious case of G. s. miarophagus utilizing fresh grass clippings for larval development; however, it is difficult to imagine this as anything more than just a very recent adaptation. If there are other reasons supporting subspecific distinction besides deference to Henry Howden, I’d be interested in knowing what they are.

REFERENCES:

Howden, H. F. 1955. Biology and taxonomy of North American beetles of the subfamily Geotrupinae with revisions of the genera Bolbocerosoma, Eucanthus, Geotrupes and Peltotrupes (Scarabaeidae). Proceedings of the United States National Museum 104:151–319.

Smith, A. B. T. 2003. Checklist of the Scarabaeoidea of the Nearctic Realm. Version 3. Electronically published, Lincoln, Nebraska. 74 pp.

Copyright © Ted C. MacRae 2013

Cicindela 44(3–4) is issued

Cicindela_44(3-4)

The latest issue of the journal Cicindela arrived in my mailbox yesterday, and it’s safe to say that I’ve got the issue “covered.” The issue features three papers, one of which documents my recent encounter with Cicindelidia ocellata rectilatera (Reticulated Tiger Beetle) in Arkansas (MacRae 2012), the first confirmed occurrence of the subspecies in that state and a northeastern extension of its known range. (This paper is an expansion of my post Just repanda… er, wait a minute…) Normally restricted to (though abundant in) Texas and New Mexico (Pearson et al. 2006), the only previous records of this subspecies east of Texas are at two localities near the eastern side of the Sabine River dividing Texas and Louisiana (Graves & Pearson 1973). More recently, however, the subspecies was also recorded just north of Texas in southwestern Oklahoma Schmidt 2004). Whether these recent extensions to its known range reflect an expanding distribution or are merely artifacts of sampling is unknown; however, one of the Arkansas localities has been visited frequently by tiger beetle enthusiasts over the years, as it is a known locality for the very attractive Cicindela formosa pigmentosignata (Reddish-green Sand Tiger Beetle), lending some support to the range expansion hypothesis.

In addition to the paper, one of the photographs that I took of C. ocellata rectilatera in Arkansas graces the cover of the issue.

Two other papers are also contained in the issue, one documenting an additional occurrence of Opisthencentrus dentipennis in Brazil by Ron Huber (2012), and another by Kristi Ellingsen featuring photographs and habitat description for the first tiger beetle to be found in Tasmania, Australia (Ellingsen 2012). A truly international journal!

Lastly, please consider subscribing to Cicindela. Subscription rates are only $10 in the U.S. and $13 outside of the U.S., amounts that even the most casually interested can justify! Also, if you have a more serious interest in tiger beetles, I hope you’ll consider submitting a manuscript for consideration. Subscription information and editorial policy can be found inside the front cover of a recent issue or at this post.

REFERENCES:

Ellingsen, K. 2012. Discovery of the first tiger beetle found on the island of Tasmania, Australia. Cicindela 44(3–4):55–57.

Graves, R. C. & D. L. Pearson. 1973. The tiger beetles of Arkansas, Louisiana, and Mississippi (Coleoptera: Cicindelidae). Transactions of the American Entomological Society 99(2):157–203.

Huber, R. L. 2012. Another locality record for Opisthencentrus dentipennis (Germar) in Brazil. Cicindela 44(3–4):55–57.

MacRae, T. C. 2012. Occurrence of Cicindelidia ocellata rectilatera (Chaudoir) (Coleoptera: Cicindelidae) in Arkansas. Cicindela 44(3–4):49–54.

Pearson, D. L., C. B. Knisley and C. J. Kazilek. 2006. A Field Guide to the Tiger Beetles of the United States and Canada. Oxford University Press, New York, 227 pp.

Schmidt, J. P. 2004. Tiger beetles of Fort Sill, Comanche County, Oklahoma, with a new state record for Cicindela ocellata rectilatera Chaudoir. Cicindela 36:1–16.

Copyright © Ted C. MacRae 2013

Diffuser comparisons for 100mm macro lens

I really wish I could just buy three Canon Speedlite 580EX II flash units, mount one directly on the camera, run the other two wirelessly on each side as slaves, put a nice big soft box diffuser on each of them, and be done with it! I’m beginning to think that’s the only way I’m going to get the kind of full flash insect macro photographs that I want with larger subjects that require the use of my 100mm macro lens. You know what I mean—nice, even, diffuse, vibrant light that comes at the subject from multiple directions (eliminating those annoying specular highlights in the eyes that result from more unidirectional lighting) and with enough power to allow minimal flash pulse durations (resulting in maximum motion freeze). But I can’t—the money is not in the budget, and even if it was I’d have to think seriously about the logistics of carrying and setting up in the field three Speedlites every time I wanted to photograph an (often moving) insect.

Thus, I continue trying to come up with some kind of system that makes the most of my Canon MT-24EX twin flash unit. It’s not that I don’t like this flash unit—I love it because of its light weight (good for field use) and the front-of-the-lens mounting feature that, with its dual heads, gets the flash heads closer to the subject but avoids the “flat” lighting effect of typical ring flash units. In addition, for those shooting insect macro photographs with Canon’s shorter focal length MP-E65 macro lens, the twin flash unit is probably the best choice of all, since the lens is right on top of the subject and it is relatively easy to place diffusing materials between the subject and the flash heads—Alex (Myrmecos) with his tracing paper diffuser and Kurt (Up Close with Nature) with his concave foam diffuser are two of the more successful designs out there. I use my MP-E65 lens a lot, but I use my 100mm macro lens a lot more because many of the beetles I photograph are best photographed at magnification ranges between 0.5–1.0X and, thus, are a little too large for the 65mm lens. The longer lens-to-subject distance of the 100mm lens may be helpful for working with skittish subjects, but it also creates challenges for the MT-24EX because of its relatively low power (more light drop off) and small flash heads (more specular highlighting). For the past couple of years I’ve been using a large sheet of polypropylene foam jury-rigged to the front of the lens, and while it too has functioned fairly well, I keep thinking that if I can just get the flash heads closer to the subject—each fitted with a good diffuser—then it should be possible to achieve results similar to what can be done with the 65 mm lens.

The photos below show the results of some of the ideas I’ve been working on. My main idea was to use extenders that would allow adjustable placement of the flash heads relatively close to the subject and diffuse the light from them with a modified version of the Sto-Fens+Puffers that I have tried in the past. Here is an example of the system mounted on my camera using cheap, flexible arms mounted on a plate attached to the bottom of the camera. If I decide to use this system in the field I would want to purchase much sturdier extenders (e.g. Really Right Stuff), but at only $25 these flexible arms are perfect for proof-of-concept testing. For the modified Sto-Fens+Puffers, I completed the modifications shown by Dalantech (No Cropping Zone) (I was planning to do this when I first tried the Sto-Fens+Puffers but soon found that I preferred the concave and tent designs by Kurt and Alex, at least for use with the 65mm lens). At any rate, to test the ideas I selected a very large (for long subject-to-lens distance), very shiny (for maximum specular highlighting potential) beetle from my collection (Megaloxantha bicolor palawanica, a stunning jewel beetle from Palawan, Philippines) and set it up for “face shots” that simulate my favorite pose for beetles in the field. Keep in mind that this was not intended to be a test of lighting for pinned specimens in the studio—that is not my interest, and there are much better approaches for doing that—but rather a proxy for the kind of lighting and diffusion I might achieve in the field. Here are the results:

IMG_2087_enh_1080x720

#1 – flash heads mounted on lens, diffused by modified Sto-Fens+Puffers

The example above show the results obtained when using the modified Sto-Fens+Puffers with the flash heads mounted directly to the front of the lens. I didn’t try this shot without diffusers, but I doubt it would be much worse than this—specular highlighting is bad because of the small apparent light size, and overall the lighting is not very even with dark shadows and harsh highlights. This shot is a perfect example of the problems inherent in using the twin-flash with a long macro lens.

IMG_2082_enh_1080x720

#2 – flash heads mounted on flexible arms, diffused by modified Sto-Fens+Puffers

This second shot shows the results when the modified Sto-Fens+Puffers are mounted on the flexible arm extenders and positioned as close to the subject as possible to maximize apparent light size. This was supposed to be the system that gave me the results I was looking for, but honestly I am not impressed. The highlights in the eyes are certainly larger than in the previous photo, and the overall lighting is not quite as uneven, but still the highlights are harsh and fairly sharply defined. Considering the greater difficulty in positioning the flash heads compared to lens-mounted, I have to consider the marginal improvement in lighting not worth the effort.

IMG_2090_enh_1080x720

#3 – flash heads mounted on lens, diffused with modified Sto-Fens+ Puffers and concave diffuser (closed)

This third shot has the modified Sto-Fens+Puffers once again mounted on the lens, but also attached is my trusty concave diffuser. Honestly this combination of diffusers provides much better overall lighting and softening of the highlights compared to the previous shot, even though the flash heads are mounted on the lens rather than positioned close to the subject. Apparently the concave diffuser, though further away from the subject, still has larger apparent size and thus allows light to be transmitted to the subject from a larger apparent area. I have not normally used another diffuser between the flash heads and the concave diffuser, but my impression from this shot is that the modified Sto-Fens+Puffers do a good job of dispersing light before it hits the concave diffuser to soften the “hot spots” behind it and provide somewhat more even lighting across its surface.

IMG_2095_enh_1080x720

#4 – flash heads mounted on lens, diffused with modified Sto-Fens+ Puffers and concave diffuser (open)

When I use the concave diffuser, I normally pull the corners back and attach them to the tops of the flash heads with Velcro to minimize light blow back (although how effective it is I really don’t know). Just for kicks, I decided to try some shots with the concave diffuser not pulled back, but left open and extending out over the subject. I did this because that actually more closely approximates how smaller versions of concave diffusers are used with the 65mm lens. The effect was not only remarkable diffusion of light, with specular highlights and hot spots almost completely lacking, but also much better lighting behind rather than just on the front of the specimen. That said, the quality of the light lacks vibrancy and seems somewhat “dead,” perhaps because of the great distance between the flash heads and the diffuser and the MT-24EX units relatively limited power. The large diffuser extending far out in front of the lens might cause problems with bumping and skittish subjects, but I am intrigued enough by this result to continue with some field testing to see what I think.

IMG_2113_enh_1080x720

#5 – flash heads mounted on flexible arms, diffused by SoftBoxes

The final shot shows the results of another promising setup—this one again uses the flash heads mounted on flexible arm extenders to get them close to the subject, but instead of the modified Sto-Fens+Puffers I fitted each flash head with a mini SoftBox. This was not easy, as the SoftBox is designed for much larger flash heads than those of the MT-24EX, so I took another set of Sto-Fen diffusers, cut off the face, then hot-glued the SoftBox to the open Sto-Fen. Thus modified it was a simple matter to “snap” the SoftBoxes in place over the flash heads. Despite the term ‘mini’ these Soft Boxes still provide a much larger area for light transmission than the modified Sto-Fens+Puffers, and this much larger apparent light size has a dramatic effect on the overall lighting and diffusion. I’m tempted to say I like this one best. However, I do have to consider ease of function in the field—the lens-mounted Sto-Fen+Puffers and concave diffuser, either open or closed, would certainly be easier and involve no further cost (for better extenders than the cheap flexible arms I now have), but if SoftBoxes on flash heads placed close to the subject gives better results than I may have to go with it.

Will you please help me decide? I setup this little poll so you can tell me which of the systems you thought gave the most pleasing result in terms of vibrant, evenly diffused light. I can’t (to my knowledge) tell who’s voting (and if there is a way don’t tell me because I don’t want to know), so don’t let privacy concerns prevent you from adding your vote—the more voters that participate, the better information I get to help me with my decision.

Copyright © Ted C. MacRae 2013