My passion for insect macro-photography is well known, so it may come as a surprise to learn that I have, during the past year or so, also become an avid “iPhone photographer”—i.e., I actually use my iPhone for “real” photography and not just selfies or quick snapshots. This is not to say that an iPhone can do everything that a digital SLR camera can do, especially when one considers the resolution of and wealth of lens options available for the latter. Nevertheless, as the world’s best selling smart phone, the iPhone has, by way of its camera function, also become the world’s best selling camera, and even though it cannot match the power of a dSLR, there are certain situations and types of photos for which the iPhone is perfectly adapted. Having gained some level of proficiency in learning what the iPhone can and cannot do when it comes to photography, I thought I would offer this photo set of a hike I did today along the Courtois Section of the Ozark Trail as a primer for the types of photos at which iPhones excel, along with some tips and tricks I’ve learned to get the most of the iPhone’s capabilities.
An iPhone is basically a fully automated, wide-angle camera (although the user can control exposure to some extent by touching the screen at the desired point). As such, it excels at landscape and general nature photos, and its small-diameter lens also allows some use for “wide-angle macro.” iPhones do not do well in low light situations or take true macro photographs (although one can use a variety of “clip-on” lenses to achieve fairly decent macro-photographs of larger insects—I have not tried this myself). As a result, I tend to use the iPhone mostly in good light situations and break out the big camera when the lighting is more challenging or if I want to take “real” macrophotographs. As with all digital photographs, good post-processing is necessary for making iPhone photos look their best, and in general a more aggressive approach than is typical for dSLR photographs will be required. The photos that follow are intended not only to give a flavor of the day’s hike, but also demonstrate my photographic approach and provide tips on composition, exposure, and post-processing. If you have gained experience in iPhone photography and have additional tips and tricks that you would like to share, I would greatly appreciate hearing about them in the comments.

Courtois Creek – immediately at the start we had to make a decision whether we could ford the creek. It was obviously too deep in most places, and we almost turned back, but then saw a path that looked like it might be passable. With air temps of 22F, we stripped off our pants, boots, and socks, packed them in our backpacks, and waded through frigid water that reached just below our hips before reaching the other side. Rich brought a towel, so we were able to dry off before getting dressed again. The whole process took almost a full half-hour.
This photo was taken into the sun, which can easily result in a washed out sky. To avoid this, I minimized the amount of sky in the photo (which also allowed the ripples in the foreground to be included for a sense of motion) and then touched the screen on the sky to set the exposure. This resulted in a dark photo, but it preserved the rich colors which could then be brought out with aggressive brightening and increasing the contrast in Photoshop. A standard set of commands that I generally use for all iPhone photos (slightly increased saturation, sharpening, and de-speckling) produced the finished version.

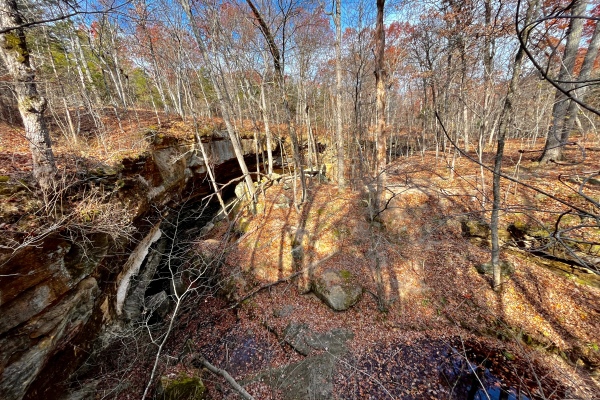
Bluffs along Courtois Creek – massive bluffs along the other side of the creek sported fallen boulders the size of dump trucks.
Another photo taken in the direction of the sun, causing the shadowed side of the rock to turn out very dark. Again I touched the screen on the sky to preserve the blue color and then aggressively lightened in Photoshop. Aggressive brightening generally requires a more aggressive increase in contrast, followed by the standard command set mentioned for the first photo.

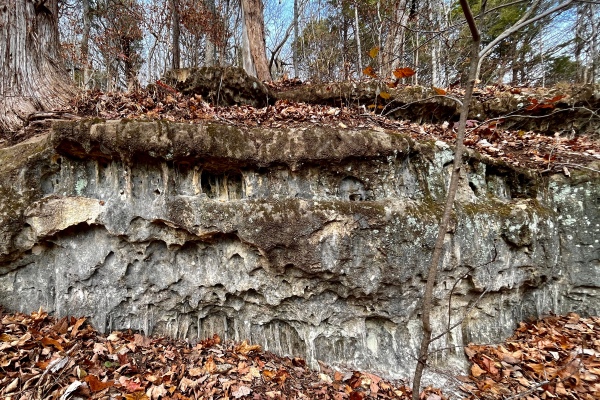
We were feeling good about our decision to ford the creek as we hiked below spectacular bluffs.
This photo required fairly minimal post-processing since it was shot away from the sun and, thus, had decent native exposure. The bluff face was a little dark and needed minor brightening, but as always I set the exposure in the brightest area of the photo and then post-corrected the dark areas (this is much easier than the opposite, i.e., darkening areas that are too bright, as such areas are often blown and cannot be fixed).

Ozark Trail blaze.
A very close-up shot of a trail blaze. The main watch out with such photos is to ensure the plane of the camera matches the subject precisely, otherwise distortion will cause elongation of one side (making the blaze a trapezoid rather than a rectangle). In post-processing I set the white point in levels by greatly magnifying the image and clicking on a very white part of the blaze to get a more natural looking white rather than the dirty gray that often results when shooting largely white subjects.
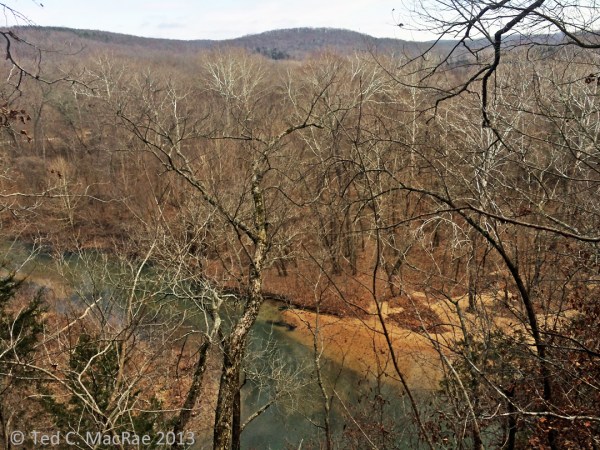
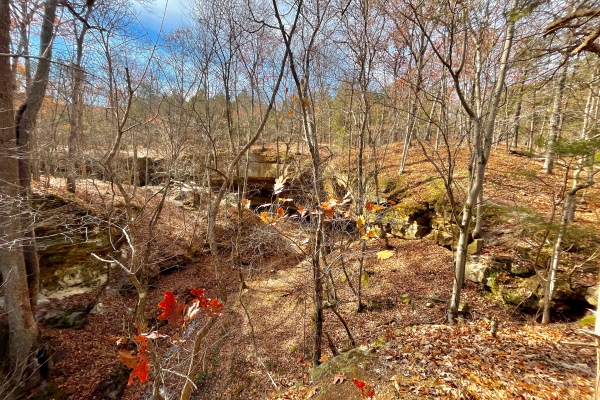
Blufftop view of Courtois Creek – from a vantage point several hundred feet above the creek we could look down on our crossing point. I have a fear of heights but nevertheless hung onto the tree fall in front of me to inch out for a clear view.
This was another photo taken fairly towards the sun. I wanted just a thin band of sky to add a sense of scale to the downward-looking view, but with little sky the camera automatically wanted to expose for the darker foreground, thus blowing the sky. To prevent this, I tilted the camera up slightly to get more sky, touched the screen on the sky to set exposure, then tilted back down to the composition I wanted and took the shot. Post-processing involved aggressive brightening as described for the first two photos above.

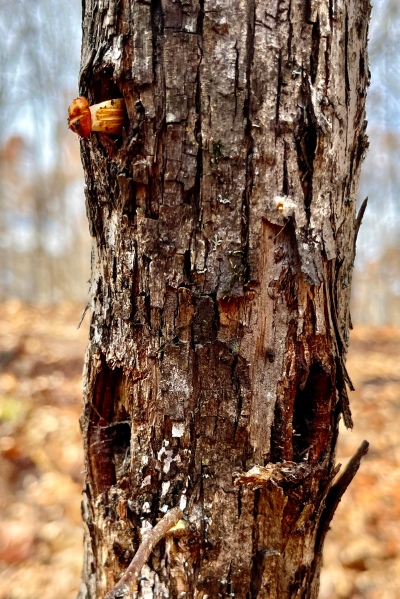
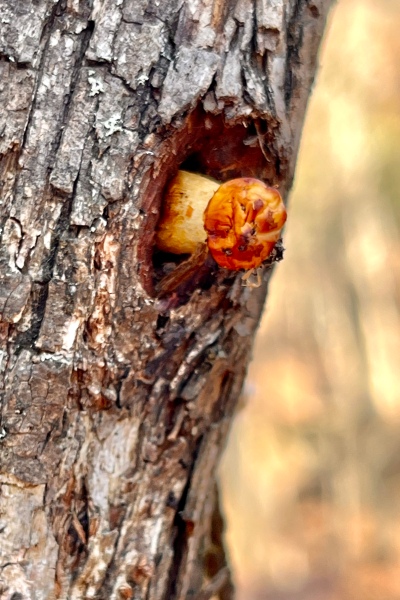
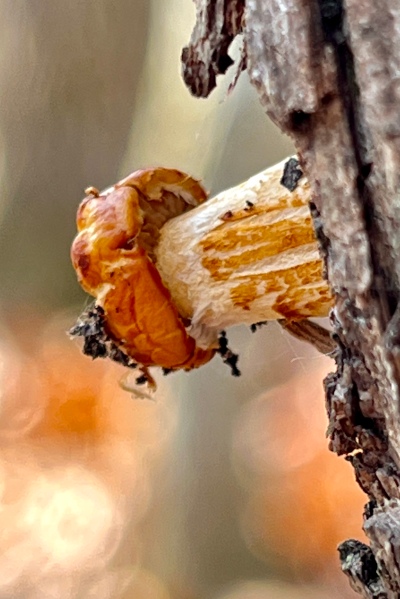
Sapsucker damage on an old tree.
I approached this tree from an angle facing the sun, so I simply waited until we passed it and could turn to place the sun behind me while shooting this tree. The trick is to get the right distance for a composition that doesn’t include too much wasted space at the foot of the tree or in its canopy, so this requires some walking back and forth until the right composition is achieved (I do not use the zoom function on the camera unless I have to because of the loss of resolution).

Close-up view of sapsucker damage. Obviously they have been using this tree for many years
A closer view of the sapsucker damage—again this is mostly a compositional challenge, which I met by getting close enough to have this interesting “looking up” perspective but still far enough away to include the lowest ring of damage at the bottom of the photo and the highest at the top. Little post-processing other than the standard set was required for this sun-behind-me photograph.
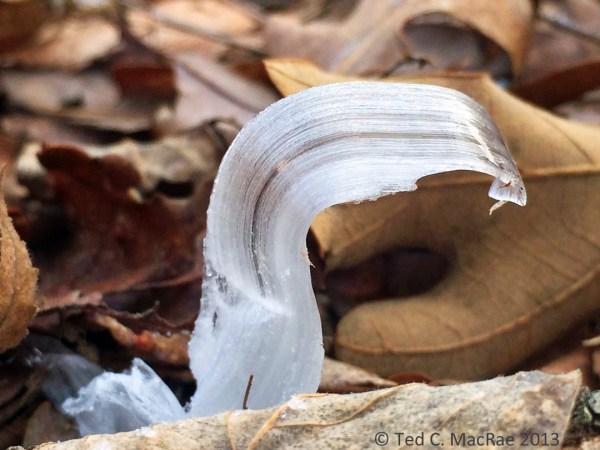
Crystallofolia forms when water drawn from the soil by certain plants oozes out of the stem and contacts frigid air. Additional water pushes out the ice, then freezes itself, resulting in long, thin ribbons of ice that curl around themselves
For photographing crystallofolia and other small, ground-dwelling features, I like to turn the iPhone so that the lens is on the bottom edge to achieve a true ground-level perspective. The macro capabilities of the iPhone are limited, so in this case I used the zoom function (maybe about 1/3 to full zoom), centered the feature in the photo to get the best exposure and focus, and then did a little more cropping post-processing at the bottom of the photo to minimize the amount of blurred foreground. Again, a mostly white subject such as this tends to come out dull in the native photograph, so I enlarged the image greatly in Photoshop, opened Levels, clicked on set white point, and then clicked on the whitest portion of the subject that I could find to achieve a more ‘naturally’ white subject. It can take a few tries to find a spot in the image that doesn’t result in unnatural over-whitening of the subject—one must play around a bit to find it.

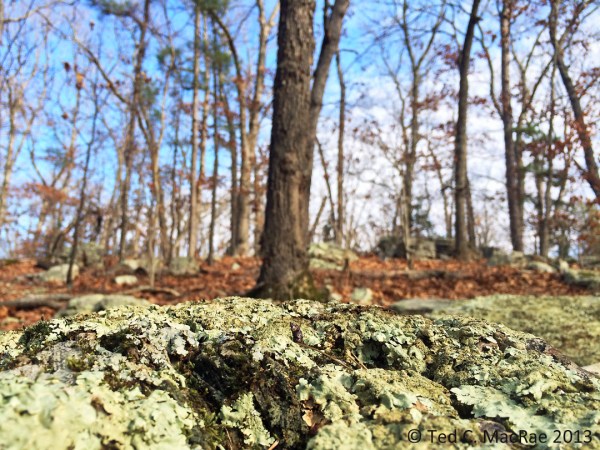
Crustose lichens abound on the dolomite bedrock exposures along the “Narrows” – a long, narrow ridge between the Courtois and Huzzah Creek Valleys.
Again, I like to use a low perspective for ground features such as these lichen-encrusted rocks strewn across the forest floor. If you let the iPhone focus naturally, it tends to focus on subjects closer to the middle of the photo, so be sure to touch the screen on the foremost subject to set the focus in the foreground. Photos with contrasting colors such as the greens, browns, and blues in this one generally benefit from a little more aggressive increase in saturation (maybe 15-20%) than I normally use for iPhone photos (usually 5-10%).
Close-up view of crustose lichens.
A semi- wide-angle macro photograph that combines a lichen encrusted rock in the foreground with forest and sky in the background. The camera will automatically focus on the background, so touch the screen at the top of the foreground object to set focus. It also helps to pan back a little bit to include more in the frame than is desired, then crop a little in Photoshop as the lower part of the foreground object will tend to be out of focus unless it is a perfectly vertical surface (rare). In this photo I cropped out about 1/5 from the bottom and a corresponding amount on each side to maintain original aspect ratio.

More dolomite exposures with crustose lichens.
Highly dimensional foreground objects add depth and perspective to low-angle shots. Again, it is better to get a little more in the photo than desired and the crop slightly afterwards than to get too close and not be able to do anything about it. Taking the native shot a little further back also ensures that the entire foreground object is in focus.

Fruticose lichens and moss intermingle in particularly moist spots.
Like the close-up photo of the lichen-encrusted rock above, this photo of intermingled moss and fruticose lichens benefits from a low perspective with a high color contrast immediate background (fallen leaves) and blurred deep background (forest/sky) to add perspective. While the latter is not completely blurred, but it’s enough that it doesn’t detract from the main subject. The latter has maximal focus by backing up slightly for the shot and then cropping off the bottom out-of-focus portion in Photoshop. Again, I increased saturation a little more than usual to emphasize the value contrast.

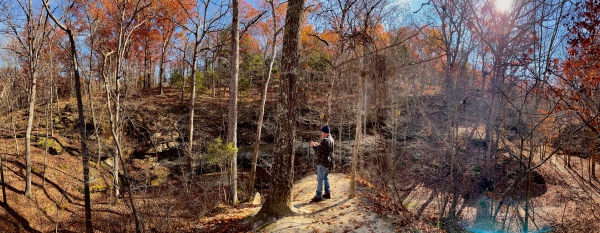
Friend and Ozark Trail co-conspirator Rich Thoma looks out over the Huzzah Creek Valley.
The main challenge with this photo was the shadow cast over Rich by the trees behind him. Setting the exposure on him resulted in a washed out sky, which I really wanted to preserve because of the textured clouds. I also wanted to include a good portion of the sky to give the sense of looking out over a far-below valley, so I set the exposure for the sky. The resulting photo had a good sky, but Rich was hidden in a darkly shadowed area. I used lighten shadows in Photoshop to brighten Rich and the shadowed area where he is standing, and I used aggressively increased saturation to make the many different shades of brown in the rest of the photo pop out.

An ancient red-cedar snag hugs the bluff tops overlooking the Huzzah Creek Valley.
This photo had largely the same challenges and was dealt with in the same manner as the previous. The ancient red-cedar snag is an interesting and unusual subject, and I first tried a portrait orientation, but I decided I liked this landscape orientation better because of the ability to include living red-cedar to add a sense of time contrast.

Icicles form on an undercut below the bluff top.
Whenever I find icicles hanging from a rock overhang, I like to provide a more unusual perspective by getting behind the icicles and looking out onto the landscape. It can be hard to get the camera to focus on the icicles rather than the distant landscape—just keep touching them on the screen until it works. I used shadow lightening in Photoshop to brighten the dark rock surfaces in the foreground.
A cap of resistant dolomite lines the top of the Huzzah Creek Valley.
This was a difficult photograph—sun on the pines/cedars on the left overexposed them, while shadows on the naturally dark rock bluff surfaces left them underexposed. This photo was made fairly acceptable by using both “darken highlights” and “lighten shadows” (careful—too aggressive with these features results in unnatural-looking photos), followed by brightening and increasing the contrast, and finally by increasing the saturation. It’s still not a great photo, but sometimes you get what you get.

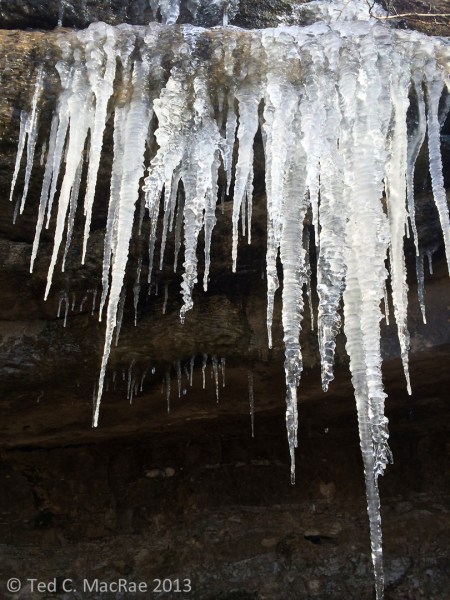
More icicles.
This larger set of icicles was nicely positioned in front of an interestingly sloped landscape with the sun coming from the left. Again, I got behind them, kept touching the screen on the icicles until the iPhone focused on them, and then adjusted the white point setting in Levels in Photoshop to really make them pop against the rich browns of the landscape behind.

Icicles were especially abundant in this section of the bluff tops.
A fairly easy shot due to the direction of the sun that required no more than the usual amount of post-processing. Note the perspective, which was to have the rock feature begin right at the bottom left corner of the photograph with some sky above it.

Despite subfreezing air temperatures, sunlight causes water to drip from overhanging icicles, causing ice stalagmites on the ground beneath.
This photo had some dark areas in the foreground that were cropped out, and to emphasize the ice I was more aggressive post-processing with brightening and increasing the contrast. Again, as with most photos with a lot of white in the subject, I adjusted the white point in Photoshop Levels to reduce the “dinginess” that seems natural for ambient light iPhone photos.
Icicles glisten in the frigid sunlight.
In this case, the sun glistening on the icicles and a deep recess behind them provided a natural contrast that I further emphasized in post-processing, along with brightening and setting white point. The icicles suffer from distortion due to my low angle (I’m not that tall!), which I tried to fix with Photoshop’s distort feature but wasn’t satisfied with the result.

Close-up of ice stalagmites, revealing the twigs and petioles around which they have formed.
The approach with this photo was very much like that used for the close-ups of the lichen-encrusted rocks and intermingled lichens/moss photos—i.e., I backed up a bit to include more foreground than I wanted (which will be blurred at the bottom after setting the focus point on one of the stalagmites) and then cropped it out in post-processing. White subject = setting white point and using more aggressive brightening and contrast.

Rock, ice, and sunlight converge along the bluff tops
Again, the formation starts at the lower corner, and in this case the foreground (the right side) also contains an interesting clump of icicles. With the sun behind me, little was required to assure proper exposure, and only normal post-processing was required.

Moss with fruiting structures on a fallen log.
This moss on a fallen log was actually one of the more difficult photographs I took. I took the photo at an angle so that the background fruiting structures would form a solid, blurred red horizon to add depth, but in doing this the iPhone didn’t know where I wanted to focus and kept choosing the background. To force it to “choose” the foreground fruiting structures, I tilted the camera down so that only the foreground was in the frame, touched the screen on the fruiting structures in the back part of the screen to set focus where I wanted, then tilted the screen back again to include the background fruiting structures distant blurred background for perspective. One must shoot quickly when doing this or the iPhone will automatically readjust its focus to the background. I’ve tried shots such as this with the sky in the background, but in my experience the iPhone cannot focus on very thin foreground objects with the sky in the background, and the difference in brightness between the background and foreground is especially difficult to correct. Like the other semi- wide-angle macro shots above, I used the zoom feature (slightly), included a little more in the photo than I wanted, and then cropped out the overly blurred bottom portion of the photo.

Mushrooms on a fallen log.
Here is a typical photograph that someone might take of these large, saucer-sized mushrooms on a fallen log. In addition to being a pedestrian view of such a subject, it seems that iPhones sometimes have difficulty registering the correct color for photos taken straight down to the ground. This photo required quite a bit of color correction, and I’m still not overly satisfied with the result.

“Bug’s eye” view of mushrooms on a fallen log.
As an alternative, I suggest getting low to photograph subjects such as this. The iPhone, with its lens against one edge and screen view, is well-adapted to take such low-angle photos, resulting in a much more interesting photo than the typical “looking down” perspective exemplified above. Inclusion of a little bit of sky in the background also provided some nice color contrast, made easier by shooting away from the sun, which was further emphasized in post-processing by increasing the saturation. As with the other semi- wide-angle macro photographs, a little bit of cropping along the bottom (but do keep the original aspect ratio) also benefited the photograph.

Moss covering the rock exposures in a delightful valley leading up from the Huzzah Creek Valley indicate an abundance of moisture.
Last, but not least, this photograph of shaded, heavily moss-laden rock outcroppings bordering a small waterfall needed to be shot very dark in order to avoid “blowing” the sky in the background. Simply pointing and shooting into the shade will cause the iPhone to correctly expose the rocks, but the sky will be blown rather than retaining its blue color. Like the first two photos, I composed the image, then touched the screen on the sky to reduce the exposure. Again, this resulted in a photo that was very dark in the foreground, but this was easily corrected by aggressive brightening, adding contrast, and increasing the saturation post-processing to achieve a nice mix of browns and greens while preserving the blue sky background. In forest shots such as this with a lot of vertical objects, pay attention to distortion while composing the photo to avoid having trees at the edge of the photo “bowing” inwards at their tops. Sometimes this can be avoided by minor adjustments to the tilt of the iPhone while taking the shot, but if your position in the landscape is such that camera tilt alone is not enough to prevent this without losing the desired composition then go ahead and shoot the desired composition and use the “distortion” tool in Photoshop to correct the distortion this works best if bowing is minor).
I hope you have enjoyed this iPhone nature photography tutorial. If you have additional ideas or suggestions please let me know, and also I would be glad to hear of any related subjects you would like me to cover.
Copyright © Ted C. MacRae 2013


 floridana")


