The ever-increasing diversity of Oklahoma beetles

My idea to return to Oklahoma’s Gloss Mountains this spring actually began taking shape during last year’s fall visit to the area, when I found a single Chrysobothris octocola adult on a dead mesquite (Prosopis glandulosa) branch. While common across the southwestern U.S. in association with this plant, its occurrence in the Gloss Mountains represented a northeastern range extension and new state record for Oklahoma! On that same trip I also collected an interesting beetle in the family Rhipiphoridae representing the species Toposcopus wrightii—also not previously recorded in the literature from Oklahoma. Combined with finding Acmaeodera macra here the previous year, it was becoming clear to me that area held good potential for other more typically southwestern species of wood boring beetles. Although I had by then visited the area several times, most of these visits were more focused on tiger beetles rather than wood boring beetles. If I could find such interesting species of wood boring beetles when I wasn’t focused on them, imagine what I might find if I timed a visit in late spring when such species should be at their peak of adult activity.

Chrysobothris quadrilineata | Gloss Mountains State Park, Major Co., Oklahoma

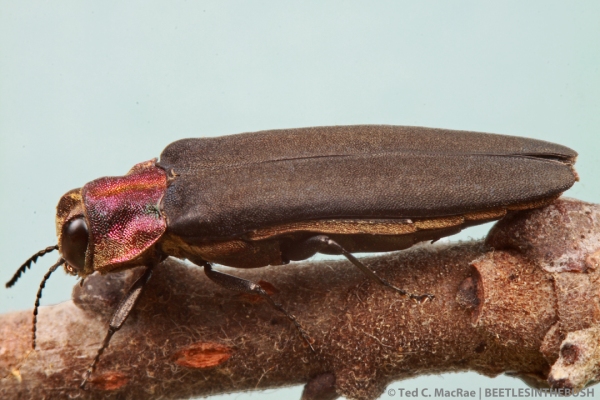
Chrysobothris quadrilineata | Gloss Mountains State Park, Major Co., Oklahoma (new state record).

Of course, success came quickly during this early June visit. I immediately found C. octocola common on the mesquite and would collect a nice series of voucher specimens before the day was over, and the second species I encountered, also on mesquite, was the longhorned beetle Plionoma suturalis—another new state record! I spent a bit of time working the mesquite, and when I had collected a sufficient series of both species, I turned my attention to the eastern red-cedars (Juniperus virginiana) in the area. Actually, I had had my eye on the red-cedars since last fall, when I noticed that nearly every tree had dead branches mixed in amongst the living branches. Closer examination revealed the workings of jewel beetle larvae in all of these dead branches, and a few larvae typical of the genus Chrysobothris were cut from one of the branches. A common species in the Great Plains associated with Juniperus is C. ignicollis, but these larvae looked rather big to represent that species, so I bundled up some dead branches and brought them back home for rearing but forgot to check on them before I left on this trip. At any rate, I walked up to one of the red-cedars, placed my beating sheet under a dead branch, gave the branch a whack with the handle of my net, and onto the sheet fell a rather robust Chrysobothris that I didn’t immediately recognize. I knew it wasn’t C. ignicollis, a much smaller species that I have collected on numerous occasions, so I thought maybe it could be C. texana, another western Juniperus-associate that I’ve collected less commonly. Still, the robust body and broad, distinct elytral and pronotal ridges had me second guessing that identification (especially after I found some individuals that looked more like what I remembered C. texana looking like). Over the next two days I beat hundreds (literally!) of dead juniper branches, finding many C. ignicollis but every now and then getting also one of these big, robust individuals.

Chrysobothris quadrilineata

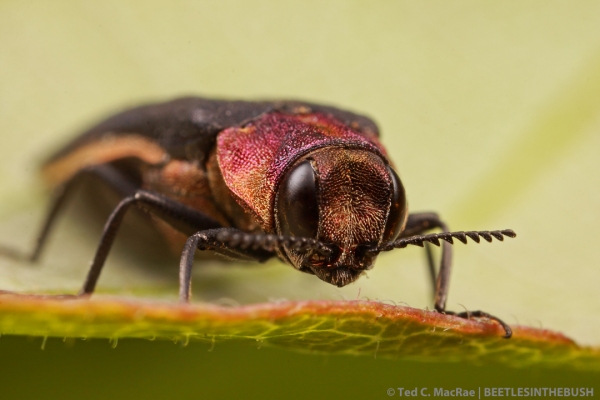
Adults were beaten from dead branches on live Juniperus virginiana (new adult host).

After returning home, I checked my heavily annotated copy of Fisher (1942) and quickly determined the robust specimens as representing C. quadrilineata—a rather uncommon species and one that I’d never collected before. Described by LeConte in 1860 from New Mexico and recorded early in the 20th century from Arizona, Nevada and California, it has in more recent years been found to occupy a rather wide distribution across the western U.S., including Texas (Barr & Westcott 1976), Colorado, Oregon, South Dakota (Nelson et al. 1982), and Utah (Nelson 1987). Notice one state that is not in that list—Oklahoma! That’s right, another new state record! I later found photographs of this species on BugGuide taken in the very same area a year earlier (7 June 2012).

Chrysobothris quadrilineata

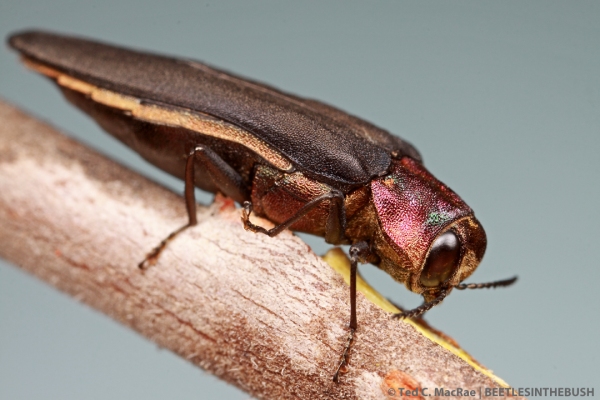
Adults also emerged from dead J. virginiana branches collected Sept. 2012 (first reported larval host).

When I returned home, I also checked the rearing cans and found several adults had emerged from the branches I collected last September. The only host associations that have been recorded for this species are adults collected on Juniperus californica (Linsley & Ross 1940) and J. pachyphloea [= J. deppeana] (Barr & Westcott 1976). Thus, J. virginiana not only represents a new host record for the species but is also the first known larval host. Considering how broadly distributed across the western U.S. this species is, it seems likely that it utilizes a number of Juniperus spp. throughout its range.

REFERENCES:

Barr, W. F. & R. L. Westcott. 1976. Taxonomic, biological and distributional notes of North American Chrysobothris, with description of a new species from California (Coleoptera: Buprestidae).  The Pan-Pacific Entomologist 52(2):138–153.

Fisher, W. S. 1942. A revision of North American species of buprestid beetles belonging to the tribe Chrysobothrini. U. S. Department of Agriculture, Miscellaneous Publication 470, 1–275.

Linsley, E. G. & E. S. Ross. 1940. Records of some Coleoptera from the San Jacinto Mountains, California.  The Pan-Pacific Entomologist 16(2):75–76.

Nelson, G. H. 1987. Additional notes on the biology and distribution of Buprestidae (Coleoptera) in North America, II.   The Coleopterists Bulletin 41(1):57–65.

Nelson, G. H., D. S. Verity & R. L. Westcott. 1982. Additional notes on the biology and distribution of Buprestidae (Coleoptera) of North America.  The Coleopterists Bulletin 35(2) [1981]:129–152.

Copyright © Ted C. MacRae 2013

“Rare jewel beetles discovered in Mexico by team of scientists!”

I hope you’ll excuse the hyperbolic title, but such has been my impression with some of the headlines I’ve seen recently in the popular media regarding newly described insect taxa in various parts of the world. The “discovery” of new species in far away, tropical lands sounds exciting and ground-breaking to many people, who envision teams of scientists wearing pith helmets and cargo shorts machete-slashing their way through miles of virgin forest before stumbling into a secret biodiversity hot-spot, their weeks of toil and sweat finally paying off by becoming the first white men to lay eyes upon a bounty of strange, exotic, never-before-seen creatures. In reality, new species of insects are not at all hard to find—in fact, depending on where you go it can be downright easy. Admittedly the chances are greater in the tropics, where many areas remain little explored, but even in well-studied North America new species turn up regularly. This includes popularly collected beetles in the very well-studied eastern U.S., where I’ve already described one new jewel beetle (family Buprestidae) and one new longhorned beetle (family Cerambycidae) from right here in my home state of Missouri (MacRae 2000, 2003) and am in the process of describing another new jewel beetle. No, finding new species is easy—recognizing them as such is the hard part. That’s not to say that new species cannot be recognized when first encountered, but I suspect that a majority of new insect species aren’t actually “discovered” until they’ve been brought back from the field, curated, and sat in a cabinet for years or decades—unrecognized for what they really are due to resemblance to known species until somebody comes along and examines them more critically.

Such is the case with two jewel beetle species that Chuck Bellamy and I describe in a paper just published in The Pan-Pacific Entomologist (MacRae & Bellamy 2013). I joined Chuck on several trips to Mexico in 1992 and again from 2004–2006 to explore the tropical thorn woodlands in the southern states of Oaxaca, Puebla, Guerrero and Michoacán. Jewel beetle diversity is high in these still relatively intact woodlands, with a number of new species already having been described from the area in recent years, and all-told we collected well over 100 species. At least a dozen or more of these look to be new, and considering that the Mexican jewel beetle fauna as a whole includes more than 800 known species the actual number could greatly exceed 1,000. The two described in this most recent paper resemble the common, widespread species Actenodes calcaratus. This big, beautiful jewel occurs from the southwestern U.S. through Mexico and Central America to northern South America, developing as larvae in dead wood of a variety of fabaceous hosts. We collected several of what we thought was this species during our trips, but a number of subtle but consistent differences in punctation and surface sculpturing emerged as we began comparing them more critically against A. calcaratus from other locations. The coup de grâce, however, was the coloration of the male face—normal bronze in A. calcaratus (Fig. 5) and similar to the female (Fig. 6), but flash-green in male A. scabrosus (Fig. 2) and green-violaceous in male A. michoacanus (Fig. 8). It’s quite remarkable that both of these species differ from their more widespread relative by subtle morphological characters but such striking sexually dimorphic facial coloration, and we subsequently found a similar situation with another species in the genus (A. undulatus) that otherwise bears little resemblance to A. calcaratus.

Figs. 1–9. Actenodes spp. 1–3. Actenodes scabrosus. 1–2. Male holotype. 1. Dorsal habitus. 2. Frontal view. 3. Female paratype (Guerrero). 4–6. A. calcaratus. 4–5. Male (MEXICO, Guerrero, Hwy 95, 5 km S Milpillas, 7.vii.1992, "big dead tree", G. H. Nelson [FSCA]). 4. Dorsal habitus. 5. Frontal view. 6. Female (MEXICO, Hwy 95, 2 km S Milpillas, 6.vii.1992, on Acacia farnesiana, G. H. Nelson [FSCA]), frontal view. 7–9. A. michoacanus. 7–8. Male holotype. 7. Dorsal view. 8. Frontal view. 9. Female paratype, frontal view. All scale bars = 5 mm.

Figs. 1–9. Actenodes spp. 1–3. Actenodes scabrosus. 1–2. Male holotype. 1. Dorsal habitus. 2. Frontal view. 3. Female paratype (Guerrero). 4–6. A. calcaratus. 4–5. Male (MEXICO, Guerrero, Hwy 95, 5 km S Milpillas, 7.vii.1992, “big dead tree”, G. H. Nelson [FSCA]). 4. Dorsal habitus. 5. Frontal view. 6. Female (MEXICO, Hwy 95, 2 km S Milpillas, 6.vii.1992, on Acacia farnesiana, G. H. Nelson [FSCA]), frontal view. 7–9. A. michoacanus. 7–8. Male holotype. 7. Dorsal view. 8. Frontal view. 9. Female paratype, frontal view. All scale bars = 5 mm.

In the case of both of these new species, the first specimens were actually collected more than 40 years ago but remained “hidden” among specimens of A. calcaratus until we examined the collections containing them more closely. While it might seem that the striking male facial coloration both of these species exhibit should have resulted in their quick recognition as undescribed species, even seemingly obvious characters such as this can be overlooked when an otherwise great resemblance to a common, widespread species prevents their critical examination.

REFERENCES:

MacRae, T. C. 2000. Review of the genus Purpuricenus Dejean (Coleoptera: Cerambycidae) in North America. The Pan-Pacific Entomologist 76(3):137–169.

MacRae, T. C. 2003. Agrilus (s. str.) betulanigrae MacRae (Coleoptera: Buprestidae: Agrilini), a new species from North America, with comments on subgeneric placement and a key to the otiosus species-group in North America. Zootaxa 380:1–9.

MacRae, T. C. & C. L. Bellamy. 2013. Two new species of Actenodes Dejean (Coleoptera: Buprestidae) from southern Mexico, with distributional and biological notes on Buprestidae from Mexico and Central America. The Pan-Pacific Entomologist 89(2):102–119.

Copyright © Ted C. MacRae 2013

Agrilus fuscipennis on Persimmon

Agrilus fuscipennis

Agrilus fuscipennis may not be the largest or the prettiest member of the genus occurring in Missouri (that honor is reserved for Agrilus concinnus, or “hibiscus jewel beetle”—MacRae 2004). Nevertheless,  it comes pretty darned close! Add to that the fact that it is among our most seldom encountered jewel beetles, and you can understand how excited I was to see this species on my sheet after beating a small persimmon (Diospyros virginiana) tree last weekend at Hercules Glades Wilderness in the White River Hills of extreme southwestern Missouri. In fact, I have only collected this species three times previously—all single specimens beaten from persimmon, and all back in the 1980s!

Agrilus fuscipennis

Jewel beetles are unquestionably popular among insect collectors, due no doubt in large part to their vivid, metallic colors. I think the family, however, would be even more popular were it not for the genus Agrilus. Fully one in five species of jewel beetles belongs to this genus, which at nearly 3,000 described species and counting (Bellamy 2008) is perhaps the largest genus in the entire animal kingdom. As might be expected, such hyperdiversity has resulted in taxonomic quagmire, with species limits difficult to define and many hardly distinguishable except by examination of male genitalia (MacRae 2003). Additionally, in contrast to the rest of the family which is generally recognized as containing some of the most spectacularly beautiful beetles in the world, the most species of Agrilus are small, usually less than 8 mm in length and often as small as only 4–5 mm, and also lack the vivid colors (at least, to the naked eye) for which the rest of the family is so noted.

Agrilus fuscipennis

Agrilus fuscipennis is one of several species that buck this general Agrilus theme. While not forming a discrete taxonomic group within the genus, they are all unified by the following characteristics: 1) relatively large for the genus (A. fuscipennis measures 12–14 mm length), 2) vivid red pronotum and black elytra, and 3) mine the lower trunks, crown and main roots of living rather than dead host plants. For A. fuscipennis the larval host is persimmon, and other similar species include A. vittaticollis on serviceberry (Amelanchier) and A. concinnus on wild hibiscus (Hibiscus). These other species also are not very commonly encountered, at least in my experience, perhaps partly because they are not as easily reared from their hosts as species that develop as larvae in dead wood (the latter can be easily reared by retrieving infested wood from the field and placing in containers to trap emerging adults).

Agrilus fuscipennis

In the interest of full disclosure, these photos were taken in the studio after returning home. Although the persimmon branch is real, the “blue sky” is actually just a colored index card. I prefer to photograph insects in the field, especially with insects such as tiger beetles where it is desirable to include elements of the insect’s natural habitat in the photograph. However, I don’t have a problem with studio photography if field photographs prove too difficult or time-consuming or present too high a risk of escape by a prize specimen. My normal protocol for the latter is to place the first individual in a vial and continue to search for another that I will then try to photograph in the field. If that doesn’t work then I still have the first individual as a backup for studio photographs. In the case of this beetle, I found it on the very first clump of persimmon that I beat but never saw another despite beating persimmon for the rest of the afternoon (just like the three I found separately back in the 80s)! I have plans to photograph A. concinnus later this summer on its Hibiscus host plant in southeastern Missouri—hopefully I will succeed in getting true field photographs of that species.

Agrilus fuscipennis

REFERENCES:

Bellamy, C. L. 2008. World catalogue and bibliography of the jewel beetles (Coleoptera: Buprestoidea), Volume 4: Agrilinae: Agrilina through Trachyini. Pensoft Series Faunistica 79:1–722.

MacRae, T. C. 1991. The Buprestidae (Coleoptera) of Missouri.  Insecta Mundi 5(2):101–126.

MacRae, T. C. 2004. Beetle bits: Hunting the elusive “hibiscus jewel beetle”. Nature Notes, Journal of the Webster Groves Nature Study Society 76(5):4–5.

Copyright © Ted C. MacRae 2013

Oversized, double-concave diffuser for MT-24EX twin flash

IMG_2865_enh_1080X720

Megaloxantha bicolor palawanica, photographed with oversized, double-concave diffuser

This jewel beetle is, of course, Megaloxantha bicolor palawanica me beetle on several occasions while testing out different diffuser designs for my Canon MT-24EX twin flash unit. In the most recent one, I had tried combining SoftBoxes with my oversized concave diffuser and was pleased enough with the result that I thought I might try it in the field. Well, let’s just say the extensions for the flash heads and SoftBoxes attached to them was far too clumsy for field use, and I abandoned the idea after just a couple of hours. Back to the drawing board.

Despite the problems with using the SoftBoxes in the field, I still wasn’t ready to give up on the idea of double diffusion, and I had also learned that extending my oversized diffuser out over the subject (leaving it “open”) produced better lighting than curling it back (as I had been doing). Curling the diffuser back only served to turn it into a convex diffuser, which results in more specular highlighting because the center of the diffuser is closer to the subject than the edges. A concave diffuser provides more even lighting because all parts of the diffuser are roughly the same distance from the subject. Just about that time, I saw a DIY diffuser design by Piotr Nascrecki that, in principle, resembled Alex Wild‘s tent diffuser. It was, however, much larger—like mine, and thus amenable for use with a 100mm macro lens (the macro lens I use most commonly). This resemblance to Alex’s diffuser did make me notice one missing feature—double diffusion layers. That’s when I thought, why not do the same with an oversized diffuser rather than fussing with separate diffusers attached to the flash heads? I had some Bogen Imaging filter sheets on hand (#129 Heavy Frost), so I picked up some 1-mm steel wire at the hardware store, found a Bic pen in the drawer that I could cut in half, and built the diffuser as shown in Piotr’s post. I then secured a second filter sheet above the first sheet by taping the two together along their sides, being sure to ‘bow’ the upper sheet above the bottom sheet to achieve the double diffusion effect. Here is the result (please excuse the iPhone shots):

Oversized double diffuser for Canon MT-24EX twin flash.

Canon 50D with MT-24EX twin flash and oversized, double-concave diffuser.

IMG_0939_enh_1080X720

Better view of the double diffusion layers and Piotr’s “Bic pen” attachment system.

I have big hopes that this will finally be the diffuser I’ve been looking for. For as quick a test shot as the jewel beetle photo above was, the lighting is great and the colors are vibrant—both achieved with typical post-processing. My only complaint is the slightly greater “hot spot” intensity in the lower parts of the highlights in the eyes. This is due to the flash heads sitting near the base of the diffuser, and (as Piotr recommends) a second set of Kaiser shoes will allow me to move the flash heads not only more towards the center of the diffuser but also further above it to help spread out the light throw and even out the highlights. I’ll need to play around positioning the flashes to figure out the best positions depending on the size and distance of the subject—sitting up higher as they are puts them more on “top” than in “front” of the subject, so they will need to be directed downward more than I am used to doing. Even more important, however, is field usability, and I really think this diffuser will prove to be convenient and easy to use in the field—no more gawky arms attached to the camera, the diffuser attaching quickly and easily and, just as importantly, coming off easily and storing flat in the backpack, and large enough to do the job while not so oversized that it gets in the way. Piotr says this diffuser also works well with the 65mm macro lens, so I will certainly be testing that out as well.

Copyright © Ted C. MacRae 2013

A jewel of a beetle

I really wish I had a photomicrography setup like the one that Sam Heads has at the University of Illinois for imaging preserved specimens. Alas, insect taxonomy is “just a hobby” for me, and any specimen photography I wish to do must be done with my field camera equipment. Of course, poverty prompts creativity (not that I consider a Canon 50D with an MP-E 65mm macro lens and MT-24EX twin flash unit a sign of poverty), and after a bit of tinkering and fiddling I’ve figured out a way to setup the specimen and flash units to create images of pinned specimens that I think are more than adequate for publication in taxonomic papers.

Here is one I did recently of the jewel beetle Actenodes calcaratus (family Buprestidae). This species is broadly distributed from the southwestern U.S. through Mexico and into Central America, where it breeds in dead branches of a variety of mostly fabaceous trees such as Acacia and Prosopis. During several trips to southern Mexico in recent years, Chuck Bellamy and I collected two new species of Actenodes that look very similar to A. calcaratus but differ in several important characters, primarily surface sculpture, the form and male coloration of the face, and male genitalia. A manuscript describing these two species and containing this and similar images of the new species was recently submitted for publication. Though not quite as razor-sharp as images created through focus-stacking processes, it still shows good detail and even lighting. What do you think?¹

¹ For those who find the pin head distracting, I am not a proponent of cloning out pin heads, debris, or other imperfections on images of preserved specimens in taxonomic papers. Other enhancements such as levels, sharpness, contrast, etc. are fine since these are all influenced greatly by lighting, but otherwise I believe the specimen needs to be presented exactly as it appears. A possible alternative is to remove the pin for imaging, but this presents a risk of damage to the specimen that is of questionable benefit in the case of non-type specimens—and downright irresponsible for primary types. Another alternative is to thoroughly clean and image the specimen prior to mounting, but this is rarely feasible as in most cases it is only after the specimen is mounted and studied further that its status as a new species is realized.

Actenodes calcaratus | MEXICO: Guerrero, Hwy 95, 5 km S Milpillas, 7.vii.1992, "big dead tree", G. H. Nelson [FSCA]. Male plesiotype.

Actenodes calcaratus | MEXICO: Guerrero, Hwy 95, 5 km S Milpillas, 7.vii.1992, “big dead tree”, G. H. Nelson [FSCA]. Male plesiotype.

Copyright © Ted C. MacRae 2013

Backyard gems

I’ve been fortunate to have the chance to travel far and wide in my searches for insects—from the Gypsum Hills of the Great Plains and Sky Islands of the desert southwest to the subtropical riparian woodlands of the Lower Rio Grande Valley, tropical thorn forests of southern Mexico and veld of southern Africa. No matter how far I travel, however, I’m always happy to return to the Missouri Ozarks. It is here where I cut my entomological teeth so many years ago, and though I’ve now scrabbled around these ancient hills for more than three decades it continues to satisfy my thirst for natural history. Though not nearly as expansive as the Great Plains, there are nevertheless innumerable nooks and crannies nestled in the Ozarks, and I find myself constantly torn between looking for new spots (it would take several lifetimes to find them all) and going back to old favorites. Living in the northeastern “foothills” in the outskirts of St. Louis provides an ideal vantage for exploration; however, sometimes I am truly amazed at the natural history gems that can be found within a stone’s throw from my house. Some examples I’ve featured previously include Shaw Nature Reserve, home to a hotspot of the one-spotted tiger beetle, Castlewood State Park, where I found a gorgeously reddish population of the eastern big sand tiger beetle, and Victoria Glades Natural Area, site of the very first new species (and perhaps also the most beautiful) that I ever collected.

Englemann Woods Natural Area | Franklin Co., Missouri

Today I found another such area—Englemann Woods Natural Area, and at only 5 miles from my doorstep it is the closest natural gem that I have yet encountered. One of the last old-growth forests in the state, its deep loess deposits on dolomite bedrock overlooking the Missouri River valley support rich, mesic forests on the moister north and east facing slopes and dry-mesic forests on the drier west-facing slopes dissected by rich, wet-mesic forests with their hundreds-of-years-old trees. A remarkable forest of white oak, ash, basswood and maple in an area dominated by monotonous second-growth oak/hickory forests.

Englemann Woods Natural Area

Steep north-facing slopes border the Missouri River valley.

It is not, however, the 200-year-old trees that will bring me back to this spot, but rather the understory on the north and east-facing slopes. Here occur some of the richest stands of eastern hornbean (Ostrya virginiana) that I have ever seen. This diminutive forest understory inhabitant is not particularly rare in Missouri, but as it prefers rather moist upland situations it is not commonly encountered in the dry-mesic forests that dominate much of the Ozarks. Stands of this tree, a member of the birch family (Betulaceae) are easy to spot in winter due to their habit of holding onto their dried canopy of tawny-brown leaves (see photo below).

Englemann Woods Natural Area

Rich stands of eastern hornbeam (Ostrya virginiana) dominate the north- and east-slope understory.

Why am I so interested in this plant? It is the primary host of the jewel beetle species Agrilus champlaini. Unlike most other members of the genus, this species breeds in living trees rather than dead wood, their larvae creating characteristic swellings (galls, if you will) on the twigs and stems as they spiral around under the bark feeding on the cambium tissues before entering the wood to pupate and emerge as adults in spring. This species is known in Missouri from just two specimens, both collected by me way back in the 1980s as they emerged from galls that I had collected during the winter at two locations much further away from St. Louis. The presence of this rich stand of hornbeam just 5 miles from my home gives me the opportunity to not only search the area more thoroughly to look for the presence of galls from which I might rear additional specimens, but also to look for adults on their hosts during spring and (possibly, hopefully) succeed in photographing them alive.

Englemann Woods Natural Area

Inside the “hornbeam forest.”

Another “draw” for me is the restoration work that has begun on some of the west-facing slopes in the areas. Pre-settlement Missouri was a far less wooded place than it is today, as evidenced by the richly descriptive writings penned by Henry Schoolcraft during his horseback journey through the Ozarks in the early 1800’s. At the interface between the great deciduous forests to the east and the expansive grasslands to the west, the forests of Missouri were historically a shifting mosaic of savanna and woodland mediated by fire. Relatively drier west-facing slopes were more prone to the occurrence of these fires, resulting in open woodlands with more diverse herbaceous and shrub layers. At the far extreme these habitats are most properly called “xeric dolomite/limestone prairie” but nearly universally referred to by Missourians as “glades”—islands of prairie in a sea of forest! I have sampled glades extensively in Missouri over the years, and they are perhaps my favorite of all Missouri habitats. However, it is not future glades or savannas that have me excited about Englemann Woods but rather the availability of freshly dead wood for jewel beetles and longhorned beetles resulting from the selective logging that has taken place as a first step towards restoration of such habitats on these west-slopes. The downed trees on these slopes and subsequent mortality of some still standing trees that is likely to result from the sudden exposure of their shade adapted trunks to full sun are likely to serve as a sink for these beetles for several years to come. I will want to use all the tools at my disposal for sampling them while I have this opportunity—beating, attraction to ultraviolet lights, and fermenting bait traps being the primary ones. It looks like I’d better stock up on molasses and cheap beer!

Englemann Woods Natural Area

Restoration efforts on the west-facing slopes begins with selective logging.

Eastern red-cedar (Juniperus virginiana) is native to Missouri, but in our time it has become a major, invasive pest tree. The suppression of fire that came with settlement also freed this tree from a major constraining influence on its establishment in various habitats around the state, primarily dolomite/limestone glades. Nowadays most former glade habitats, unless actively managed to prevent it, have become choked with stands of this tree, resulting in shading out of the sun-loving plants that historically occurred much more commonly in the state. Untold dollars are spent each year by landscape managers on mechanical removal and controlled burns to remove red-cedar and prevent its reestablishment in these habitats. There is one habitat in Missouri, however, in which eastern red-cedar has reigned supreme for centuries or possibly millenia—dolomite/limestone bluff faces.

Juniperus virginiana

Craggly, old Eastern red-cedars (Juniperus virginiana) cling tenaciously to the towering dolomite bluffs.

With little more than a crack in the rock to serve as a toehold, red-cedars thrive where no other tree can, growing slowly, their gnarled trunks contorted and branches twisted by exposure to sun and wind and chronic lack of moisture. Some of the oldest trees in Missouri are red-cedars living on bluffs, with the oldest example reported coming from Missouri at an incredible 750–800 years old. There is something awe-inspiring about seeing a living organism that existed in my home state before there were roads and cars and guns. These ancient trees are now an easy drive from my house (though a rather strenuous 300-ft bushwhacking ascent to reach the bluff tops)—they seem ironically vulnerable now after having endured for so long against the forces of nature. For me, they will serve as a spiritual draw—a reason to return to this place again regardless of what success I might have at finding insects in the coming months.

Juniperus virginiana

This tree may pre-date Eurpoean settlement.

Aplectrum hyemale

Adam-and-Eve orchid (Aplectrum hyemale).

Copyright © Ted C. MacRae 2013

Diffusion versus post-processing, or perhaps something even better?

One of the comments on my post Diffuser comparisons for 100mm macro lens was by Stephen Barlow, one of the original “concave diffuser” advocates, who claimed that the “dead” appearance of Photo #4 was an artifact of post-processing and not really a problem with the diffusion method itself. Heeding this comment, I reprocessed Photo #4 to see if this was really all that was needed to give it a “livelier” look by rather aggressively bumping up the brightness and contrast by 30% each (to correct for underexposure), then reducing the saturation by 10% (to correct for the effect on color caused by increased brightness and contrast), adjusted levels to a set point of 240 to add some more “high end,” and reduced highlights and shadows just a bit (10% each). Following is the original and then the reprocessed version of Photo #4:

IMG_2095_enh_1080x720

Original post-processing

IMG_2095_enh2_1080x720

Additional post-processing.

There is no question that this additional reprocessing has greatly improved the photo. However, after I did this I got to thinking—why not try combining the two diffusers that gave the best results? Recall that the diffusion method in Photo #5 (SoftBoxes on flexible arm extenders) easily “won the vote” over Photo #4 (open concave diffuser) by a 2:1 margin (35 to 17). This may have been at least partly a result of the less than flattering post-processing of the original version of #4, but still the overall lighting effect on Photo #5 caused by the diffusion method used was quite dramatic. The only downside of the #5 method was the persistence of hot spots (albeit muted) from the flash heads and a dark background with lots of shadowing caused by light drop off (since the flash heads were mounted on the lens rather than extenders). Double diffusers are nothing new, the idea being that the first diffuser spreads the light out more before it hits the second diffuser than does a bare flash head, allowing even further diffusion of the light the reaches the subject (and background) for truly even lighting. I reasoned that using SoftBoxes on flexible arm extenders plus the concave diffuser would not only accomplish double diffusion but also allow controlled placement of the flash heads close to the specimen to maximize apparent light size and minimize light drop off. To test this I re-shot the same beetle with the same camera settings, and here is the result:

Flash heads mounted on flexible arms, diffused by SoftBoxes + open concave diffuser

Flash heads mounted on flexible arms, diffused by SoftBoxes + open concave diffuser

My personal opinion is that this photo combines the best of both methods. While loss of light can be a problem with double diffusion, my use of extenders to place the flash heads close to the subject minimizes, or perhaps even completely negates this problem. Additionally, while subtle hot spots are still apparent, they are not nearly as apparent as in Photo #5 (SoftBox diffusers on extenders w/o concave diffuser—refresh your memory here) due to the additional diffusion, which also dramatically reduces shadowing as a result of better light throw. The hot spots are also more subtle than in #4 because of the larger apparent light size (a combination of closer flash head placement and the SoftBoxes), and is it just me or are the colors more vibrant and life-like in this photo compared to #4 (even reprocessed)? The flat colors were my biggest criticism of Photo #4, and even heavy-handed reprocessing, while helpful, didn’t completely bring it “back to life.” In contrast, the double-diffused photo required only typical post-processing to achieve a more than acceptable result—I have to believe that, all other things being equal, a photo that requires less post-processing is better than one that requires more.

Of course, using a setup like this in the studio is one thing—using it in the field is another. Both the extenders and the oversized concave diffuser are likely to make things a little clumsier in the field, and the two combined may be more clumsiness than I care to deal with. Nevertheless, the results from my test shots are certainly promising enough to give it an honest effort. Have I finally found a viable solution to diffusion in long-lens, full-flash macrophotography? We’ll find out this summer!

Copyright © Ted C. MacRae 2013

Diffuser comparisons for 100mm macro lens

I really wish I could just buy three Canon Speedlite 580EX II flash units, mount one directly on the camera, run the other two wirelessly on each side as slaves, put a nice big soft box diffuser on each of them, and be done with it! I’m beginning to think that’s the only way I’m going to get the kind of full flash insect macro photographs that I want with larger subjects that require the use of my 100mm macro lens. You know what I mean—nice, even, diffuse, vibrant light that comes at the subject from multiple directions (eliminating those annoying specular highlights in the eyes that result from more unidirectional lighting) and with enough power to allow minimal flash pulse durations (resulting in maximum motion freeze). But I can’t—the money is not in the budget, and even if it was I’d have to think seriously about the logistics of carrying and setting up in the field three Speedlites every time I wanted to photograph an (often moving) insect.

Thus, I continue trying to come up with some kind of system that makes the most of my Canon MT-24EX twin flash unit. It’s not that I don’t like this flash unit—I love it because of its light weight (good for field use) and the front-of-the-lens mounting feature that, with its dual heads, gets the flash heads closer to the subject but avoids the “flat” lighting effect of typical ring flash units. In addition, for those shooting insect macro photographs with Canon’s shorter focal length MP-E65 macro lens, the twin flash unit is probably the best choice of all, since the lens is right on top of the subject and it is relatively easy to place diffusing materials between the subject and the flash heads—Alex (Myrmecos) with his tracing paper diffuser and Kurt (Up Close with Nature) with his concave foam diffuser are two of the more successful designs out there. I use my MP-E65 lens a lot, but I use my 100mm macro lens a lot more because many of the beetles I photograph are best photographed at magnification ranges between 0.5–1.0X and, thus, are a little too large for the 65mm lens. The longer lens-to-subject distance of the 100mm lens may be helpful for working with skittish subjects, but it also creates challenges for the MT-24EX because of its relatively low power (more light drop off) and small flash heads (more specular highlighting). For the past couple of years I’ve been using a large sheet of polypropylene foam jury-rigged to the front of the lens, and while it too has functioned fairly well, I keep thinking that if I can just get the flash heads closer to the subject—each fitted with a good diffuser—then it should be possible to achieve results similar to what can be done with the 65 mm lens.

The photos below show the results of some of the ideas I’ve been working on. My main idea was to use extenders that would allow adjustable placement of the flash heads relatively close to the subject and diffuse the light from them with a modified version of the Sto-Fens+Puffers that I have tried in the past. Here is an example of the system mounted on my camera using cheap, flexible arms mounted on a plate attached to the bottom of the camera. If I decide to use this system in the field I would want to purchase much sturdier extenders (e.g. Really Right Stuff), but at only $25 these flexible arms are perfect for proof-of-concept testing. For the modified Sto-Fens+Puffers, I completed the modifications shown by Dalantech (No Cropping Zone) (I was planning to do this when I first tried the Sto-Fens+Puffers but soon found that I preferred the concave and tent designs by Kurt and Alex, at least for use with the 65mm lens). At any rate, to test the ideas I selected a very large (for long subject-to-lens distance), very shiny (for maximum specular highlighting potential) beetle from my collection (Megaloxantha bicolor palawanica, a stunning jewel beetle from Palawan, Philippines) and set it up for “face shots” that simulate my favorite pose for beetles in the field. Keep in mind that this was not intended to be a test of lighting for pinned specimens in the studio—that is not my interest, and there are much better approaches for doing that—but rather a proxy for the kind of lighting and diffusion I might achieve in the field. Here are the results:

IMG_2087_enh_1080x720

– flash heads mounted on lens, diffused by modified Sto-Fens+Puffers

The example above show the results obtained when using the modified Sto-Fens+Puffers with the flash heads mounted directly to the front of the lens. I didn’t try this shot without diffusers, but I doubt it would be much worse than this—specular highlighting is bad because of the small apparent light size, and overall the lighting is not very even with dark shadows and harsh highlights. This shot is a perfect example of the problems inherent in using the twin-flash with a long macro lens.

IMG_2082_enh_1080x720

– flash heads mounted on flexible arms, diffused by modified Sto-Fens+Puffers

This second shot shows the results when the modified Sto-Fens+Puffers are mounted on the flexible arm extenders and positioned as close to the subject as possible to maximize apparent light size. This was supposed to be the system that gave me the results I was looking for, but honestly I am not impressed. The highlights in the eyes are certainly larger than in the previous photo, and the overall lighting is not quite as uneven, but still the highlights are harsh and fairly sharply defined. Considering the greater difficulty in positioning the flash heads compared to lens-mounted, I have to consider the marginal improvement in lighting not worth the effort.

IMG_2090_enh_1080x720

– flash heads mounted on lens, diffused with modified Sto-Fens+ Puffers and concave diffuser (closed)

This third shot has the modified Sto-Fens+Puffers once again mounted on the lens, but also attached is my trusty concave diffuser. Honestly this combination of diffusers provides much better overall lighting and softening of the highlights compared to the previous shot, even though the flash heads are mounted on the lens rather than positioned close to the subject. Apparently the concave diffuser, though further away from the subject, still has larger apparent size and thus allows light to be transmitted to the subject from a larger apparent area. I have not normally used another diffuser between the flash heads and the concave diffuser, but my impression from this shot is that the modified Sto-Fens+Puffers do a good job of dispersing light before it hits the concave diffuser to soften the “hot spots” behind it and provide somewhat more even lighting across its surface.

IMG_2095_enh_1080x720

#4 – flash heads mounted on lens, diffused with modified Sto-Fens+ Puffers and concave diffuser (open)

When I use the concave diffuser, I normally pull the corners back and attach them to the tops of the flash heads with Velcro to minimize light blow back (although how effective it is I really don’t know). Just for kicks, I decided to try some shots with the concave diffuser not pulled back, but left open and extending out over the subject. I did this because that actually more closely approximates how smaller versions of concave diffusers are used with the 65mm lens. The effect was not only remarkable diffusion of light, with specular highlights and hot spots almost completely lacking, but also much better lighting behind rather than just on the front of the specimen. That said, the quality of the light lacks vibrancy and seems somewhat “dead,” perhaps because of the great distance between the flash heads and the diffuser and the MT-24EX units relatively limited power. The large diffuser extending far out in front of the lens might cause problems with bumping and skittish subjects, but I am intrigued enough by this result to continue with some field testing to see what I think.

IMG_2113_enh_1080x720

#5 – flash heads mounted on flexible arms, diffused by SoftBoxes

The final shot shows the results of another promising setup—this one again uses the flash heads mounted on flexible arm extenders to get them close to the subject, but instead of the modified Sto-Fens+Puffers I fitted each flash head with a mini SoftBox. This was not easy, as the SoftBox is designed for much larger flash heads than those of the MT-24EX, so I took another set of Sto-Fen diffusers, cut off the face, then hot-glued the SoftBox to the open Sto-Fen. Thus modified it was a simple matter to “snap” the SoftBoxes in place over the flash heads. Despite the term ‘mini’ these Soft Boxes still provide a much larger area for light transmission than the modified Sto-Fens+Puffers, and this much larger apparent light size has a dramatic effect on the overall lighting and diffusion. I’m tempted to say I like this one best. However, I do have to consider ease of function in the field—the lens-mounted Sto-Fen+Puffers and concave diffuser, either open or closed, would certainly be easier and involve no further cost (for better extenders than the cheap flexible arms I now have), but if SoftBoxes on flash heads placed close to the subject gives better results than I may have to go with it.

Will you please help me decide? I setup this little poll so you can tell me which of the systems you thought gave the most pleasing result in terms of vibrant, evenly diffused light. I can’t (to my knowledge) tell who’s voting (and if there is a way don’t tell me because I don’t want to know), so don’t let privacy concerns prevent you from adding your vote—the more voters that participate, the better information I get to help me with my decision.

Copyright © Ted C. MacRae 2013