2014 Great Plains Collecting Trip iReport

During the past year or so I’ve followed up my longer (one week or more) insect collecting trips with a synoptic “iReport”—so named because they are illustrated exclusively with iPhone photographs. It may come as a surprise to some, but iPhones actually take pretty good pictures (especially if you pay attention to their strengths and weaknesses), and their small, compact size makes it easy to take lots of photos while trying to use time in the field wisely. I find the iPhone to be a great tool for documenting the general flavor of a trip and for taking quick photos of subjects before getting out the big rig. I will, of course, feature photographs taken with the ‘real’ camera in future posts.

For this trip, I teamed up with Jeff Huether for the third time since 2012. Our quarry for this trip was longhorned beetles (family Cerambycidae) in the genus Prionus. Larvae of these beetles are subterranean, with some species feeding on roots of woody plants and others on roots of grasses and other herbaceous plants. Among the latter are an array of species occurring in the Great Plains, many of which have been very uncommonly collected. However, in recent years lures have been produced that are impregnated with prionic acid—the principal component of sex pheromones emitted by females in the genus. Originally produced for use in commercial orchards (which are sometimes attacked by P. laticollis in the east and P. californicus in the west), these lures are proving themselves to be useful for us taxonomist-types who wish to augment the limited amount of available material of other, non-economic species in the genus. While Prionus was our main goal, rest assured that I did not pass on the opportunity to find and photograph other beetles of interest.

I began the trip by driving from St. Louis to Wichita, Kansas to meet up with Jeff, who had flown there from his home in upstate New York. Our plan was to visit sites in southeastern Colorado and northeastern New Mexico, where several of the Prionus spp. that we were looking for were known to occur. Before doing this, however, we stopped in Hardtner, Kansas to see “Beetle Bill” Smith and tour his amazing natural history tribute, Bill and Janet’s Nature Museum.

"Beetle" Bill Smith, founder of Bill & Janet's Nature Museum, Hardtner, Kansas.

“Beetle Bill” Smith, founder of Bill & Janet’s Nature Museum, Hardtner, Kansas.

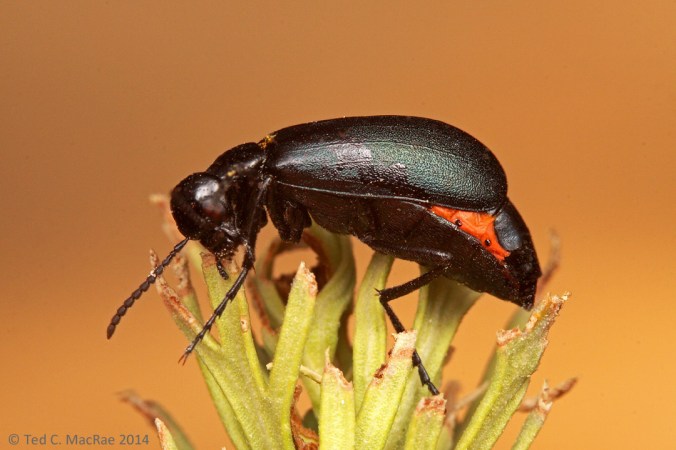
After the tour (and a delicious lunch at his house of fried crappie prepared by his wife Janet), we headed west of town and then south just across the state line into Oklahoma to a spot where Bill had found a blister beetle (family Meloidae) that Jeff was interested in finding. During lunch I mentioned a jewel beetle (family Buprestidae) that I had looked for in the area several times, but which had so far eluded me—Buprestis confluenta. Emerald green with a dense splattering of bright yellow flecks on the elytra, it is one of North America’s most striking jewel beetles and is known to breed in the trunks of dead cottonwoods (Populus deltoides). Bill mentioned that he had collected this species at the very spot where we were going, and when we arrived I was enticed by the sight of a cottonwood grove containing several large, dead standing trunks—perfect for B. confluenta.

Buprestis spp. love large, dead, barkless cottonwood trunks.

Buprestis spp. love large, dead, barkless cottonwood trunks.

I searched for more than one hour without seeing the species, though I did find a few individuals of the related (and equally striking) B. rufipes on the trunks of the large, dead trees. Once that amount of time passes I’m no longer really expecting to see what I’m looking for, but suddenly there it was in all of its unmistakable glory! It would be the only individual seen despite another hour of searching, but it still felt good for the first beetle of the trip to be one I’d been looking for more than 30 years!

Buprestis (Knulliobuprestis) confluenta, on large, dead Populus deltoides trunk | Woods Col., Oklahoma| USA: Oklahoma

Buprestis confluenta, on the trunk of a large, dead cottonwood (Populus deltoides) | Woods Col., Oklahoma| USA: Oklahoma

I usually wait until near the end of a collecting trip to take the requisite selfie, but on this trip I was sporting new headgear and anxious to document its maiden voyage. My previous headgear of choice, a vintage Mambosok (impossible to get now), finally disintegrated after 20 years of field use, and on the way out-of-town I picked up a genuine Buff® do-rag. I know many collectors prefer a brim, but I don’t like they way brims limit my field of vision or get in the way when I’m using a camera. Besides, I’m usually looking down on the ground or on vegetation, so sun on my face is not a big issue. And do I be stylin’ or wut?

A "selfie" makes the trip official.

A “selfie” makes the trip official.

We made it to our first locality in southeast Colorado by noon the next day—the vast, dry grasslands north of Las Animas. Jeff had collected a blister beetle of interest here on an earlier trip, but as I looked out across the desolate landscape I wondered what on Earth I could find here that would be even remotely interesting to me.

Shortgrass prairie habitat for Prionus integer.

Shortgrass prairie habitat for Prionus integer.

Letting Jeff have some time to look for his blister beetle, I started down the roadside and after a short time found a live female Prionus sp. (later determined to represent P. integer). The only female Prionus I had ever collected before was P. heroicus, a giant species out in Arizona, and that was almost 30 years ago, so I wasn’t immediately sure what it was. Eventually I decided it must be Prionus, and a quick stop to kick the dirt while Jeff looked for his beetle turned into an intense search for more Prionus that surely were there. I did find two male carcasses shortly thereafter, and then nothing more was seen for the next hour or so.

Prionus integer male | Bent Co., Colorado

Prionus integer male (found dead) | Bent Co., Colorado

During the time that I was searching, however, I started noticing strange burrows in the ground. I excavated a few—they were shallow but contained nothing. Nevertheless, they matched the size of the beetles perfectly—surely there was a connection?

Prionus integer adult burrow.

Prionus integer adult burrow.

I wondered if Jeff knew about the beetles occurring here, but when I showed him what I had found the surprised look on his face told me this was not the case. I showed him the burrows, and we both agreed they had to be connected. I got the shovel out of the truck and walked back to the area where I had seen the live female, then sunk the shovel deep into the ground next to one of the burrows and pried up a chuck of the soil containing the burrow in its entirety. As we broke apart the soil another female was revealed, and we immediately decided to set out some traps baited with prionic acid lures. We expected the beetles to become active during dusk, so we went into town to get something to eat and then check out another nearby locality before returning to the site at dusk. While we were gone it rained heavily at the site, so we weren’t sure if or how this would affect beetle activity and their possible attraction to the traps. However, as we approached the site (slipping and sliding on the muddy 2-track), we could actually see beetles crawling on the road from afar. What we found when we got out of the car was nothing short of mind-blowing—the beetles were everywhere, crawling on the road, crawling through the grass, and overflowing in the flooded traps! The vast majority were males, as expected, but we also found a fair number of the much more rarely collected females. This was significant, as the chance to observe mating and oviposition behavior made the encounter far more informative than if we had only found and collected the much more numerous males.

Prionus integer mating pair.

Prionus integer mating pair.

The following day we headed south into northeastern New Mexico to look at some shortgrass prairie sites near Gladstone (Union Co.) where two species of Prionus had been collected in recent years: P. fissicornis (the lone member of the subgenus Antennalia) and P. emarginatus (one of eight species in the poorly known subgenus Homaesthesis, found primarily in the Great Plains and Rocky Mountains). Fresh off of our experience the previous day, we were on the lookout for any suspicious looking “burrows” as we checked the roadsides at several spots in the area but found nothing, and while a few blister beetles piqued the interest of Jeff at one site, the complete absence of woody vegetation or flowering plants in general in the stark grassland landscape made the chances of me finding any other woodboring beetles remote. Eventually I became distracted by the lizards that darted through the vegetation around us, including this lesser earless lizard (Holbrookia maculata) and a collared lizard (better photos of both forthcoming).

Holbrookia maculata (lesser earless lizard) | Union Co., New Mexico.

Holbrookia maculata (lesser earless lizard) | Union Co., New Mexico.

Despite no clues to suggest that Prionus beetles were active in the area, we set out some traps at two sites with soil exposures that seemed similar to those seen the day before. As Jeff set the last pair of traps in place, my distraction with saurian subjects continued with a dusty hognose snake (Heterodon nasicus gloydi). While photographing the animal I looked down to my side, and what did I see but a male Prionus fissicornis crawling through the vegetation! I called out to Jeff, and for the next half an hour or so we scoured the surrounding area in a failed attempt to find more. We would not be back until the next morning to check the traps, so our curiosity about how abundant the beetles might be would have to wait another 18 hours. We cast an eye towards the north and watched late afternoon thunderstorms roll across the expansive landscape and decided to check out the habitat in nearby Mills Rim.

Thunderstorms over shortgrass prairie.

Thunderstorms over shortgrass prairie.

The rocky terrain with oak/pine/juniper woodlands at Mills Rim was a dramatic contrast to the gently rolling grasslands of the surrounding areas. We came here mostly out of curiosity, without any specific goal, but almost immediately after getting out of the car a huge Prionus male flew up to us—almost surely attracted by the scent of the lures we were carrying. Within a few minutes another male flew in, and then another. Because of their huge size and occurrence within oak woodland habitat, we concluded they must represent P. heroicus, more commonly encountered in the “Sky Islands” of southeastern Arizona. We stuck around to collect a few more, but as dusk approached we returned to the surrounding grasslands to set out some lures to see if we could attract other Prionus species. The frontal system that had waved across the landscape during the afternoon had left in its wake textured layers of clouds, producing spectacular colors as the sun sank inexorably below the horizon.

Sunset over shortgrass prairie.

Sunset over shortgrass prairie.

This attempt to collect grassland Prionus beetles would not be successful, and as dusk progressed we became distracted collecting cactus beetles (Moneilema sp., family Cerambycidae) from prickly pear cactus plants (Opuntia sp.) before darkness ended our day’s efforts. This did not mean, however, that all of our efforts were done—there are still night active insects, and in the Great Plains what better nocturnal insect to look for than North America’s largest tiger beetle, the Great Plains giant tiger beetle (Amblycheila cylindriformis, family Cicindelidae—or subfamily Cicindelinae—or supertribe Cicindelitae, depending on who you talk to)?! We kept our eyes on the headlamp illuminated 2-track as we drove back to the highway and then turned down another road that led into promising looking habitat. Within a half-mile of the highway we saw one, so I got out to pick it up and then started walking. I walked another half-mile or so on the road but didn’t see anything except a few Eleodes darkling beetles (family Tenebrionidae), then turned around and walked the habitat alongside the road on the way back. As I walked, tiny little rodents—looking like a cross between a mouse and a vole—flashed in and out of my headlight beam as they hopped and scurried through the vegetation in front of me. Most fled frantically in response to my attempted approach, but one, for some reason, froze long enough under my lamp to allow me this one photo. When I posted the photo on my Facebook page, opinions on its identity ranged from kangaroo rat (Dipodomys sp.) silky pocket mouse (Perognathus flavus) to jumping mouse (Zapus sp.). Beats me.

silky pocket mouse? Zapus sp., jumping mouse? | Union Co., New Mexico.

Kangaroo rat? Silky pocket mouse? Jumping mouse? | Union Co., New Mexico.

Almost as if by command, it rained during the early evening hours where we had set the traps, and the following morning we were rewarded with traps brimming with Prionus fissicornis males. Not only were the traps full, but males were still running around in the vicinity, and we even found a few females, one of which was in the act of ovipositing into the soil at the base of a plant.

Prionic acid-bated traps w/ Prionus fissicornis males.

Prionic acid-bated traps w/ Prionus fissicornis males.

Prionic acid-bated traps w/ Prionus fissicornis males.

Prionic acid-bated traps w/ Prionus fissicornis males.

Prionus fissicornis male | Harding Co., New Mexico.

Prionus fissicornis male | Harding Co., New Mexico.

Prionus fissicornis oviposition hole.

Prionus fissicornis oviposition hole.

Eventually P. fissicornis activity subsided, and we decided to go back to the area around Mills Rim to see what beetles we might find in the woodland habitats. We also still were not sure about the Prionus beetles we had collected there the previous day and whether they truly represented P. heroicus. The scrubby oaks and conifers screamed “Beat me!”, and doing so proved extraordinarily productive, with at least a half-dozen species of jewel beetles collected—including a nice series of a rather large Chrysobothris sp. from the oaks that I do not recognize and a single specimen of the uncommonly collected Phaenops piniedulis off of the pines.

Oak/juniper woodland at Mills Canyon, habitat for Prionus heroicus.

Oak/juniper woodland at Mills Canyon, habitat for Prionus heroicus.

Not only is the scenery at Mills Rim Campground beyond spectacular, it also boasts some of the most adoringly cute reptiles known to man—such as this delightfully spiky horned lizard (I prefer the more colloquial name “horny toad”!). I’m probably going to regret not having photographed this fine specimen with the big camera.

Phrynosoma cornutum (Texas horned lizard) | Harding Co., New Mexico.

Phrynosoma cornutum (Texas horned lizard) | Harding Co., New Mexico.

Fresh diggings beside a rock always invite a peek inside. You never know who might be peeking out.

Who's home?

Who’s home?

Peek-a-boo!

Peek-a-boo!

The trip having reached the halfway point, we debated whether to continue further south to the sand dunes of southern New Mexico (with its consequential solid two-day drive back to Wichita) or turn back north and have the ability to collect our way back. We chose the latter, primarily because we had not yet had a chance to explore the area around Vogel Canyon south of Las Animas, Colorado. We had actually planned to visit this area on the day we encountered P. integer in the shortgrass prairie north of town, and a quick visit before going back to check the traps that evening showed that the area had apparently experienced good rains as shown by the cholla cactus (Cylindropuntia imbricata) in full bloom.

Cylindropuntia imbricata | Otero Co., Colorado.

Cylindropuntia imbricata | Otero Co., Colorado.

Whenever I see cholla plants I can’t help myself—I have to look for cactus beetles (Moneilema spp.). It had rained even more since our previous visit a few days ago, and accordingly insects were much more abundant. Several Moneilema adults were seen on the cholla, one of which I spent a good bit of time photographing. The iPhone photo below is just a preview of the photos I got with the big camera (which also included some very impressive-sized cicadas—both singing males and ovipositing females). The cactus spines impaled in the camera’s flash control unit serve as a fitting testament to the hazards of photographing cactus insects!

Moneilema sp. on Cylindropuntia imbracata } Otero Co., Colorado.

Moneilema sp. on Cylindropuntia imbracata } Otero Co., Colorado.

The hazards of photographing cactus beetles.

The hazards of photographing cactus beetles.

Later in the afternoon we hiked down into the canyon itself, and while insects were active we didn’t find much out of the ordinary. We did observe some petroglyphs on the sandstone walls of the canyon dating from the 1200s to the 1700s—all, sadly, defaced by vandals. Despite the rather uninspiring collecting, we stayed in the area for two reasons: 1) Jeff wanted to setup blacklights at the canyon head in hopes of collecting a blister beetle that had been caught there on an earlier trip, and 2) I had noted numerous Amblycheila larval burrows in the area (and even fished out a very large larva from one of them) and wanted to search the area at night to see if I could find adults. Jeff was not successful in his goal, and for a time I thought I would also not succeed in mine until we closed up shop and started driving the road out of the canyon. By then it was after 11 p.m. and we managed to find about a half-dozen A. cylindriformis adults. This was now the third time that I’ve found adults of this species, and interestingly all three times I’ve not seen any beetles despite intense searching until after 11 p.m and up until around midnight.

Lithographs on canyon wall | Mills Canyon, Colorado.

Lithographs on canyon wall | Mills Canyon, Colorado.

The next morning we found ourselves with two days left in the trip but several hundred miles west of Wichita, where I needed to drop Jeff off for his flight back home before I continued on home to St. Louis. I had hoped we could make it to the Glass Mountains just east of the Oklahoma panhandle to see what Prionus species might be living in the shortgrass prairies there (and also to show Jeff this remarkable place where I’ve found several new state records over the past few years). As we headed in that direction, I realized our path would take us near Black Mesa at the western tip of the Oklahoma pandhandle, and having been skunked on my first visit to the area last year due to dry conditions but nevertheless intrigued by its very un-Oklahoma terrain and habitat I suggested we stop by the area and have a look around before continuing on to the Glass Mountains. We arrived in the area mid-afternoon and headed straight for a rock outcropping colonized by scrub oak (Quercus sp.) and pinyon pine (Pinus sp.)—very unusual for western Oklahoma—that I had found during my previous trip.

The author looks pensively out over the Black Mesa landscape.

The area around Black Mesa couldn’t be more unlike the perception that most people have of Oklahoma.

I wanted to beat the oaks for buprestids—surely there would be a state record or two just sitting there waiting for me to find them, but as I started walking from the car towards the oaks the approach of a loud buzz caught my attention. I turned around to see—would you believe—a large Prionus beetle circling the air around me and was fortunate to net it despite its fast and agile flight. I hurried back to the car to show Jeff what I had found; we looked at each other and said, “Let’s collect here for a while.” The beetle had apparently been attracted to the lures in the car, so we got them out, set them up with some traps, and went about beating the oaks and watching for beetles to fly to the lure. Sadly, no  jewel beetles were collected on the oaks, although I did find evidence of their larval workings in some dead branches (which were promptly collected for rearing). Every once in a while, however, a Prionus beetle would fly in, apparently attracted to the lure but, curiously, never flying directly to it and falling into the trap. Many times they would land nearby and crawl through the vegetation as if searching but never actually find the trap. However, just as often they would approach the trap in flight and not land, but rather continue circling around in the air for a short time and before suddenly turning and flying away (forcing me to watch forlornly as they disappeared in the distance). Based on their very large size, blackish coloration and broad pronotum, we surmised (and later confirmed) these must also be P. heroicus, despite thinking (and later confirming) that the species was not known as far east as Oklahoma. Not only had we found a new state record, but we had also recorded a significant eastern range extension for the species. And to think that we only came to Black Mesa because I wanted to beat the oaks!

Prionus heroicus male

Prionus heroicus male

Bite from Prionus heroicus male.

Proof that Prionus heroicus males can bite hard enough to draw blood!

We each collected a nice series of the beetles, and despite never witnessing the beetles actually going to the traps a few more were found in the traps the next morning after spending the night in a local bed & breakfast. I also found a dove’s nest with two eggs hidden in the vegetation, and as we were arranging for our room at the bed & breakfast a fellow drove up and dropped off a freshly quarried dinosaur footprint (the sandstone, mudstone, and shale deposits around Black Mesa are the same dinosaur fossil bearing deposits made more famous at places like Utah’s Dinosaur National Monument).

Dove's nest w/ eggs.

Dove’s nest w/ eggs.

Dinosaur fossil footprint

Freshly quarried dinosaur fossil footprint

By the way, if you ever visit the area, the Hitching Post at Black Mesa is a great place to stay. A longhorn skull on the barn above an authentic 1882 stagecoach give a hint at the ambiance, and breakfast was almost as good as what my wife Lynne can do (almost! 🙂 ).

Longhorn skull on barn at our Bead and Breakfast.

Longhorn skull on barn at our Bead and Breakfast.

132-year-old stagecoach - model!

132-year-old stagecoach – model!

After breakfast we contemplated the long drive that lay between us and our arrival in Wichita that evening—our longer than expected stay in the area had virtually eliminated the possibility to collect in the Glass Mountains. Nevertheless, there was one more thing that I wanted to see before we left—the dinosaur footprints laying in a trackway along Carrizo Creek north of the mesa. I only knew they were in the area based on a note on a map, but as there were no signs our attempt to find them the previous day was not successful. Armed with detailed directions from the B&B owners, however, we decided to give it one more shot. Again, even after we found the site I didn’t see them immediately, I suppose because I was expecting to see distinct depressions in dry, solid rock. Only after the reflections of light from an alternating series of small puddles—each measuring a good 10–12″ in diameter—did I realize we had found them. Recent rains had left the normally dry creek bed filled with mud, with the footprints themselves still filled with water.

Dinosaur tracks | vic. Black Mesa, Oklahoma.

Dinosaur tracks | vic. Black Mesa, Oklahoma.

It is not surprising that I would be so excited to find the tracks, but what did surprise me was the effect they had on me. Seeing the actual signs of near mythical beasts that lived an incomprehensible 100 million years ago invites contemplation and reminds us that our time here on Earth has, indeed, been short!

Dinosaur tracks | vic. Black Mesa, Oklahoma.

Dinosaur tracks | vic. Black Mesa, Oklahoma.

By this time, we had no choice but to succumb to the long drive ahead. We did manage to carve out a short stop at the very first locality of the trip in an effort to find more Buprestis confluens (finding only a few more B. rufipes), but otherwise the day was spent adhering to our goal of reaching Wichita before nightfall. Jeff was home and sipping tea before lunchtime the next day, while I endured one more solid day of driving before making it back to St. Louis in time for dinner with the family. At that point, the trip already could have been considered a success, but how successful it ultimately ends up being depends on what beetles emerge during the next season or two from these batches of infested wood that I collected at the various spots we visited.

Wood collected for rearing wood-boring beetles.

Wood collected for rearing wood-boring beetles.

If you like this Collecting Trip iReport, you might also like the iReports that I posted for my 2013 Oklahoma and 2013 Great Basin collecting trips as well.

© Ted C. MacRae 2014

Sunset beetles

Acmaeodera immaculata? | vic. Vogel Canyon, Colorado.

Acmaeodera immaculata? (family Buprestidae) | vic. Vogel Canyon, Colorado.

Regular readers of this blog know that I am fond of natural sky backgrounds for insects found during the day on flowers and foliage. Not only does the sky provide a clean, uncluttered background that allows the subject to stand out, it also gives the photo a more appropriate temporal flavor—i.e., photographs of diurnal insects should look like they were taken during the day. It’s a little bit tricky setting the camera to allow flash illumination of the subject while still allowing the sky to register as well, but I find such photographs more pleasing and interesting than those with a jet-black background, typical in flash macrophotography, and far more pleasing than those with a jumble of sticks and weeds cluttered behind the subject. These days my daytime insect photos almost always incorporate a blue-sky background (examples here and here) unless: 1) I actually photographed the subject at night (examples here and here); or 2) I wish to highlight an intensely white or delicately structured subject (examples here and here).

Aulicus sp. | vic. Black Mesa, Oklahoma

Trichodes oresterus? (family Cleridae) | vic. Black Mesa, Oklahoma

But what about in between day and night—specifically, sunset? Incorporating a sunset sky into a flash-illuminated macrophotograph is even trickier than incorporating a blue midday sky because the central problem—low light levels—is magnified. Blue sky photographs challenge the fast shutter speeds and high f-stops usually needed for macrophotographs, but relatively minor adjustments to ISO, shutter speed, and f-stop are usually sufficient to allow the sky to register while still being able to maintain depth of field and minimize motion blur. At sunset, however, because there is much less illumination of the sky, more aggressive settings are often required to allow the sky to register on the camera sensor—settings that can sometimes result in too much motion blur or insufficient depth of field. These problems can be mitigated to some degree with the use of a tripod (and very cooperative subjects), but for dedicated “hand-held” enthusiasts like myself this is not an option. Why bother? Because the results can be spectacular! The setting sun often creates stunning colors not seen at other times of the day and offer a change of pace from blue skies, which, like black backgrounds, can start looking rather monotonous if used exclusively in one’s portfolio.

Linsleya convexa | vic. Vogel Canyon, Colorado

Linsleya convexa (family Meloidae) | vic. Vogel Canyon, Colorado

The photos featured in this post were taken during several sunsets on a trip earlier this past summer through Colorado and Oklahoma. I especially like the jewel beetle (Acmaeodera immaculata?) photograph—technically it has good focus and depth of field and a pleasing composition, but I really like the color coordination between the beetle, flower, and sky. The checkered beetle (Trichodes oresterus?) photograph is also very pleasing, especially the detail on the beetle, although the color of the sky is only somewhat different than a more typical daytime blue. The blister beetle (Linsleya convexa) photograph is probably the most problematic technically due to slight motion blur and being slightly off-focus at the eye—not surprising since of the three this photo had the lowest light conditions. However, the color contrast between the sky and subject make this a nevertheless striking image.

If you have experience with ambient light backgrounds in flash macrophotography, your comments on approaches you’ve taken to deal with reduced light situations will be most welcome.

© Ted C. MacRae 2014

The importance of post-processing

One of the most frustrating realizations I had when I began photographing insects was the fact that photographs didn’t come out of the camera “ready-to-go”—i.e., they still needed to be processed to some degree to make them look good. Even worse, this required processing is to large degree subjective based on the taste of the individual photographer, and as such a “quick manual” describing the exact process in a way that beginners can understand doesn’t exist. Essentially, I didn’t know that when I decided to become an insect photographer, that I would also have to become proficient at photo processing. This frustrates me a lot less now because I’ve finally worked out a process for doing this that works for me and that I am comfortable with, and having done so I also realize that every photographer has to go through this process for themselves to make their photographs look the way they want them to look. That said, I wish I’d had access to some easy tutorials when I was trying to figure out the process that could have saved me some stumbling time before arriving at a process I liked. With that in mind, I thought I would share a quick overview of how I deal with post-processing in the hopes that somebody else mind find a useful tip or two here as they try to figure out their own process. This is not meant to be an exhaustive description of all the post-processing tools that I might use, but rather the typical adjustments that are needed for almost all of the photographs that I take. To illustrate the process, I use a rather basic shot of a cricket that I photographed last week in northeastern Missouri. You can click on each photo to access a larger and better see the issues discussed and resulting enhancements.

Straight from the camera (JPG converted from original RAW file).

The photo above is basically how the shot came out of the camera. These days I shoot only in RAW format, as this allows the maximum amount of data to be retained regardless of how many times the file is accessed. The image above is a JPG converted directly from the unaltered RAW file, and you can see that it looks rather flat and could benefit from levels and color adjustments as well as sharpening and some general “cleaning up” of sensor dust artifacts and debris on the subject. Since I use a Canon body, I have the Digital Photo Professional software that came with the camera, and I also have Photoshop Elements. For my purposes, I’ve found it most convenient to do certain enhancements directly to the RAW file in DPP, generate a TIFF format version of the file from the edited RAW file, and then do the final enhancements to the TIFF file. Since TIFF is also a “loss-less” format, I can then use the enhanced TIFF to generate JPGs of whatever size and resolution on an as-needed basis without worrying about data loss in the full-sized, fully enhanced version of the photo. I think this is preferable to shooting JPGs directly or generating them directly from the RAW file because JPGs are not loss-less files, and as a result every time a JPG is accessed or modified there is a loss of data. Sure, you can go back to the original RAW file and generate a new JPG, but any enhancements made after the first conversion will have to be repeated. Another advantage to making adjustments in DPP is that they are reversable—the original, unaltered RAW file can always be recovered without the need to create multiple backups representing different stages of enhancement.

After initial processing (JPG converted from edited RAW file).

So, what enhancements do I do in DPP? First I open the tool palette and adjust the white balance—in this case it was a full flash photo, so I select “Flash” from the drop-down menu. Then I select the RGB tab and adjust the upper and lower levels on the histogram. The general approach is to cut off data-lacking areas at either extreme, but there is also a lot of subjectivity in deciding what “looks right”. I then open the Stamp Tool (I find cloning adjustments easier and more effective in DPP than in PS) and clone out dust marks in the background (I know, I need to clean my sensor) and debris on the subject. On that last point, there are purists who will argue that this is an “unnatural” alteration. I take a much less conservative position on such alterations, since in my opinion the entire photograph itself is the result of interpretation—not just of the photographer, but of the equipment used and settings chosen. If debris on the subject is an important aspect of the subject’s natural history, then it should remain. However, in most cases, dirt flecks on the subject are not an important part of the story and provide an unnecessary detraction from the aesthetic appearance of the photo. If any cropping is necessary I prefer to do this also in DPP since this is reversible should I change my mind at some point in the future. The second photo above shows what the image looks like after this initial round of post-processing in DPP. At this point, the RAW file is ready to be converted to TIFF format for final post-processing in PS.

After additional processing in Photoshop (jpg converted from edited TIFF).

After additional processing in Photoshop (jpg converted from edited TIFF).

Because I’ve done much of the levels adjustment and cloned out any flaws in DPP, the original TIFF needs only minor adjustments. I generally like to start with “Autocorrect” and see what it does, as this function usually does a good job of toning down highlights and shadows and especially giving a more natural color to blue sky backgrounds such as in this photo. If I don’t like the result from Autocorrect, I hit Ctrl+Z and adjust levels and color manually until I like the result. I find that most photos still benefit from a little bit of brightening and increased contrast (usually ~10% each), and this often also serves to add a little color saturation that is generally sufficient but can sometimes be too much. If the latter occurs, it’s an easy matter to adjust the saturation back down a little bit. After the levels and color are fully adjusted the only thing left to do is apply unsharp mask to sharpen up the photo and bring out the detail—remember to zoom the image to 100% to get the best view of how the settings affect the appearance of the photo, as the settings that you will need depend greatly on the size of the image. Once these adjustments are made, I save a new version of the file (I like to append the file name with “_enh”). The third photo above represents the final enhanced version, and it is this file that I will use to generate JPGs of whatever size I need on an as-needed basis. The original TIFF can be retained if desired, but since an identical version can always be generated anew from the enhanced RAW file this is not essential.

The head slightly narrower than the pronotum and early spring occurrence of this large nymph make me think this is the northern woods cricket (Gryllus vernalis).

The head slightly narrower than the pronotum and early spring occurrence of this large nymph in northeastern Missouri make me think this is the northern wood cricket (Gryllus vernalis).

I hope you’ve found one or tips of use in this little tutorial, which I end with the above frontal portrait of the subject shown in the previous photos. Based on its all black color, the head slight narrower than the pronotum, and its early spring occurrence as a late-instar nymph in northern Missouri, I take this to be a northern wood cricket, Gryllus vernalis, but of course I am open to being corrected by somebody more knowledgeable about crickets than I.

Copyright © Ted C. MacRae 2014

Best of BitB 2013

Welcome to the 6th Annual “Best of BitB”, where I pick my favorite photographs from the past year. Like last year, 2013 was another year of heavy travel. For work I did my annual tour of soybean field sites throughout Argentina during late February and early March, then cranked it up for my own field season with frequent travel to sites in Illinois and Tennessee from May to October. In the meantime I spent a week at company meetings in Las Vegas in August, toured field sites across the southeastern U.S. for two weeks in September, visited Argentina again in October to finalize research plans for their upcoming season, and finished off the travel year by attending the Entomological Society of America (ESA) Meetings in Austin, Texas during November. On top of all this, I managed to slip in two of the best insect collecting trips I’ve had in years, with 10 days in northwestern Oklahoma in early June and another 10 days in California, Nevada, Utah, and Colorado during late August, and I got to play “visiting scientist” during short trips to Montana State University in late July and the Illinois Natural History Survey in late October! Of course, during my brief interludes at home I wasn’t sitting still, giving entomology seminars to several local nature societies and hosting two ESA webinars on insect photography. Needless to say, come December I was more than ready to spend some quite time at home (well, except for hiking most weekends) and am happy to report that I’ve successfully become reacquainted with my family and office mates. It’s a peripatetic life—and I wouldn’t have it any other way!

Okay, let’s get down to business. Here are my favorite BitB photographs from 2013. This year was less about learning new techniques as it was about refining the techniques I’ve found most useful for the style I’ve chosen as a photographer, i.e., hand-held, in situ field shots that (hopefully) excel at both natural history and aesthetic beauty. Links to original posts are provided for each photo selection, and I welcome any comments you may have regarding which (if any) is your favorite and why—such feedback will be helpful for me as I continue to hone my craft. If you’re interested, here are my previous years’ picks for 2008, 2009, 2010, 2011, and 2012. Once again, thank you for your readership, and I hope to see you in 2014!


Tremex columba, female ovipositing | Sam A. Baker State Park, Missouri

Tremex columba female drilling for oviposition into hardwood trunk | Sam A. Baker State Park, Missouri

From Ovipositing Pigeon Horntail (posted 6 Jan). I like this photo for the combination of vibrant, contrasting colors between the wasp and moss-covered wood and the visualization it provides of the remarkable depth to which this wasp will insert its ovipositor into solid wood!


Eurhinus cf. adonis on Solidago chilensis | Chaco Province, Argentina

Eurhinus cf. adonis on Solidago chilensis flowers | Chaco Province, Argentina

From Giving me the weevil eye! (posted 28 Apr). While a little soft, the color combination is pleasing and the pose taken by the beetle almost comically inquisitive.


Helicoverpa gelotopeon feeding on soybean pod | Buenos Aires Prov., Argentina

Helicoverpa gelotopeon feeding on soybean pod | Buenos Aires Prov., Argentina

From Bollworms rising! (posted 30 Mar). This is the first photo of an economic pest that has made one of my “Best of BitB” lists. The two holes in the soybean pod, one with the caterpillar and its head still completely inserted, visualizes how the feeding habits of these insects can so dramatically affect yield of the crop.


cf. Eremochrysa punctinervis | Gloss Mountains, Major Co., Oklahoma

cf. Eremochrysa punctinervis | Gloss Mountains, Major Co., Oklahoma

From “Blue-sky” tips and tricks (posted 1 July). Insects with a lot of delicate detail and long, thin appendages are especially difficult to photograph against the sky due to wind movement. See how I dealt with the antennae of this delicate lacewing without resorting to the standard black background typical of full-flash macrophotography.


Cicindela scutellaris lecontei x s. unicolor

Cicindela scutellaris lecontei x s. unicolor intergrade | Holly Ridge Natural Area, Stoddard Co., Missouri

From The Festive Tiger Beetle in Southeast Missouri (posted 25 Oct). I like this photo a lot more now than I did when I first took it. Its shadowy feel and the beetle “peering” from behind a leaf edge give a sense of this beetle’s attempts to hide and then checking to see if the “coast is clear”


Batyle suturalis on paperflower (Psilostrophe villosa) | Alabaster Caverns State Park, Woodward Co., Oklahoma

Batyle suturalis on Psilostrophe villosa flowers | Alabaster Caverns State Park, Woodward Co., Oklahoma

From Tips for photographing shiny beetles on yellow flowers (posted 10 Aug). “Bug on a flower” photos are a dime a dozen, but shiny beetles on yellow flowers with natural sky background can be quite difficult to take. All of the techniques for dealing with the problems posed by such a photo came together nicely in this photo.


Agrilus walsinghami | Davis Creek Regional Park, Washoe Co., Nevada

Agrilus walsinghami | Davis Creek Regional Park, Washoe Co., Nevada

From Sunset for another great collecting trip (posted 1 Sep). This photo is not without its problems, with a little blurring of the backlit fuzz on the plant, but the placement of the sun behind the subject’s head and resulting color combination make it my favorite in my first attempts at achieving a “sun-in-the-sky” background with a true insect macrophotograph.


A tiny male mates with the ginormous female.

Pyrota bilineata on Chrysothamnus viscidflorus | San Juan Co., Utah

From Midget male meloid mates with mega mama (posted 8 Nov). Another blue-sky-background photograph with good color contrast, its real selling point is the natural history depicted. with some of the most extreme size dimorphism among mating insects that I’ve ever seen.


Phymata sp.

Phymata sp. on Croton eleagnifolium foliage | Austin, Texas

From ESA Insect Macrophotography Workshop (posted 13 Nov). The oddly sculpted and chiseled body parts of ambush bugs makes them look like they were assembled from robots. Contrasting the body against a blue sky gives a more unconventional view of these odd beasts than the typical top-down-while-sitting-on-a-flower view.


Fourth attempt - holding detached pad up against sky for cleaner background.

Moneilema armata on Opuntia macrorhiza | Alabaster Caverns State Park, Woodward Co., Oklahoma

From Q: How do you photograph cactus beetles? (posted 24 Nov). Photographing cactus beetles requires patience, persistence, long forceps, and strong forearms. Natural sky provides a much more pleasing background than a clutter of cactus pads and jutting spines.


I hope you’ve enjoyed this 2013 version of “Best of BitB” and look forward to seeing everyone in 2014.

Copyright © Ted C. MacRae 2013

How to be an “iPhone nature photographer”

My passion for insect macro-photography is well known, so it may come as a surprise to learn that I have, during the past year or so, also become an avid “iPhone photographer”—i.e., I actually use my iPhone for “real” photography and not just selfies or quick snapshots. This is not to say that an iPhone can do everything that a digital SLR camera can do, especially when one considers the resolution of and wealth of lens options available for the latter. Nevertheless, as the world’s best selling smart phone, the iPhone has, by way of its camera function, also become the world’s best selling camera, and even though it cannot match the power of a dSLR, there are certain situations and types of photos for which the iPhone is perfectly adapted. Having gained some level of proficiency in learning what the iPhone can and cannot do when it comes to photography, I thought I would offer this photo set of a hike I did today along the Courtois Section of the Ozark Trail as a primer for the types of photos at which iPhones excel, along with some tips and tricks I’ve learned to get the most of the iPhone’s capabilities.

An iPhone is basically a fully automated, wide-angle camera (although the user can control exposure to some extent by touching the screen at the desired point). As such, it excels at landscape and general nature photos, and its small-diameter lens also allows some use for “wide-angle macro.” iPhones do not do well in low light situations or take true macro photographs (although one can use a variety of “clip-on” lenses to achieve fairly decent macro-photographs of larger insects—I have not tried this myself). As a result, I tend to use the iPhone mostly in good light situations and break out the big camera when the lighting is more challenging or if I want to take “real” macrophotographs. As with all digital photographs, good post-processing is necessary for making iPhone photos look their best, and in general a more aggressive approach than is typical for dSLR photographs will be required. The photos that follow are intended not only to give a flavor of the day’s hike, but also demonstrate my photographic approach and provide tips on composition, exposure, and post-processing. If you have gained experience in iPhone photography and have additional tips and tricks that you would like to share, I would greatly appreciate hearing about them in the comments.

Courtois Creek - immediately at the start we had to make a decision whether we could ford the creek. It was obviously too deep in most places, and we almost turned back, but then saw a path that looked like it might be passable. With air temps of 22F, we stripped off our pants, boots, and socks, packed them in our backpacks, and waded through frigid water that reached just below our hips before reaching the other side. Rich brought a towel, so we were able to dry off before getting dressed again. The whole process took almost a full half-hour.

Courtois Creek – immediately at the start we had to make a decision whether we could ford the creek. It was obviously too deep in most places, and we almost turned back, but then saw a path that looked like it might be passable. With air temps of 22F, we stripped off our pants, boots, and socks, packed them in our backpacks, and waded through frigid water that reached just below our hips before reaching the other side. Rich brought a towel, so we were able to dry off before getting dressed again. The whole process took almost a full half-hour.

This photo was taken into the sun, which can easily result in a washed out sky. To avoid this, I minimized the amount of sky in the photo (which also allowed the ripples in the foreground to be included for a sense of motion) and then touched the screen on the sky to set the exposure. This resulted in a dark photo, but it preserved the rich colors which could then be brought out with aggressive brightening and increasing the contrast in Photoshop. A standard set of commands that I generally use for all iPhone photos (slightly increased saturation, sharpening, and de-speckling) produced the finished version.

Bluffs along Courtois Creek - massive bluffs along the other side of the creek sported fallend boulders the size of dump trucks.

Bluffs along Courtois Creek – massive bluffs along the other side of the creek sported fallen boulders the size of dump trucks.

Another photo taken in the direction of the sun, causing the shadowed side of the rock to turn out very dark. Again I touched the screen on the sky to preserve the blue color and then aggressively lightened in Photoshop. Aggressive brightening generally requires a more aggressive increase in contrast, followed by the standard command set mentioned for the first photo.

We were feeling good about our decision to ford the creek as we hiked below spectacular bluffs.

We were feeling good about our decision to ford the creek as we hiked below spectacular bluffs.

This photo required fairly minimal post-processing since it was shot away from the sun and, thus, had decent native exposure. The bluff face was a little dark and needed minor brightening, but as always I set the exposure in the brightest area of the photo and then post-corrected the dark areas (this is much easier than the opposite, i.e., darkening areas that are too bright, as such areas are often blown and cannot be fixed).

Ozark Trail blaze.

Ozark Trail blaze.

A very close-up shot of a trail blaze. The main watch out with such photos is to ensure the plane of the camera matches the subject precisely, otherwise distortion will cause elongation of one side (making the blaze a trapezoid rather than a rectangle). In post-processing I set the white point in levels by greatly magnifying the image and clicking on a very white part of the blaze to get a more natural looking white rather than the dirty gray that often results when shooting largely white subjects.

Blufftop view of Courtois Creek - from a vantage point several hundred feet above the creek we could look down on our crossing point. I have a fear of heights but nevertheless hung onto the treefall in front of me to inch out for a clear view.

Blufftop view of Courtois Creek – from a vantage point several hundred feet above the creek we could look down on our crossing point. I have a fear of heights but nevertheless hung onto the tree fall in front of me to inch out for a clear view.

This was another photo taken fairly towards the sun. I wanted just a thin band of sky to add a sense of scale to the downward-looking view, but with little sky the camera automatically wanted to expose for the darker foreground, thus blowing the sky. To prevent this, I tilted the camera up slightly to get more sky, touched the screen on the sky to set exposure, then tilted back down to the composition I wanted and took the shot. Post-processing involved aggressive brightening as described for the first two photos above.

Sapsucker damage on an old tree.

Sapsucker damage on an old tree.

I approached this tree from an angle facing the sun, so I simply waited until we passed it and could turn to place the sun behind me while shooting this tree. The trick is to get the right distance for a composition that doesn’t include too much wasted space at the foot of the tree or in its canopy, so this requires some walking back and forth until the right composition is achieved (I do not use the zoom function on the camera unless I have to because of the loss of resolution).

Close-up view of sapsucker damage. Obviously they have been using this tree for many years

Close-up view of sapsucker damage. Obviously they have been using this tree for many years

A closer view of the sapsucker damage—again this is mostly a compositional challenge, which I met by getting close enough to have this interesting “looking up” perspective but still far enough away to include the lowest ring of damage at the bottom of the photo and the highest at the top. Little post-processing other than the standard set was required for this sun-behind-me photograph.

Crystallifolia forms when water drawn from the soil by certain plants oozes out of the stem and contacts frigid air. Additional water pushes out the ice, then freezes itself, resulting in long, thin ribbons of ice that curl around themselves

Crystallofolia forms when water drawn from the soil by certain plants oozes out of the stem and contacts frigid air. Additional water pushes out the ice, then freezes itself, resulting in long, thin ribbons of ice that curl around themselves

For photographing crystallofolia and other small, ground-dwelling features, I like to turn the iPhone so that the lens is on the bottom edge to achieve a true ground-level perspective. The macro capabilities of the iPhone are limited, so in this case I used the zoom function (maybe about 1/3 to full zoom), centered the feature in the photo to get the best exposure and focus, and then did a little more cropping post-processing at the bottom of the photo to minimize the amount of blurred foreground. Again, a mostly white subject such as this tends to come out dull in the native photograph, so I enlarged the image greatly in Photoshop, opened Levels, clicked on set white point, and then clicked on the whitest portion of the subject that I could find to achieve a more ‘naturally’ white subject. It can take a few tries to find a spot in the image that doesn’t result in unnatural over-whitening of the subject—one must play around a bit to find it.

Crustose lichens abound on the dolomite bedrock exposures along the "Narrows" - a long, narrow ridge between the Courtois and Huzzah Creek Valleys.

Crustose lichens abound on the dolomite bedrock exposures along the “Narrows” – a long, narrow ridge between the Courtois and Huzzah Creek Valleys.

Again, I like to use a low perspective for ground features such as these lichen-encrusted rocks strewn across the forest floor. If you let the iPhone focus naturally, it tends to focus on subjects closer to the middle of the photo, so be sure to touch the screen on the foremost subject to set the focus in the foreground. Photos with contrasting colors such as the greens, browns, and blues in this one generally benefit from a little more aggressive increase in saturation (maybe 15-20%) than I normally use for iPhone photos (usually 5-10%).

Close-up view of crustose lichens.

Close-up view of crustose lichens.

A semi- wide-angle macro photograph that combines a lichen encrusted rock in the foreground with forest and sky in the background. The camera will automatically focus on the background, so touch the screen at the top of the foreground object to set focus. It also helps to pan back a little bit to include more in the frame than is desired, then crop a little in Photoshop as the lower part of the foreground object will tend to be out of focus unless it is a perfectly vertical surface (rare). In this photo I cropped out about 1/5 from the bottom and a corresponding amount on each side to maintain original aspect ratio.

More dolomite exposures with crustose lichens.

More dolomite exposures with crustose lichens.

Highly dimensional foreground objects add depth and perspective to low-angle shots. Again, it is better to get a little more in the photo than desired and the crop slightly afterwards than to get too close and not be able to do anything about it. Taking the native shot a little further back also ensures that the entire foreground object is in focus.

Fruticose lichens and moss intermingle in particularly moist spots.

Fruticose lichens and moss intermingle in particularly moist spots.

Like the close-up photo of the lichen-encrusted rock above, this photo of intermingled moss and fruticose lichens benefits from a low perspective with a high color contrast immediate background (fallen leaves) and blurred deep background (forest/sky) to add perspective. While the latter is not completely blurred, but it’s enough that it doesn’t detract from the main subject. The latter has maximal focus by backing up slightly for the shot and then cropping off the bottom out-of-focus portion in Photoshop. Again, I increased saturation a little more than usual to emphasize the value contrast.

Friend and Ozark Trail co-conspirator Rich Thoma looks out over the Huzzah Creek Valley.

Friend and Ozark Trail co-conspirator Rich Thoma looks out over the Huzzah Creek Valley.

The main challenge with this photo was the shadow cast over Rich by the trees behind him. Setting the exposure on him resulted in a washed out sky, which I really wanted to preserve because of the textured clouds. I also wanted to include a good portion of the sky to give the sense of looking out over a far-below valley, so I set the exposure for the sky. The resulting photo had a good sky, but Rich was hidden in a darkly shadowed area. I used lighten shadows in Photoshop to brighten Rich and the shadowed area where he is standing, and I used aggressively increased saturation to make the many different shades of brown in the rest of the photo pop out.

An ancient red-cedar snag hugs the bluff tops overlooking the Huzzah Creek Valley.

An ancient red-cedar snag hugs the bluff tops overlooking the Huzzah Creek Valley.

This photo had largely the same challenges and was dealt with in the same manner as the previous. The ancient red-cedar snag is an interesting and unusual subject, and I first tried a portrait orientation, but I decided I liked this landscape orientation better because of the ability to include living red-cedar to add a sense of time contrast.

Icicles form on an undercut below the bluff top.

Icicles form on an undercut below the bluff top.

Whenever I find icicles hanging from a rock overhang, I like to provide a more unusual perspective by getting behind the icicles and looking out onto the landscape. It can be hard to get the camera to focus on the icicles rather than the distant landscape—just keep touching them on the screen until it works. I used shadow lightening in Photoshop to brighten the dark rock surfaces in the foreground.

A cap of resistant dolomite lines the top of the Huzzah Creek Valley.

A cap of resistant dolomite lines the top of the Huzzah Creek Valley.

This was a difficult photograph—sun on the pines/cedars on the left overexposed them, while shadows on the naturally dark rock bluff surfaces left them underexposed. This photo was made fairly acceptable by using both “darken highlights” and “lighten shadows” (careful—too aggressive with these features results in unnatural-looking photos), followed by brightening and increasing the contrast, and finally by increasing the saturation. It’s still not a great photo, but sometimes you get what you get.

More icicles.

More icicles.

This larger set of icicles was nicely positioned in front of an interestingly sloped landscape with the sun coming from the left. Again, I got behind them, kept touching the screen on the icicles until the iPhone focused on them, and then adjusted the white point setting in Levels in Photoshop to really make them pop against the rich browns of the landscape behind.

Icicles were especially abundant in this section of the bluff tops.

Icicles were especially abundant in this section of the bluff tops.

A fairly easy shot due to the direction of the sun that required no more than the usual amount of post-processing. Note the perspective, which was to have the rock feature begin right at the bottom left corner of the photograph with some sky above it.

Despite subfreezing air temperatures, sunlight causes water to drip from overhanging icicles, causing ice stalagmites on the ground beneath.

Despite subfreezing air temperatures, sunlight causes water to drip from overhanging icicles, causing ice stalagmites on the ground beneath.

This photo had some dark areas in the foreground that were cropped out, and to emphasize the ice I was more aggressive post-processing with brightening and increasing the contrast. Again, as with most photos with a lot of white in the subject, I adjusted the white point in Photoshop Levels to reduce the “dinginess” that seems natural for ambient light iPhone photos.

Icicles glisten in the frigid sunlight.

Icicles glisten in the frigid sunlight.

In this case, the sun glistening on the icicles and a deep recess behind them provided a natural contrast that I further emphasized in post-processing, along with brightening and setting white point. The icicles suffer from distortion due to my low angle (I’m not that tall!), which I tried to fix with Photoshop’s distort feature but wasn’t satisfied with the result.

Close-up of ice stalagmites, revealing the twigs and petioles around which they have formed.

Close-up of ice stalagmites, revealing the twigs and petioles around which they have formed.

The approach with this photo was very much like that used for the close-ups of the lichen-encrusted rocks and intermingled lichens/moss photos—i.e., I backed up a bit to include more foreground than I wanted (which will be blurred at the bottom after setting the focus point on one of the stalagmites) and then cropped it out in post-processing. White subject = setting white point and using more aggressive brightening and contrast.

 Ted MacRae Yesterday ·  Rock, ice, and sunlight converge along the bluff tops


Rock, ice, and sunlight converge along the bluff tops

Again, the formation starts at the lower corner, and in this case the foreground (the right side) also contains an interesting clump of icicles. With the sun behind me, little was required to assure proper exposure, and only normal post-processing was required.

Moss with fruiting structures on a fallen log.

Moss with fruiting structures on a fallen log.

This moss on a fallen log was actually one of the more difficult photographs I took. I took the photo at an angle so that the background fruiting structures would form a solid, blurred red horizon to add depth, but in doing this the iPhone didn’t know where I wanted to focus and kept choosing the background. To force it to “choose” the foreground fruiting structures, I tilted the camera down so that only the foreground was in the frame, touched the screen on the fruiting structures in the back part of the screen to set focus where I wanted, then tilted the screen back again to include the background fruiting structures distant blurred background for perspective. One must shoot quickly when doing this or the iPhone will automatically readjust its focus to the background. I’ve tried shots such as this with the sky in the background, but in my experience the iPhone cannot focus on very thin foreground objects with the sky in the background, and the difference in brightness between the background and foreground is especially difficult to correct. Like the other semi- wide-angle macro shots above, I used the zoom feature (slightly), included a little more in the photo than I wanted, and then cropped out the overly blurred bottom portion of the photo.

Mushrooms on a fallen log.

Mushrooms on a fallen log.

Here is a typical photograph that someone might take of these large, saucer-sized mushrooms on a fallen log. In addition to being a pedestrian view of such a subject, it seems that iPhones sometimes have difficulty registering the correct color for photos taken straight down to the ground. This photo required quite a bit of color correction, and I’m still not overly satisfied with the result.

"Bug's eye" view of mushrooms on a fallen log.

“Bug’s eye” view of mushrooms on a fallen log.

As an alternative, I suggest getting low to photograph subjects such as this. The iPhone, with its lens against one edge and screen view, is well-adapted to take such low-angle photos, resulting in a much more interesting photo than the typical “looking down” perspective exemplified above. Inclusion of a little bit of sky in the background also provided some nice color contrast, made easier by shooting away from the sun, which was further emphasized in post-processing by increasing the saturation. As with the other semi- wide-angle macro photographs, a little bit of cropping along the bottom (but do keep the original aspect ratio) also benefited the photograph.

Moss covering the rock exposures in a delightful valley leading up from the Huzzah Creek Valley indicate an abundance of moisture.

Moss covering the rock exposures in a delightful valley leading up from the Huzzah Creek Valley indicate an abundance of moisture.

Last, but not least, this photograph of shaded, heavily moss-laden rock outcroppings bordering a small waterfall needed to be shot very dark in order to avoid “blowing” the sky in the background. Simply pointing and shooting into the shade will cause the iPhone to correctly expose the rocks, but the sky will be blown rather than retaining its blue color. Like the first two photos, I composed the image, then touched the screen on the sky to reduce the exposure. Again, this resulted in a photo that was very dark in the foreground, but this was easily corrected by aggressive brightening, adding contrast, and increasing the saturation post-processing to achieve a nice mix of browns and greens while preserving the blue sky background. In forest shots such as this with a lot of vertical objects, pay attention to distortion while composing the photo to avoid having trees at the edge of the photo “bowing” inwards at their tops. Sometimes this can be avoided by minor adjustments to the tilt of the iPhone while taking the shot, but if your position in the landscape is such that camera tilt alone is not enough to prevent this without losing the desired composition then go ahead and shoot the desired composition and use the “distortion” tool in Photoshop to correct the distortion this works best if bowing is minor).

I hope you have enjoyed this iPhone nature photography tutorial. If you have additional ideas or suggestions please let me know, and also I would be glad to hear of any related subjects you would like me to cover.

Copyright © Ted C. MacRae 2013

Q: How do you photograph cactus beetles?

A: Very carefully!

This past June I went out to one of my favorite spots in northwestern Oklahoma—Alabaster Caverns State Park in Woodward Co. The park, of course, is best known for its alabaster gypsum cavern—one of the largest such in the world—and the large population of bats that occupies it. Truth be told, in my several visits to the park during the past few years I have never been inside the cavern. The draw for me is—no surprise—it’s beetles. On my first visit in 2009 I found what is now known to be one of the largest extant populations of the rare Cylindera celeripes (swift tiger beetle), previously considered by some to be a potential candidate for listing on the federal endangered species list, and last year I found the northernmost locality of the interesting, fall-active jewel beetle Acmaeodera macra. This most recent visit was the earliest in the season yet, and as I walked the trails atop the mesa overlying the cavern I noticed numerous clumps of prickly pear cactus (Opuntia macrorhiza) dotting the landscape.

Opuntia phaecantha | Alabaster State Park, Woodward Co., Oklahoma

Opuntia macrorhiza | Alabaster Caverns State Park, Woodward Co., Oklahoma

Whenever I see prickly pear cactus anywhere west of Missouri I immediately think of cactus beetles—longhorned beetles in the genus Moneilema. A half-dozen species of these relatively large, bulky, clumsy, flightless, jet-black beetles live in the U.S., with another dozen or so extending the genus down into Mexico and Baja California, and all are associated exclusively with cactus, primarily species of the genus Opuntia. It wasn’t long before I found one, and deliberate searching among the cactus clumps produced a nice series of beetles representing what I later determined as M. armatum. The resemblance between Moneilema spp. and darkling beetles of the genus Eleodes is remarkable, not only in their appearance but also in their shared defensive habit of raising the abdomen when disturbed. The genus has been related taxonomically to the Old World genus Dorcadion, but Linsley & Chemsak (1984) regard the loss of wings and other morphological modifications to represent convergence resulting from the environmental constraints imposed by root-feeding, subterranean habits in arid environments and other situations where flightlessness is advantageous.

Moneilema armatum adult.

Moneilema armatum adult in situ on Opuntia macrorhiza pad.

I have encountered Moneilema beetles a number of times out west, including this species in Texas where it is most common, but since I have only been photographing insects for the past few years this was my first  chance to capture cactus beetle images as well as specimens. The above shot, taken with my iPhone, was straightforward enough, but I wanted some real photographs of the beetle—i.e., true close-up photos taken with a dedicated macro lens. I quickly learned that this would be highly problematic—those cactus spines are long and stiff and vicious, and these beetles are no dummies! Clearly their ability to adapt to such a terrifyingly well-defended plant has had a lot to do with the evolution of their slow, clumsy, flightless, you-don’t-scare-me demeanor. Normally when I photograph insects I do a little pruning or rearranging of nearby vegetation to get a clear, unobstructed view of the subject, and sometimes this also involves “pushing” my way into the vegetation to get the most desirable angle on the subject for the sake of composition. Not so here! In my first attempt, all I could think to do was locate a beetle sitting in repose and try to position myself in some way so that the beetle was within the viewfinder and the cactus’ spines were not impaled within my arms! The photo below shows the only shot out of several that I even considered halfway acceptable, but clearly the spines obstructing the view of the beetle were not going to be to my liking.

First attempt - looking down into plant where beetle was first sitting.

First attempt – looking down into plant where beetle was first sitting.

What to do? The beetle was behaving fairly well (i.e., it was not bolting for cover upon my approach), so I pulled out a pair of long forceps (that I carry with me for just such cases) and used them to gently prod the beetle into a more exposed position. The beetle crawled up onto one of the unopened cactus flower buds and perched momentarily, and I thought I had my winner photograph. I crouched down again, was able to get a little bit closer to the beetle than before, and fired a few shots. Looking at them in the preview window, however, left me still dissatisfied—the beetle was no longer obstructed, but the background was still jumbled, messy and dark, making it difficult for the dark-colored beetle to stand out. I would need to think of something else.

Second attempt - looking down on beetle after coaxing it up.

Second attempt – looking down on beetle after coaxing it up.

I actually take a lot of my photos with the insects sitting on plant parts that have been detached from the plant. This allows me to hold the plant in front of whatever background I choose and micro-adjust the position of the insect in the viewfinder for the best composition. This is “easier” (a relative term) with a shorter lens (think MP-E 65-mm) because the lens-to-subject distance matches almost perfectly the distance between my wrist and my fingers, allowing me to rest the camera lens on my wrist while holding the plant part with my fingers to “fix” the lens-to-subject distance. These beetles, however, are much too big for the MP-E 65-mm, so I had to use my longer 100-mm macro lens. The longer lens-to-subject distance does not allow resting the lens on my wrist, so I must come up with other ways of bracing myself and the subject to minimize movement. Detaching the pad on which the beetle was resting (and if you’ve never tried to detach an Opuntia cactus pad from its parent plant while trying not to disturb a beetle sitting on it, I can tell you it is not an easy thing), I also discovered that the pad was quite heavy and that holding it with the same forceps that I had used to prod the beetle (because of its vicious spines) was yet another unanticipated difficulty. I decided the best way to deal with it would be to get down on one knee in front of the plant, rest my arm on my other knee with the cactus pad extending out in front of me, and photograph the beetle with the plant as close in the background as possible to achieve a lighted and colored background that would help the beetle stand out. Following are examples of those attempts.

Third attempt - holding detaching pad with forceps for better view.

Third attempt – holding detaching pad with forceps for better view.

Detached allows even better close-ups.

Detached allows even better close-ups.

Better for sure, especially the latter, closer one. Still, I wasn’t satisfied—the backgrounds still just had too much clutter that detracted from the beetle and complicated the lighting. I decided to go for broke—why not go for the blue sky background, the cleanest, most natural and aesthetically pleasing background possible! This actually was my first thought when I saw the beetles, but I could never find one on a high enough plant that was growing in a situation where I was able to crouch low enough to get the angle with the sky in the background. By this time my arm was quite weak from holding the heavy cactus pad and squeezing the forceps firmly, and as I contemplated how I could possibly hold the pad up towards the sky and take the shots without being able to rest the camera on my arm I had an idea. Why not rest my arm on the camera? Specifically on top of the flash master unit atop the camera. I adjusted the camera settings for blue sky background, positioned the cactus pad in the forceps so that the pad (and beetle) were hanging down from the forceps but still in an upright position, pointed the camera to the brightest part of the sky (a few degrees from the sun), and then held the cactus pad out in front of the camera with my arm resting on the flash master unit. It worked! My arm still got tired quickly and needed frequent breaks, and I had to do a number of takes to get the exposure settings and composition I was looking for, but the photo below represents my closest approach to what I envisioned when I first knelt down to photograph these beetles. A clear view of the beetle, on its host plant, with lots of nice value contrast between beetle, plant and background.

Fourth attempt - holding detached pad up against sky for cleaner background.

Fourth attempt – holding detached pad up against sky for cleaner background.

Once I had the technique figured out, I was able to get some really close-ups shots as well, still, however, with enough blue sky in the background to make it clean and pretty…

Zooming in with sky background gives a nice, clean close-up.

Zooming in with sky background gives a nice, clean close-up.

…as well as playing with some unusual compositions that one can afford to try only after they are confident they have gotten the required shots. I am particularly fond of the following photo, in which the beetle appears to be “peeking” from behind its well-defended hiding place on its host plant.

Having a little fun with the close-ups - he's peaking!

Having a little fun with the close-ups – he’s peaking!

If you have any experiences photographing these or other such “well-defended” insects (without resorting to the white box!) I would love to hear about them.

REFERENCE:

Linsley, E. G. and J. A. Chemsak. 1984. The Cerambycidae of North America, Part VII, No. 1: Taxonomy and classification of the subfamily Lamiinae, tribes Parmenini through Acanthoderini. University of California Publications in Entomology 102:1–258 [preview].

Copyright © Ted C. MacRae 2013

ESA Insect Macrophotography Workshop

Today is the last day of the Entomological Society of America (ESA) Annual Meeting in Austin, Texas, and it has been an action packed week for me. Annual meetings such as this serve several purposes. In addition to seeing talks on a variety of subjects—in my case covering subjects ranging from insect resistance management to scientific outreach to beetle systematics—they also offer the chance to establish new connections with other entomologists that share common interests and reinforce existing ones. Of course, a major part of my interest in entomology revolves around insect macrophotography, and in recent years ESA has begun to cater to the entomological photographer contingent within the society. Last year’s meetings featured a macrophotography symposium titled, “Entomologists Beyond Borders” (for which I was one of the invited speakers), and this year featured an Insect Macrophotography Workshop led by Austin-based entomologist/photographer Ian Wright. Having done this for a few years now I figured a lot of the workshop might be review for me, but I still have much to learn and am willing to accept new ideas from any source. Besides, the workshop involved a field trip to a local habitat to try out our insect photography skills, and for a field junkie like me time in the field at an otherwise all-indoor event spanning close to a week is always welcome. The location of the meetings in Austin this year made this possible, as even in mid-November there still remain insects out and about that can be photographed if the weather cooperates (and it did).

This will be a somewhat different post than what I usually post here. Rather than featuring photos of a certain species and using them as a backdrop for a more detailed look at their taxonomy or natural history, I’m just going to post all the photos that I ended up keeping from the field trip portion of the workshop with just a comment or two about each. We went to the city’s nearby waste-water treatment facility, the grounds of which are wild and woolly enough to provide habitat for insects, and spent about an hour and a half seeing what we could find. For myself, it was a chance to photograph some insects I’ve not normally tried to photograph (i.e., dragonflies, ambush bugs) and get more practice on my blue sky technique. I did appreciate the chance to spend some time talking to Ian during while we traveled to the site and back, and I also ended up helping other participants with their camera equipment questions and technique suggestions. With that, here are the photos I took—I’ll be curious to see what readers think of this post format versus my more typical style.

Micrutalis calva

Micrutalis calva (Hemiptera: Membracidae) on silverleaf nightshade (Solanum elaeagnifolium).

Micrutalis calva

This species of treehopper is restricted to herbaceous plant hosts.

Anax junius

Anax junius (Odonata: Aeshnidae), one of the darner species of dragonfly.

Anax junius

This adult was perched on a dead twig tip and seemed to be “asleep.”

Anax junius

I clipped the perch and held it up for these “in-your-face” shots – it then awoke with a start and flew off.

Phymata sp.

Phymata sp. (Hemiptera: Reduviidae), one of the so-called “jagged ambush bugs.”

Phymata sp.

Formerly a separate family, ambush bugs are now combined with assassin bugs (family Reduviidae).

Acmaeodera flavomarginata

Acmaeodera flavomarginata (Coleoptera: Buprestidae).

Acmaeodera flavomarginata

This is one of a few species of jewel beetle in the southcentral US that are active during the fall.

Mecaphesa sp.

Mecaphesa sp. (Araneae: Thomisidae), one of the crab spiders

Mecaphesa sp.

Cryptic coloration allows the spider to lurk unseen by potential insect prey visiting the flower.

Gratiana pallidula

Gratiana pallidula (Coleoptera: Chrysomelidae) on silverleaf nightshade (Solanum eleagnifolium).

Gratiana pallidula

A type of tortoise beetle, adults “clamp” down against the leaf as a defense against predators.

Copyright © Ted C. MacRae 2013

Just another ‘bug on white’

“White box” photography seems to have become quite popular for insects during the past couple of years, and what used to be a rarely used technique for photographing insects has become rather commonplace. It’s really not that hard to do—all you need is a camera, a flash, an insect, and… um, a white box. Put the insect in the box (maybe cover it with a petri dish and turn the lights off for a bit of time until it settles down), direct the flash towards the interior of the box, and start shooting. It takes only a little bit of trial and error to dial in the proper flash direction and duration (or flash exposure compensation if you use ETTL), and the results can be dramatic, especially if you post-process to enhance levels, contrast, brightness, etc. You can even cheat a little and skip the white box if you have a good flash diffuser and don’t care that there might be a little bit of gray in the furthest reaches of the background (pleading guilty here)—just place the bug on white paper and shoot away.

Cicindela oregona oregona | Topaz Lake, California

Cicindela oregona oregona | Topaz Lake, California

I guess I can’t complain about the new-found popularity of “bug-on-white” photography—anything that makes insects more appealing to the general public is a good thing, and the purity of the photos seems not only to enhance the appearance of the insects but actually makes them seem… well, “cleaner.” Nevertheless, I’ve only dabbled in bug-on-white photos and not gotten into the technique in a big way. The reason for this is that I still, all things being equal, prefer to photograph insects in the field in their native habitats—hopefully also exhibiting interesting natural behaviors. That is the goal, of course, but it is not always a possibility, especially when it comes to one of my favorite subject groups—tiger beetles. Photographing tiger beetles in the field is a challenge due to their extremely wary habits, swift running and rapid flight capabilities, and penchant for extreme, often hostile habitats. Many times I am up for the challenge and will spend whatever time it takes and suffer all manner of indignance to get the shot. However, there are times when there are other tasks at hand or a perfect storm of conditions makes the beetles simply impossible to approach. This was one of those times.

Cicindela oregona oregona | Topaz Lake, California


We encountered the beetle shown in these photos on the California side of Lake Topaz along its muddy southwestern banks. The beetles were not numerous—unusual for the species Cicindela oregona which can oftentimes be quite abundant along shoreline habitats throughout the western U.S. Time was at a premium, as it was supposed to be just a quick stop to see what might be found as we headed further south into Mono Co. to look for some rather spectacular longhorned beetles in the genus Crossidius unique to the area. An added difficulty was the habitat—the beetles were at the edge of a very shallowly pitched mudflat, preventing us from reaching the water’s edge without sinking deeply into the rancid mud. Between this and their scarce numbers, field photographs would have required more of an investment in time and cleanup than I was prepared to spend, so I netted a few individuals for the record and kept one alive for photographs later that night in the comfort of my hotel room.

xxx

One of the nice things about bug-on-white photographs is the ability to get a variety of carefully executed compositions from the most optimum vantage point. Lateral profile shots are almost a requirement, as are shots with the head of the insect slightly turned towards the lens. Of course, I cannot photograph a tiger beetle and not take the perfectly centered, full-on face shot. In all of these cases, the ability to get the camera truly “down” on the subject’s level means that I can maximize the use of low perspective, and nowadays I don’t even bother with dorsal shots that might be good for some future field guide but that I find really quite boring in their aesthetics.

xxx

In fact, you can even take the low perspective to the extreme by actually elevating the subject and coaxing it towards the edge of its platform to allow photography from below. Compare the above frontal portrait of the beetle, taken from a particularly extreme low perspective, with the photo above it, taken at the same level as the subject. Both photographs provide an interesting and aesthetically pleasing perspective, but in very different ways despite the small change in the angle of the camera—the upper photo is pleasing due more to the symmetry of the composition, while the lower photo derives its interest in the unusual perspective that highlights the setose mouthparts and bulging eyes.

xxx

I have long wanted to photograph a tiger beetle with blue sky background (hat tip to Thomas Shahan for giving me that idea during the inaugural BugShot). Sadly, I have not succeeded in doing this. The main problem is in trying to get an extremely wary subject in just the right place at the right time. Since these beetles occur on the ground rather than being elevated on foliage (at least under normal circumstances in the U.S.), one must find a spot where the ground drops sharply enough to allow the photographer to get below the subject, and then somehow get the tiger beetle to pose right at the edge of the precipice. The above photograph is sort of a simulation of the kind of photo I am striving for, achieved in this case by (are you ready for this?) hanging a pair of blue underwear behind the subject, which is sitting on a piece of white paper placed at the edge of the table. The combination of “blue-sky” and bug-on-white techniques is interesting, but don’t think I’ll be able to rest until I have succeeded in a true field version of this photograph. If anyone manages to achieve this before I do, please let me know how you did it (in exchange for me having given you the idea :)).

Copyright © Ted C. MacRae 2013