Just another ‘bug on white’

“White box” photography seems to have become quite popular for insects during the past couple of years, and what used to be a rarely used technique for photographing insects has become rather commonplace. It’s really not that hard to do—all you need is a camera, a flash, an insect, and… um, a white box. Put the insect in the box (maybe cover it with a petri dish and turn the lights off for a bit of time until it settles down), direct the flash towards the interior of the box, and start shooting. It takes only a little bit of trial and error to dial in the proper flash direction and duration (or flash exposure compensation if you use ETTL), and the results can be dramatic, especially if you post-process to enhance levels, contrast, brightness, etc. You can even cheat a little and skip the white box if you have a good flash diffuser and don’t care that there might be a little bit of gray in the furthest reaches of the background (pleading guilty here)—just place the bug on white paper and shoot away.

Cicindela oregona oregona | Topaz Lake, California

Cicindela oregona oregona | Topaz Lake, California

I guess I can’t complain about the new-found popularity of “bug-on-white” photography—anything that makes insects more appealing to the general public is a good thing, and the purity of the photos seems not only to enhance the appearance of the insects but actually makes them seem… well, “cleaner.” Nevertheless, I’ve only dabbled in bug-on-white photos and not gotten into the technique in a big way. The reason for this is that I still, all things being equal, prefer to photograph insects in the field in their native habitats—hopefully also exhibiting interesting natural behaviors. That is the goal, of course, but it is not always a possibility, especially when it comes to one of my favorite subject groups—tiger beetles. Photographing tiger beetles in the field is a challenge due to their extremely wary habits, swift running and rapid flight capabilities, and penchant for extreme, often hostile habitats. Many times I am up for the challenge and will spend whatever time it takes and suffer all manner of indignance to get the shot. However, there are times when there are other tasks at hand or a perfect storm of conditions makes the beetles simply impossible to approach. This was one of those times.
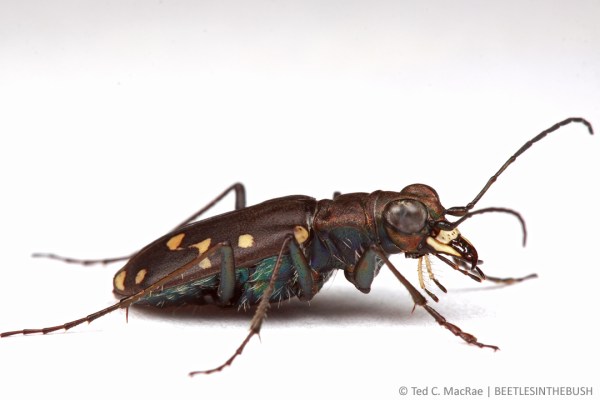
Cicindela oregona oregona | Topaz Lake, California


We encountered the beetle shown in these photos on the California side of Lake Topaz along its muddy southwestern banks. The beetles were not numerous—unusual for the species Cicindela oregona which can oftentimes be quite abundant along shoreline habitats throughout the western U.S. Time was at a premium, as it was supposed to be just a quick stop to see what might be found as we headed further south into Mono Co. to look for some rather spectacular longhorned beetles in the genus Crossidius unique to the area. An added difficulty was the habitat—the beetles were at the edge of a very shallowly pitched mudflat, preventing us from reaching the water’s edge without sinking deeply into the rancid mud. Between this and their scarce numbers, field photographs would have required more of an investment in time and cleanup than I was prepared to spend, so I netted a few individuals for the record and kept one alive for photographs later that night in the comfort of my hotel room.

xxx

One of the nice things about bug-on-white photographs is the ability to get a variety of carefully executed compositions from the most optimum vantage point. Lateral profile shots are almost a requirement, as are shots with the head of the insect slightly turned towards the lens. Of course, I cannot photograph a tiger beetle and not take the perfectly centered, full-on face shot. In all of these cases, the ability to get the camera truly “down” on the subject’s level means that I can maximize the use of low perspective, and nowadays I don’t even bother with dorsal shots that might be good for some future field guide but that I find really quite boring in their aesthetics.

xxx

In fact, you can even take the low perspective to the extreme by actually elevating the subject and coaxing it towards the edge of its platform to allow photography from below. Compare the above frontal portrait of the beetle, taken from a particularly extreme low perspective, with the photo above it, taken at the same level as the subject. Both photographs provide an interesting and aesthetically pleasing perspective, but in very different ways despite the small change in the angle of the camera—the upper photo is pleasing due more to the symmetry of the composition, while the lower photo derives its interest in the unusual perspective that highlights the setose mouthparts and bulging eyes.

xxx

I have long wanted to photograph a tiger beetle with blue sky background (hat tip to Thomas Shahan for giving me that idea during the inaugural BugShot). Sadly, I have not succeeded in doing this. The main problem is in trying to get an extremely wary subject in just the right place at the right time. Since these beetles occur on the ground rather than being elevated on foliage (at least under normal circumstances in the U.S.), one must find a spot where the ground drops sharply enough to allow the photographer to get below the subject, and then somehow get the tiger beetle to pose right at the edge of the precipice. The above photograph is sort of a simulation of the kind of photo I am striving for, achieved in this case by (are you ready for this?) hanging a pair of blue underwear behind the subject, which is sitting on a piece of white paper placed at the edge of the table. The combination of “blue-sky” and bug-on-white techniques is interesting, but don’t think I’ll be able to rest until I have succeeded in a true field version of this photograph. If anyone manages to achieve this before I do, please let me know how you did it (in exchange for me having given you the idea :)).

Copyright © Ted C. MacRae 2013

Under Blood Red Skies

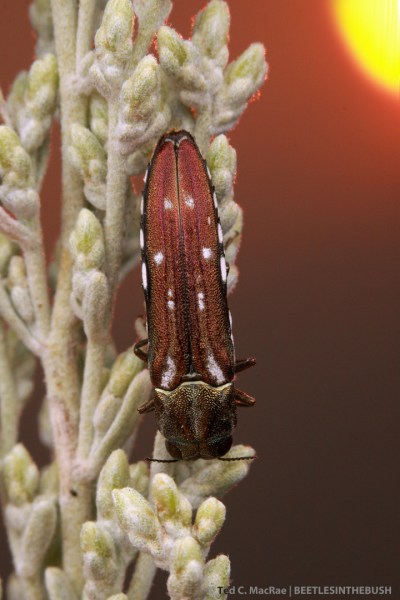
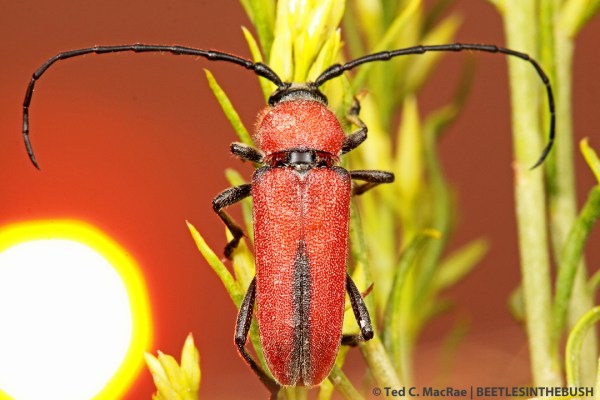
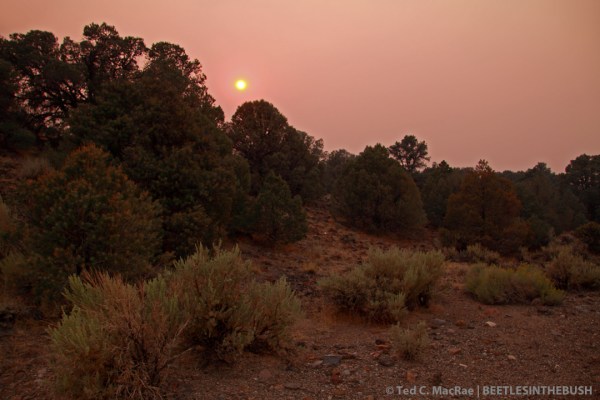
At the start of my recent Great Basin collecting trip, I found myself presented with a rather unique and unanticipated photographic opportunity. As I landed in Reno, Nevada, the then 6-day old Rim Fire was already well on it’s way to becoming the largest wildfire on record in the California Sierra Nevada. As acre after acre of the Sierra’s dramatic coniferous forest succumbed to the blaze, an enormous plum of smoke drifted northward for several hundred miles over eastern California and western Nevada, blanketing the area in a thick haze that turned the sun’s hot glare to a soft glow and limited visibility to under a mile. It was like a thick overcast foggy day, only without the cool, damp humidity. This was of little consequence to our business at hand—collecting beetles (although it did make pointless most attempts to photograph the area’s stunning landscape). At day’s end, however, a dramatic transformation took place in the sky as the sun sank lower and lower, turning to an increasingly red globe as it strained to shine through the ever thicker layer of smoke and haze. Then, for a few brief moments, the sun floated—a dark red globe under blood red skies—before the thick bottom layers of haze finally extinguished its fading light.

I’ve just begun trying to incorporate setting suns into my photography, having made to this point only a few attempts over Midwestern landscapes. I’m not really sure what gave me the idea, but I thought it might be fun to try incorporating the spectacular sun and unusual sky I was seeing as backgrounds in full-flash insect macrophotographs. Perhaps it seemed a logical progression from the natural sky background macrophotographs that I’ve put a lot of effort into perfecting this year. It was certainly a learning experience, but the basic principle is the same as it is for blue sky background—finding the right combination of camera and flash settings to balance flash illumination of the subject with ambient illumination of the background. The most difficult thing was, surprisingly, getting the sun in the desired position within the composition, as it does not appear through the viewfinder as the discrete ball that is seen in the photos. Rather, it appears as a large, amorphous, blinding flash that comes and goes as one pans across it, leading to a lot of guesswork regarding its actual position within the composition.

I gave a sneak preview of one of these photos in Sunset for another great collecting trip, and several of the photos I’ve shared since then have featured the remarkably colored sky in the background. Here are some other attempts that I was happy with:

Agrilus walsinghami (female) | Washoe Co., Nevada

Agrilus walsinghami (female) | Washoe Co., Nevada

Agrilus walsinghami (male) | Washoe Co., Nevada

Agrilus walsinghami (male) | Washoe Co., Nevada

Crossidius coralinus temprans (male) | Pershing Co., Nevada

Crossidius coralinus temprans (male) | Pershing Co., Nevada

Initially hot yellow (previous photo), the sun turns to soft yellow...

Initially hot yellow (previous photo), the sun turns to soft yellow…

...then yellow-red...

…then yellow-red…

...and finally blood-red!

…and finally blood-red!

Crossidius hirtipes macswainei (female) | Lyon Co., Nevada

Crossidius hirtipes macswainei (female) | Lyon Co., Nevada

Sunset over Toiyabe National Forest | Lyon Co., Nevada

Sunset over Toiyabe National Forest | Lyon Co., Nevada

Gray rabbitbrush (Ericameria nauseosa) | Lyon Co., Nevada

Gray rabbitbrush (Ericameria nauseosa) | Lyon Co., Nevada

Copyright © Ted C. MacRae 2013

Sunday Spider: Backlit Araneus

Araneus sp. | Wildwood, St. Louis Co., Missouri

Araneus sp. | Wildwood, St. Louis Co., Missouri

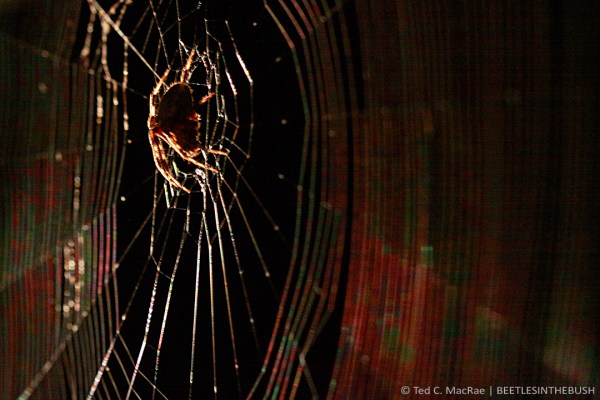
Letting the dog out tonight, I encountered this spider—presumably in the genus Araneus—who had strung up her web in the corner of the doorway and was eerily backlit when I turned on the porch light. Without a tripod that would allow me to position the camera about 7′ above the floor and make use of a super long exposure, my only option for capturing the scene hand-held was to crank the ISO all the way up to 3200, ratchet down the shutter speed to 1/20th sec, and open up the aperture to f/5.6 (any lower and the shallow depth of field would have been unacceptable). Heavy-handed processing to reduce noise and increase sharpness yielded a serviceable photo; however, I’ve been thinking about getting a tripod lately, and the chance to produce much better versions of scenes like this only strengthen those thoughts.

Copyright © Ted C. MacRae 2013
Tips for photographing shiny beetles on yellow flowers

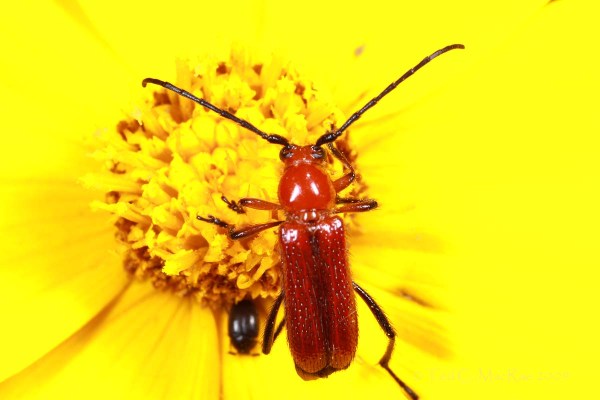
I really hate starting off this post with the following photo—typically it is the first photo in a post that readers see in syndicated feeds; however, I use it in this post to make a point. This photo was taken back in May 2009 and is among the very first photographs that I took after getting my current dSLR camera setup. I was certainly happy enough with it at the time; however, in the following years I have learned a lot about lighting and composition. Such is the curse of any photographer—the further back one goes in their portfolio, the less satisfied they are with the photos taken at a particular point in time. What was then a pretty photo of a shiny, red longhorned beetle on a bright, yellow flower is now teaching material for what not to do when taking photos of shiny beetles on yellow flowers.

One of my first photos of Batyle suturalis, taken in May 2009 | Franklin Co., Missouri

Batyle suturalis on Coreopsis lanceolata | Shaw Nature Preserve, Franklin Co., Missouri

Compare the above with the following much more recently taken photos of the same beetle species from this past June. The beetle is the same, and while the flowers are a different species they are the same intense shade of yellow, but in nearly all respects the photos are far superior to the first. What are the problems with the first photo? First, the smooth and shiny surface of the beetle combined with poor diffusion of the flash has resulted in intense specular highlights on the body of the beetle. This is especially evident in the “twin highlights” on the pronotum of the beetle that is the signature mark of the Canon MT-24EX twin flash unit when used without some type of diffuser. Secondly, the darker color of the beetle requires more flash for adequate illumination than does the much brighter yellow flower—setting the flash power high enough to fully expose the beetle resulted in overexposure of the yellow flower. One cannot even see where one petal ends and another begins. Thirdly, the top-down perspective is, well… boring, no doubt because this is far and away the most commonly used composition in photographs of insects on flowers. Lastly, in my zeal to get as close as possible to the subject, I’ve not only eliminated elements from the background that could add interest in texture to the composition but also clipped the hind tarsus of the beetle itself.

Batyle suturalis on paperflower (Psilostrophe villosa) | Alabaster Caverns State Park, Woodward Co., Oklahoma

Batyle suturalis on Psilostrophe villosa | Alabaster Caverns State Park, Woodward Co., Oklahoma

The first problem is easily addressed by using a good diffuser. It is remarkable that both Canon and Nikon have produced such incredibly effective lenses and flash units for macrophotography, yet completely ignored the demand for diffusers designed to work with them. As a result, most insect macrophotographers have resorted to various do-it-yourself (DIY) designs to fill the void. The diversity in DIY diffuser designs is as large as the diversity of insect macrophotographers, and each person has their own favorite. I have tried many different versions myself, and my current design (admittedly a fusion of ideas stolen from and Alex Wild and Piotr Naskrecki) has produced quite good results. This is evidenced in the more recent photos shown here by the very soft highlights that are spread out evenly over the body of the beetle and not concentrated into intense spots or bands.

Batyle suturalis

Portrait orientation is under-utilized in ”bug on a flower” shots.

The second problem—that of overexposure of the flower to properly expose the beetle—is handled in a simple yet somewhat counter-intuitive manner. I find yellow flowers to be especially prone to overexposure. However, it is much easier to “fix” underexposed than overexposed areas of a photo in post-processing. When a photo is underexposed, all of the data regarding color and hue is still there. It is a simple matter to increase the brightness in the image processing software to restore underexposed areas to their natural brightness. Overexposure, however, is much more difficult to correct, as once the exposure is “blown” there is no data remaining regarding the true color and hue. The only way to fix blown highlights is with the laborious process of cloning over them with nearby areas of the photo that are not blown. Perhaps some can do this quickly and with good results, but I am not one of those people. I like to selectively increase the brightness of underexposed areas using “Lighten Shadows” tool in Photoshop. Be careful, as a light hand is all it takes—overly heavy-handed adjustments look  unnatural.

Batyle suturalis

Side profiles are more interesting than ”top down” shots and allow high color-contrast backgrounds.

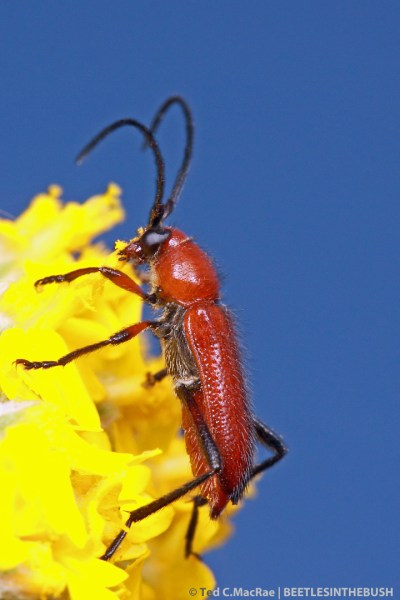
Finally, think about more interesting compositions for your “bug on a flower” photos than the far too commonly used top-down perspective. Getting low relative to the beetle and looking at it from the side or front not only provides a less common view of the subject but also allows for far more creativity in the overall composition. My personal preference for insects on flowers is a blue sky background, which can add a lot of value contrast to photos compared to those in which the entire background consists only of the flower on which the insect is sitting. Use of blue sky background can also further help avoid overexposure of the yellow flower, as the slightly higher ISO and slightly lower aperture settings and shutter speeds used in that technique serve to increase the amount of ambient light contributing to the photo, thereby reducing the amount of illumination needed by the flash. Side views of the insect also facilitate use of portrait orientation—an important consideration if you are interested in producing photos for potential use on journal or magazine covers (nearly always printed in portrait). Also, as you compose your photo, try backing off a bit rather than trying to focus in on the subject as tightly as possible. Backed off views not only avoid the more straightforward problem of clipping parts of the insect but can also result in much more aesthetically pleasing photographs by allowing the incorporation of other elements in the composition for balance, scale, and even a sense of motion or dynamics (as exemplified by the partially buried grass blades in this photo of the Eastern Big Sand Tiger Beetle). Photos can always be cropped in post-processing, and while excessive cropping as a way to artificially increase magnification is to be avoided, there is nothing wrong at all with slight cropping to improve composition.

Copyright © Ted C. MacRae 2013

Registration is now open for my ESA Webinar

Just released from ESA (Entomological Society of America):

Approaching the Unapproachable: Tips and Tricks for Field Photography of Wary Insects presented by Ted MacRae.  Learn valuable field photography techniques from Ted MacRae, Senior Research Entomologist at Monsanto Company.  Ted specializes in photographing tiger beetles in their natural habitats. These colorful beetles are fast runners and powerful fliers, making them among the more difficult insects to approach. Ted will describe some of the techniques that he uses to obtain close-up and macro photographs of these beautiful beetles and also techniques for field photography of other insects as well.

There’s no cost and you learn right from your desktop, laptop, or smart-phone.  This 60 minute webinar takes place August 8 at 2 PM  Eastern Time (US Time) and will be a great investment of your time.

Register for the live Webinar, August 8th at 2 PM Eastern Time (US Time).

Unable to attend, an archive of the presentation will be available at http://www.entsoc.org/students/esa-webinar-series for ESA members only.

Make a list of your pressing questions on this topic, as we’ll allow plenty of time for you to participate in the Q & A portion of the session. You may also send in questions prior to the event and this will assure you that the presenter will address your queries.

After registering you will receive a confirmation email containing information about joining the Webinar.

System Requirements
PC-based attendees
Required: Windows® 7, Vista, XP or 2003 Server

Macintosh®-based attendees
Required: Mac OS® X 10.5 or newer

“Blue-sky” tips and tricks

For the past two years I’ve been working to refine my “blue-sky” technique for insect macrophotographs. This refers to careful balancing of camera and flash settings to achieve full-flash illumination of the subject while still allowing enough ambient illumination from the sky to produce a natural looking blue background. The use of flash, of course, is almost a necessity in insect macrophotography, as it’s nearly impossible to take hand-held photographs of insects, especially small ones, using only ambient light—there just isn’t enough of it to adequately illuminate the subject while using fast shutter speeds to prevent motion blur and high aperture settings to achieve acceptable depth-of-field. Flash illumination, however, has a drawback (actually several, but let’s focus on one)—if there isn’t something else close enough behind the subject to reflect light from the flash, the background will be jet black. In some cases this is perfectly fine, and it is almost always preferred over a cluttered background of jumbled branches and foliage. However, it usually doesn’t work well with darkly colored insects, and to me it gives the undesirable impression that the photo was taken at night. I suppose I could carry around colored cards to place behind the subjects that I photograph, but as a photographer who prides himself on the ability to take in situ field photographs of insects in their native habitats, something about the ‘artificiality’ of colored cards prevents me from resorting to them. A leaf placed behind the subject may be an acceptable alternative, but is usually possible only with quite small subjects (due to the size of the leaf needed) and is virtually impossible in dry, western habitats.

cf. Eremochrysa punctinervis | Gloss Mountains, Major Co., Oklahoma

cf. Eremochrysa punctinervis | Gloss Mountains, Major Co., Oklahoma

It’s hard to recommend specific camera settings for blue sky background, as they must be determined experimentally in each situation. The above photo of what I take to be Eremochrysa punctinervis (a green lacewing in the family Chrysopidae—identification via Frank & Slosser 1996) was taken with a 100mm macro lens set at f/16 and with ISO bumped up slightly to 320 (I normally use ISO 100–200) and shutter speed decreased slightly to 1/160 sec (I normally use 1/200 to 1/250 sec). The higher ISO makes the camera sensor more sensitive to light and the slower shutter speed allows more time for ambient light to reach the sensor. When aimed at the brightest part of the sky (next to but not right at the sun), these settings allowed sufficient light to register this beautiful shade of blue on the camera sensor. The ambient light alone is still not sufficient to illuminate the subject—if the photograph had been taken with these settings but without flash, the background would still be blue, but the subject and branch on which it is sitting would be nearly black! Only a flash pulse occurring while the shutter is open can provide enough light to fully illuminate the subject when the aperture setting is that high. In essence, the photo combines two exposures—a flash-illuminated subject and an ambient-illuminated sky.

Eremochrysa punctinervis | Gloss Mountains, Major Co., Oklahoma

Same photo before cloning out antennal shadowing

One problem that can be encountered when using this technique is the effect of wind. Holding the subject up against the sky exposes it to even the slightest of breezes, which can cause movement of delicate body parts such as the long antennae of this subject. What looks like blurring of the antennae is actually shading of the sky by the antennae as they fluttered in the wind. The antennae themselves were “frozen” by the very short flash pulse—much shorter than the 1/160 sec exposure, but they blocked enough light from the sky during the 1/160 sec exposure to darken the part of the background over which they moved. In the case of the finished photo shown at the beginning of the post, it was a relatively simple matter to use Photoshop’s cloning tool to remove the shadowing. Nevertheless, even more desirable is to avoid the need for such post-processing manipulations to begin with—waiting for a pause in the wind or moving to a more protected location would have obviated the need for PS cleanup.

REFERENCE:

Frank, W. A. & J. E. Slosser. 1996. An Illustrated Guide to the Predaceous Insects of the Northern Texas Rolling Plains. Texas Agricultural Experiment Station, Cotton DVD, Publication #MP-1718, 24 pp.

Copyright © Ted C. MacRae 2013
Oversized, double-concave diffuser for MT-24EX twin flash

IMG_2865_enh_1080X720

Megaloxantha bicolor palawanica, photographed with oversized, double-concave diffuser

This jewel beetle is, of course, Megaloxantha bicolor palawanica me beetle on several occasions while testing out different diffuser designs for my Canon MT-24EX twin flash unit. In the most recent one, I had tried combining SoftBoxes with my oversized concave diffuser and was pleased enough with the result that I thought I might try it in the field. Well, let’s just say the extensions for the flash heads and SoftBoxes attached to them was far too clumsy for field use, and I abandoned the idea after just a couple of hours. Back to the drawing board.

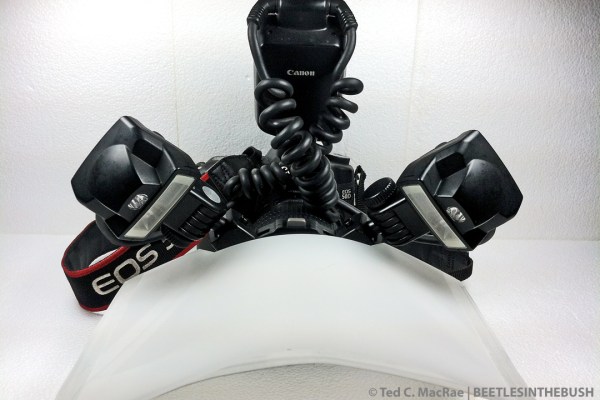
Despite the problems with using the SoftBoxes in the field, I still wasn’t ready to give up on the idea of double diffusion, and I had also learned that extending my oversized diffuser out over the subject (leaving it “open”) produced better lighting than curling it back (as I had been doing). Curling the diffuser back only served to turn it into a convex diffuser, which results in more specular highlighting because the center of the diffuser is closer to the subject than the edges. A concave diffuser provides more even lighting because all parts of the diffuser are roughly the same distance from the subject. Just about that time, I saw a DIY diffuser design by Piotr Nascrecki that, in principle, resembled Alex Wild‘s tent diffuser. It was, however, much larger—like mine, and thus amenable for use with a 100mm macro lens (the macro lens I use most commonly). This resemblance to Alex’s diffuser did make me notice one missing feature—double diffusion layers. That’s when I thought, why not do the same with an oversized diffuser rather than fussing with separate diffusers attached to the flash heads? I had some Bogen Imaging filter sheets on hand (#129 Heavy Frost), so I picked up some 1-mm steel wire at the hardware store, found a Bic pen in the drawer that I could cut in half, and built the diffuser as shown in Piotr’s post. I then secured a second filter sheet above the first sheet by taping the two together along their sides, being sure to ‘bow’ the upper sheet above the bottom sheet to achieve the double diffusion effect. Here is the result (please excuse the iPhone shots):

Oversized double diffuser for Canon MT-24EX twin flash.

Canon 50D with MT-24EX twin flash and oversized, double-concave diffuser.

IMG_0939_enh_1080X720

Better view of the double diffusion layers and Piotr’s “Bic pen” attachment system.

I have big hopes that this will finally be the diffuser I’ve been looking for. For as quick a test shot as the jewel beetle photo above was, the lighting is great and the colors are vibrant—both achieved with typical post-processing. My only complaint is the slightly greater “hot spot” intensity in the lower parts of the highlights in the eyes. This is due to the flash heads sitting near the base of the diffuser, and (as Piotr recommends) a second set of Kaiser shoes will allow me to move the flash heads not only more towards the center of the diffuser but also further above it to help spread out the light throw and even out the highlights. I’ll need to play around positioning the flashes to figure out the best positions depending on the size and distance of the subject—sitting up higher as they are puts them more on “top” than in “front” of the subject, so they will need to be directed downward more than I am used to doing. Even more important, however, is field usability, and I really think this diffuser will prove to be convenient and easy to use in the field—no more gawky arms attached to the camera, the diffuser attaching quickly and easily and, just as importantly, coming off easily and storing flat in the backpack, and large enough to do the job while not so oversized that it gets in the way. Piotr says this diffuser also works well with the 65mm macro lens, so I will certainly be testing that out as well.

Copyright © Ted C. MacRae 2013
Giving me the weevil eye!

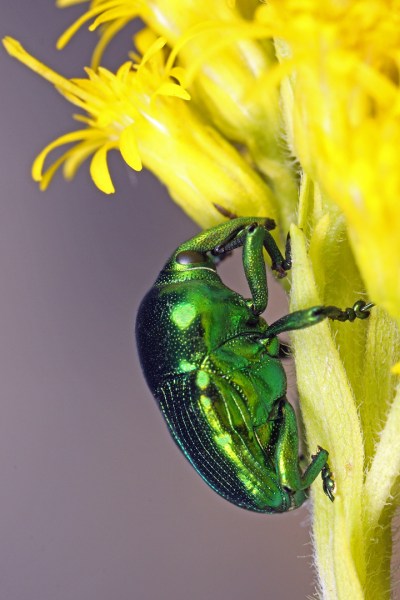
The order Coleoptera (beetles) is, of course, the largest single group of animals on earth, and by most accounts the Curculionidae (weevils) and their close relatives are the largest family-level group within the order. At 60,000 species and counting, weevils account for approximately one out of every 20 described life forms, and as a result their diversity of forms, colors and life histories are as staggering as their numbers. Among the small slice of the group that I have seen, Megabaris quadriguttatus is without question the most colorful, but species in the related genus Eurhinus (both genera belong to the curculionid subfamily Bardinae, which I point out here for reasons discussed below) must rank as among the shiniest of all weevils. Twenty-three species, all colored brilliant metallic green, blue, purple or red, are known from this exclusively Neotropical genus (Vaurie 1982), one of which has also recently established in southern Florida (Ulmer et al. 2007). The individual featured in this post was seen April 2012 in northern Argentina near La Escondida (Chaco Province) and compares well with Eurhinus adonis (ID courtesy Charles O’Brien, Green Valley, AZ). Vaurie (1982) records that species from southern Brazil, Bolivia, Paraguay and Argentina (although only from Missiones Province in the latter) and says that nothing is known of its biology.

Giving me the weevil eye!

Eurhinus cf. adonis on Solidago chilensis | Chaco Province, Argentina

This is certainly among the most challenging insects that I’ve ever photographed. Overblown specular highlights are a constant challenge in flash macrophotography of bright, shiny, metallic beetles, and yellow flowers are prone to blown highlights as well. Add on top of that my desire for a blue sky rather than the typical black background and the usual difficulties of hand-held, field photography of an actively moving subject, and you’ve got a quadruple challenge. Adequate diffusion of the flash is critical, and although the diffusers I was using at the time weren’t perfect, they were enough in combination with intentional underexposure of the photograph to further minimize the chance of blown highlights (underexposed photographs can be relatively easily “fixed” during post-processing, as all of the information is still there, while overexposed photographs can rarely be fixed because the information is gone). Bumping up the ISO (in this case 400) also helps—higher sensitivity to light by the sensor not only allows light from the sky to register and create a blue background, but also further reduces flash duration and the risk of blown highlights. No amount of camera settings, however, can address the final challenge—getting the subject well composed and in focus within the frame. For that, the three “P”s (patience, practice, and persistence) are the only advice I can offer.

Eurhinus cf. adonis on Solidago chilensis flowers | Chaco Province, Argentina.

What’s in a name? That which we call a Eurhinus by any other name would be as shiny!

This genus of weevils was involved in one of the more interesting nomenclatural problems that I’ve encountered. The genus was originally given the name Eurhin by Illiger in 1807, but Schönherr in 1824 changed it to Eurhinus—believing (incorrectly) that Eurhin was not a properly formed name. Unfortunately, the name Eurhinus had already been used by Kirby in 1819 for a different genus of weevils in the subfamily Apioninae. The rules of zoological nomenclature, of course, prohibit the same name being used for two different genera, and several attempts were made during the following years to provide a replacement name for Schönherr’s Eurhinus. None gained acceptance, however, and eventually Schönherr in 1833—still considering justified his correction of Eurhin to Eurhinus—proposed the name Eurhynchus for Kirby’s Eurhinus. Remarkably, the name Eurhynchus also had been used previously (for a genus of birds). Nevertheless, the change gained acceptance, and both of Schönherr’s names remained in use for the next century and a half—Eurhinus in the subfamily Baridinae and Eurhynchus in the subfamily Apioninae, with both credited to Schönherr. Strict application of the rules of nomenclature would require that the name Eurhinus be transferred back to the apionine genus and credited to Kirby and the name Eurhin resurrected for the baridine genus and credited to Illiger. However, as pointed out by Zimmerman & Thompson (1983) this would not only destroy more than a century’s worth of nomenclatural stability but also complicate the formation of family-group names such as tribes—since the two original names each have the same root (Eurhin-), tribal names based on them would be identical (Eurhinini). To resolve these issues, a formal application was submitted to the International Commission of Zoological Nomenclature (ICZN) to preserve  Schönherr’s long accepted usage of Eurhinus and Eurhynchus. To do this, the ICZN would not only have to declare Schönherr’s correction of Eurhin to Eurhinus justified, but also suppress the original use of the name Eurhynchus (as a genus of birds) in order to allow Schönherr’s subsequent use for the apionine genus to stand. Fortunately, suppressing the first use of Eurhynchus had no impact on stability, since an older name was already in use for the genus of birds and the younger name had not been used since its original description. The authors of the application also noted the support of several contemporary weevil specialists (including Charles O’Brien) and that Patricia Vaurie, in her revision of the genus one year earlier (Vaurie 1982), had used the original name Eurhin with reluctance on the then-correct advice of her contemporaries. It was a classic case of priority versus stability, and while the ICZN typically is rather conservative in favoring priority, they were clearly swayed in this case by the interests of stability and impact on formation of family-group names.

REFERENCES:

Ulmer, B. J., R. E. Duncan, J. Prena & J. E. Peña. 2007. A weevil, Eurhinus magnificus Gyllenhal (Insecta: Coleoptera: Curculionidae). University of Florida, IFAS Publication #EENY-417/IN751, 6 pp.

Vaurie, P. 1982. Revision of Neotropical Eurhin (Coleoptera, Curculionidae, Baridinae). American Museum Novitates 2753:1–44.

Zimmerman, E.C. & R. T. Thompson. 1983. On family group names based upon Eurhin, Eurhinus and Eurhynchus (Coleoptera). Bulletin of Zoological Nomenclature 40:45–52.

Copyright © Ted C. MacRae 2013