Fun at Salinas Grandes

IMG_2507_enh_1080x726
My colleagues and I greatly enjoyed our visit to the Salinas Grandes salt flats in Catamarca Province, but there was a moment of tension between Federico and Agustín. You see, Federico is only 12″ tall, so we have to keep a close eye on him to make sure he doesn’t get himself into any trouble. Apparently he had wandered off too far for Agustín’s comfort, leading to a bit of a scolding. Despite his small size, however, Federico took it all in stride and stayed close for the remainder of our visit.

Copyright © Ted C. MacRae 2013

A jewel of a beetle

I really wish I had a photomicrography setup like the one that Sam Heads has at the University of Illinois for imaging preserved specimens. Alas, insect taxonomy is “just a hobby” for me, and any specimen photography I wish to do must be done with my field camera equipment. Of course, poverty prompts creativity (not that I consider a Canon 50D with an MP-E 65mm macro lens and MT-24EX twin flash unit a sign of poverty), and after a bit of tinkering and fiddling I’ve figured out a way to setup the specimen and flash units to create images of pinned specimens that I think are more than adequate for publication in taxonomic papers.

Here is one I did recently of the jewel beetle Actenodes calcaratus (family Buprestidae). This species is broadly distributed from the southwestern U.S. through Mexico and into Central America, where it breeds in dead branches of a variety of mostly fabaceous trees such as Acacia and Prosopis. During several trips to southern Mexico in recent years, Chuck Bellamy and I collected two new species of Actenodes that look very similar to A. calcaratus but differ in several important characters, primarily surface sculpture, the form and male coloration of the face, and male genitalia. A manuscript describing these two species and containing this and similar images of the new species was recently submitted for publication. Though not quite as razor-sharp as images created through focus-stacking processes, it still shows good detail and even lighting. What do you think?¹

¹ For those who find the pin head distracting, I am not a proponent of cloning out pin heads, debris, or other imperfections on images of preserved specimens in taxonomic papers. Other enhancements such as levels, sharpness, contrast, etc. are fine since these are all influenced greatly by lighting, but otherwise I believe the specimen needs to be presented exactly as it appears. A possible alternative is to remove the pin for imaging, but this presents a risk of damage to the specimen that is of questionable benefit in the case of non-type specimens—and downright irresponsible for primary types. Another alternative is to thoroughly clean and image the specimen prior to mounting, but this is rarely feasible as in most cases it is only after the specimen is mounted and studied further that its status as a new species is realized.

Actenodes calcaratus | MEXICO: Guerrero, Hwy 95, 5 km S Milpillas, 7.vii.1992, "big dead tree", G. H. Nelson [FSCA]. Male plesiotype.

Actenodes calcaratus | MEXICO: Guerrero, Hwy 95, 5 km S Milpillas, 7.vii.1992, “big dead tree”, G. H. Nelson [FSCA]. Male plesiotype.

Copyright © Ted C. MacRae 2013

Diffusion versus post-processing, or perhaps something even better?

One of the comments on my post Diffuser comparisons for 100mm macro lens was by Stephen Barlow, one of the original “concave diffuser” advocates, who claimed that the “dead” appearance of Photo #4 was an artifact of post-processing and not really a problem with the diffusion method itself. Heeding this comment, I reprocessed Photo #4 to see if this was really all that was needed to give it a “livelier” look by rather aggressively bumping up the brightness and contrast by 30% each (to correct for underexposure), then reducing the saturation by 10% (to correct for the effect on color caused by increased brightness and contrast), adjusted levels to a set point of 240 to add some more “high end,” and reduced highlights and shadows just a bit (10% each). Following is the original and then the reprocessed version of Photo #4:

IMG_2095_enh_1080x720

Original post-processing

IMG_2095_enh2_1080x720

Additional post-processing.

There is no question that this additional reprocessing has greatly improved the photo. However, after I did this I got to thinking—why not try combining the two diffusers that gave the best results? Recall that the diffusion method in Photo #5 (SoftBoxes on flexible arm extenders) easily “won the vote” over Photo #4 (open concave diffuser) by a 2:1 margin (35 to 17). This may have been at least partly a result of the less than flattering post-processing of the original version of #4, but still the overall lighting effect on Photo #5 caused by the diffusion method used was quite dramatic. The only downside of the #5 method was the persistence of hot spots (albeit muted) from the flash heads and a dark background with lots of shadowing caused by light drop off (since the flash heads were mounted on the lens rather than extenders). Double diffusers are nothing new, the idea being that the first diffuser spreads the light out more before it hits the second diffuser than does a bare flash head, allowing even further diffusion of the light the reaches the subject (and background) for truly even lighting. I reasoned that using SoftBoxes on flexible arm extenders plus the concave diffuser would not only accomplish double diffusion but also allow controlled placement of the flash heads close to the specimen to maximize apparent light size and minimize light drop off. To test this I re-shot the same beetle with the same camera settings, and here is the result:

Flash heads mounted on flexible arms, diffused by SoftBoxes + open concave diffuser

Flash heads mounted on flexible arms, diffused by SoftBoxes + open concave diffuser

My personal opinion is that this photo combines the best of both methods. While loss of light can be a problem with double diffusion, my use of extenders to place the flash heads close to the subject minimizes, or perhaps even completely negates this problem. Additionally, while subtle hot spots are still apparent, they are not nearly as apparent as in Photo #5 (SoftBox diffusers on extenders w/o concave diffuser—refresh your memory here) due to the additional diffusion, which also dramatically reduces shadowing as a result of better light throw. The hot spots are also more subtle than in #4 because of the larger apparent light size (a combination of closer flash head placement and the SoftBoxes), and is it just me or are the colors more vibrant and life-like in this photo compared to #4 (even reprocessed)? The flat colors were my biggest criticism of Photo #4, and even heavy-handed reprocessing, while helpful, didn’t completely bring it “back to life.” In contrast, the double-diffused photo required only typical post-processing to achieve a more than acceptable result—I have to believe that, all other things being equal, a photo that requires less post-processing is better than one that requires more.

Of course, using a setup like this in the studio is one thing—using it in the field is another. Both the extenders and the oversized concave diffuser are likely to make things a little clumsier in the field, and the two combined may be more clumsiness than I care to deal with. Nevertheless, the results from my test shots are certainly promising enough to give it an honest effort. Have I finally found a viable solution to diffusion in long-lens, full-flash macrophotography? We’ll find out this summer!

Copyright © Ted C. MacRae 2013

Diffuser comparisons for 100mm macro lens

I really wish I could just buy three Canon Speedlite 580EX II flash units, mount one directly on the camera, run the other two wirelessly on each side as slaves, put a nice big soft box diffuser on each of them, and be done with it! I’m beginning to think that’s the only way I’m going to get the kind of full flash insect macro photographs that I want with larger subjects that require the use of my 100mm macro lens. You know what I mean—nice, even, diffuse, vibrant light that comes at the subject from multiple directions (eliminating those annoying specular highlights in the eyes that result from more unidirectional lighting) and with enough power to allow minimal flash pulse durations (resulting in maximum motion freeze). But I can’t—the money is not in the budget, and even if it was I’d have to think seriously about the logistics of carrying and setting up in the field three Speedlites every time I wanted to photograph an (often moving) insect.

Thus, I continue trying to come up with some kind of system that makes the most of my Canon MT-24EX twin flash unit. It’s not that I don’t like this flash unit—I love it because of its light weight (good for field use) and the front-of-the-lens mounting feature that, with its dual heads, gets the flash heads closer to the subject but avoids the “flat” lighting effect of typical ring flash units. In addition, for those shooting insect macro photographs with Canon’s shorter focal length MP-E65 macro lens, the twin flash unit is probably the best choice of all, since the lens is right on top of the subject and it is relatively easy to place diffusing materials between the subject and the flash heads—Alex (Myrmecos) with his tracing paper diffuser and Kurt (Up Close with Nature) with his concave foam diffuser are two of the more successful designs out there. I use my MP-E65 lens a lot, but I use my 100mm macro lens a lot more because many of the beetles I photograph are best photographed at magnification ranges between 0.5–1.0X and, thus, are a little too large for the 65mm lens. The longer lens-to-subject distance of the 100mm lens may be helpful for working with skittish subjects, but it also creates challenges for the MT-24EX because of its relatively low power (more light drop off) and small flash heads (more specular highlighting). For the past couple of years I’ve been using a large sheet of polypropylene foam jury-rigged to the front of the lens, and while it too has functioned fairly well, I keep thinking that if I can just get the flash heads closer to the subject—each fitted with a good diffuser—then it should be possible to achieve results similar to what can be done with the 65 mm lens.

The photos below show the results of some of the ideas I’ve been working on. My main idea was to use extenders that would allow adjustable placement of the flash heads relatively close to the subject and diffuse the light from them with a modified version of the Sto-Fens+Puffers that I have tried in the past. Here is an example of the system mounted on my camera using cheap, flexible arms mounted on a plate attached to the bottom of the camera. If I decide to use this system in the field I would want to purchase much sturdier extenders (e.g. Really Right Stuff), but at only $25 these flexible arms are perfect for proof-of-concept testing. For the modified Sto-Fens+Puffers, I completed the modifications shown by Dalantech (No Cropping Zone) (I was planning to do this when I first tried the Sto-Fens+Puffers but soon found that I preferred the concave and tent designs by Kurt and Alex, at least for use with the 65mm lens). At any rate, to test the ideas I selected a very large (for long subject-to-lens distance), very shiny (for maximum specular highlighting potential) beetle from my collection (Megaloxantha bicolor palawanica, a stunning jewel beetle from Palawan, Philippines) and set it up for “face shots” that simulate my favorite pose for beetles in the field. Keep in mind that this was not intended to be a test of lighting for pinned specimens in the studio—that is not my interest, and there are much better approaches for doing that—but rather a proxy for the kind of lighting and diffusion I might achieve in the field. Here are the results:

IMG_2087_enh_1080x720

– flash heads mounted on lens, diffused by modified Sto-Fens+Puffers

The example above show the results obtained when using the modified Sto-Fens+Puffers with the flash heads mounted directly to the front of the lens. I didn’t try this shot without diffusers, but I doubt it would be much worse than this—specular highlighting is bad because of the small apparent light size, and overall the lighting is not very even with dark shadows and harsh highlights. This shot is a perfect example of the problems inherent in using the twin-flash with a long macro lens.

IMG_2082_enh_1080x720

– flash heads mounted on flexible arms, diffused by modified Sto-Fens+Puffers

This second shot shows the results when the modified Sto-Fens+Puffers are mounted on the flexible arm extenders and positioned as close to the subject as possible to maximize apparent light size. This was supposed to be the system that gave me the results I was looking for, but honestly I am not impressed. The highlights in the eyes are certainly larger than in the previous photo, and the overall lighting is not quite as uneven, but still the highlights are harsh and fairly sharply defined. Considering the greater difficulty in positioning the flash heads compared to lens-mounted, I have to consider the marginal improvement in lighting not worth the effort.

IMG_2090_enh_1080x720

– flash heads mounted on lens, diffused with modified Sto-Fens+ Puffers and concave diffuser (closed)

This third shot has the modified Sto-Fens+Puffers once again mounted on the lens, but also attached is my trusty concave diffuser. Honestly this combination of diffusers provides much better overall lighting and softening of the highlights compared to the previous shot, even though the flash heads are mounted on the lens rather than positioned close to the subject. Apparently the concave diffuser, though further away from the subject, still has larger apparent size and thus allows light to be transmitted to the subject from a larger apparent area. I have not normally used another diffuser between the flash heads and the concave diffuser, but my impression from this shot is that the modified Sto-Fens+Puffers do a good job of dispersing light before it hits the concave diffuser to soften the “hot spots” behind it and provide somewhat more even lighting across its surface.

IMG_2095_enh_1080x720

#4 – flash heads mounted on lens, diffused with modified Sto-Fens+ Puffers and concave diffuser (open)

When I use the concave diffuser, I normally pull the corners back and attach them to the tops of the flash heads with Velcro to minimize light blow back (although how effective it is I really don’t know). Just for kicks, I decided to try some shots with the concave diffuser not pulled back, but left open and extending out over the subject. I did this because that actually more closely approximates how smaller versions of concave diffusers are used with the 65mm lens. The effect was not only remarkable diffusion of light, with specular highlights and hot spots almost completely lacking, but also much better lighting behind rather than just on the front of the specimen. That said, the quality of the light lacks vibrancy and seems somewhat “dead,” perhaps because of the great distance between the flash heads and the diffuser and the MT-24EX units relatively limited power. The large diffuser extending far out in front of the lens might cause problems with bumping and skittish subjects, but I am intrigued enough by this result to continue with some field testing to see what I think.

IMG_2113_enh_1080x720

#5 – flash heads mounted on flexible arms, diffused by SoftBoxes

The final shot shows the results of another promising setup—this one again uses the flash heads mounted on flexible arm extenders to get them close to the subject, but instead of the modified Sto-Fens+Puffers I fitted each flash head with a mini SoftBox. This was not easy, as the SoftBox is designed for much larger flash heads than those of the MT-24EX, so I took another set of Sto-Fen diffusers, cut off the face, then hot-glued the SoftBox to the open Sto-Fen. Thus modified it was a simple matter to “snap” the SoftBoxes in place over the flash heads. Despite the term ‘mini’ these Soft Boxes still provide a much larger area for light transmission than the modified Sto-Fens+Puffers, and this much larger apparent light size has a dramatic effect on the overall lighting and diffusion. I’m tempted to say I like this one best. However, I do have to consider ease of function in the field—the lens-mounted Sto-Fen+Puffers and concave diffuser, either open or closed, would certainly be easier and involve no further cost (for better extenders than the cheap flexible arms I now have), but if SoftBoxes on flash heads placed close to the subject gives better results than I may have to go with it.

Will you please help me decide? I setup this little poll so you can tell me which of the systems you thought gave the most pleasing result in terms of vibrant, evenly diffused light. I can’t (to my knowledge) tell who’s voting (and if there is a way don’t tell me because I don’t want to know), so don’t let privacy concerns prevent you from adding your vote—the more voters that participate, the better information I get to help me with my decision.

Copyright © Ted C. MacRae 2013

Best of BitB 2012

Welcome to the 5th Annual “Best of BitB”, where I pick my favorite photographs from the past year. 2012 was one of the most intensive travel years I’ve ever had—I spent 8 weeks in Argentina from February through April, made separate trips to Puerto Rico and Arkansas in May (bracketing a personal week in California), traveled almost weekly to Illinois and Tennessee from June to September (interrupted by a personal week in Florida in July), toured the southeastern U.S. (Arkansas, Louisiana, Mississippi and Georgia—great food!) in early September, chased tiger beetles in Oklahoma, Texas and Arkansas in late September, went back to Argentina for a week in October, and capped off the travel year by attending the Entomological Society of America Annual Meetings in Knoxville, Tennessee (for the first time in more than 10 years!)—whew! While many would cringe at such a travel load, I am among the lucky few who actually get paid for doing something that is also my hobby—entomology! This gives me ample opportunity to further hone my photography skills (nine of the 13 photos I’ve selected below were actually taken while I was on business travel), resulting in two key accomplishments this year—my first ever photography talk at the ESA’s insect photography symposium and my first commercial sales (look for the BitB commercial site to go online in 2013).

Enough blather! Here are my favorite BitB photographs from 2012. Click the link in the text below the photo to see the original post. I would greatly appreciate knowing if you have a favorite (and why)—your feedback will be enormously helpful to me as I continue to learn and develop as a photographer.  For those interested, here are my previous year picks for 2008, 2009, 2010 and 2011. And, as always, thank you for your readership!


Spintherophyta (?) sp. in flower of Abutilon pauciflorum | Buenos Aires, Argentina

From  (posted 2 Feb). One of my 2012 learnings was that sometimes a photograph that is not so close is more effective than one that is as close as possible. In one of my earlier attempts at “not-so-close” macrophotgraphy, the soft colors of the flower compliment the brash shininess of the tiny leaf beetle that has been feeding on its pollen. Pink lines lead the eye directly to the subject and create a pleasing composition, and pollen grains stuck to the beetle—a distraction in some situations—add to the miniature natural history story of the photo.


Apiomerus flavipennis with stink bug prey and kleptoparasitic flies | Chaco Province, Argentina

From  (posted 11 Mar). I selected this photo solely for the complex natural history story drama it shows—stink bug (Piezodorus guildenii) feeding on soybean becomes prey of an assassin bug (Apiomerus flavipennis), with volatiles from the chemicals it emitted in a vain attempt to defend itself serving as cues to kleptoparasitic flies (families Milichiidae and Chloropidae) that benefit from the assassin bug’s labors.


Planthopper nymph | Buenos Aires Province, Argentina

From  (posted 26 Mar). Another learning that I began putting into practice in 2012 was the use of low perspective for compositional impact. The cryptic coloration of this planthopper nymph (family Fulgoridae) made it almost invisible on the branch on which it was sitting when viewed from a normal “top-down” human perspective. Getting “down under” it, however, brought the nymph to life and emphasized its unusual form.


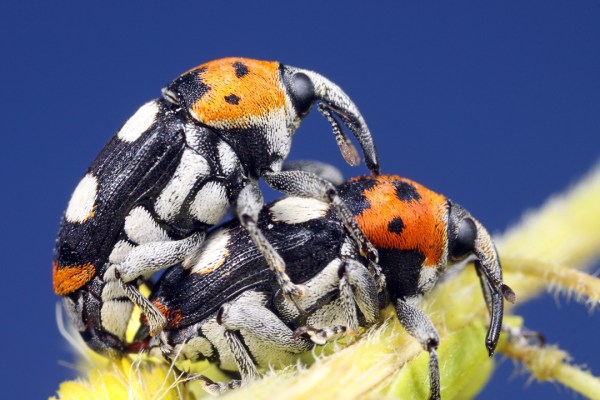
Megabaris quadriguttatus | Corrientes Province, Argentina

From  (posted 12 Apr). I spent much of 2012 working on the “blue sky background” technique, with these weevils from northern Argentina representing one of my better attempts. Macrophotography of insects with a blue sky background involves setting exposure, ISO, and aperture to achieve two separate exposures—full flash illumination of the subject for maximum depth-of-field, and ambient light from the sky to create a clean, uncluttered, natural-looking background. In this shot I managed to achieve an almost ideal shade of blue to compliment the wild black, white and red colors of the beetles. (My one criticism of the photo is having clipped one of the beetle’s feet.)


Bombylius sp. cf. mexicanus | Scott Co., Missouri

From  (posted 16 May). This photo is unusual if nothing else. Focus, lighting, depth-of-field, and composition are all better than can be hoped for in a single shot, but the subject—perfectly alive—is in a most unusual position. Read the original post to find out how this happened.


Perisphaerus sp. (a pill roach) | Vietnam (captive individual)

From  (posted 27 May). White-box photography is an excellent technique for clean, uncluttered photographs of insects, but it also isolates them from their natural surroundings and limits their natural history appeal. The best white-box photos are those that highlight a key feature or behavior of the subject—in this case a pill roach’s comically conglobulating defensive posture.


Micronaspis floridana (Florida intertidal firefly) larva | Pinellas Co., Florida

From  (posted 31 July). Here is another photo whose back story played a big part in its selection. This firefly larva not only represents a rare Florida-endemic species but was also first seen by my then 12-year old nephew, who willingly accompanied me through a dark, spooky salt marsh in the middle of a humid Florida night to see what he could learn. The lesson here for budding natural historians (and old-timers like me) cannot be overstated!


Arctosa littoralis (beach wolf spider) | Lewis Co., Missouri

From  (posted 23 Aug—prelude to  posted 28 Aug). Those who follow this blog know of my obsession with close-up portraits, and while tiger beetles are the subjects I most commonly photograph in this manner, I am always on the lookout for good subjects in other taxa. This wolf spider “face” almost looks human, with “two” eyes, two “nostrils” and a shiny upper lip above huge (albeit hairy) buck teeth! It’s enough fill-the-frame spidery goodness to melt (or explode) the heart of even the most ardent arachnophobe!


Anticarsia gemmatalis (velvetbean caterpillar) egg on soybean leaf

From Life at 8X—Guide to lepidopteran eggs on soybean (posted 3 Sep). “Life at 8X” was a new series I introduced this year, featuring insects photographed at magnifications testing the upper limit of my equipment and photographic skills. Diffraction is the chief difficulty with magnifications as high as this and is the primary flaw in the above photograph. Nevertheless, such view of a moth egg on the underside of a soybean leaf provides a spectacular view of the otherwise unseen micro-world that lives right beneath our noses.


Megacyllene decora (amorpha borer) on snakeroot flowers | Mississippi Co., Missouri

From  (posted 12 Sep). This second example of “blue sky background” was taken later in the year and was considerably more difficult to capture than the first because of the larger size of the subject and resulting need for a longer focal length macro lens. Getting a well-lit, focused, and composed image with a desirable shade of blue in the background depended not only on finding the proper camera settings, but also secure body and camera bracing techniques for this completely hand-held shot.


Cicindelidia politula politula (Limestone Tiger Beetle) | Montague Co., Texas

From  (posted 28 Sep). I will go ahead and say it—this is my favorite photograph of 2012. As discussed under the first entry, panning back from the subject can allow for some very interesting compositions. This photo combines charismatic pose by a wary subject with panning back and low perspective to create an image that scores high in both natural history and aesthetic appeal.


Calosoma sayi (black caterpillar hunter) | New Madrid Co., Missouri

From Black is beautiful! (posted 7 Nov). Of course, close-as-possible can also be used to create striking photos, especially if the subject exhibits features that are best seen up close. Anything with jaws fits the bill in my book, and highlighting the mandibular sculpturing of this caterpillar hunter (a type of ground beetle) required precise angling of the flash heads for maximum effect.


Cicindela repanda (Bronze Tiger Beetle) | St. Louis Co., Missouri

From  (12 Nov). This final selection is not a rare species, but it is as close as I have come to what I consider the “perfect” tiger beetle macrophotograph—a close, low angle, lateral profile of an adult in full-stilt posture (a thermoregulatory behavior), well lit, perfectly focused, and with a dynamic but pleasingly blurred background. It’s a perfect storm of a photo that took the better part of two hours to achieve—rarely do all of these elements come together in a hand-held photograph of an unconfined tiger beetle in its native habitat.


Well, there you have it. I hope you’ve enjoyed my selections, and again please do let me know if you have a personal favorite. See you in 2013!

Copyright © Ted C. MacRae 2012

Life at 8X: MPMI Cover


The January 2013 issue of Molecular Plant-Microbe Interactions (volume 26, number 1) is now online. Why do I mention this? You may recall the cover photos of the soybean aphid, Aphis glycines, from my post —one of a series of posts I’ve done featuring insects photographed at 8X life-size.

MPMI is a publication of The American Phytopathological Society, and I have Dr. Gustavo MacIntosh at Iowa State University to thank for the appearance of these photos on the cover of this Special Focus Issue. Dr. MacIntosh is Associate Professor of Biochemistry, Biophysics and Molecular Biology and studies hormone-based defense mechanisms in soybeans. In a paper appearing in this special issue, Dr. MacIntosh and co-author Matthew Studham published the results of a study that suggests soybean aphids are able to “short-circuit” soybean defense mechanisms, making it easier for other pests (e.g., soybean cyst nematode) to colonize infested plants as well. Their study revealed large differences in transcription profiles of soybean varieties with and without an endogenous resistance gene (Rag1) in response to aphid infestation and suggested that the aphids are able to circumvent the defense response in susceptible plants by triggering activation of abscissic acid (normally associated with abiotic stress responses) as a “decoy” strategy (Studham & MacIntosh 2013). Plants infested with aphids have been shown to also become more susceptible to soybean cyst nematode—even varieties with genetic resistance to nematodes (McCarville et al. 2012). Dr. MacIntosh saw my photos when I posted them here and asked permission to submit them as candidates for the cover of the MPMI issue in which his paper was to appear.

Dr. Macintosh hopes that his research will enable the development of soybean varieties that will be more resistant to aphids and other pests.

REFERENCE:

McCarville, M. T., M. O’Neal, G. L. Tylka, C. Kanobe & G. C. MacIntosh. 2012. A nematode, fungus, and aphid interact via a shared host plant: implications for soybean management. Entomologia Experimentalis et Applicata 143(1):55–66 [DOI: 10.1111/j.1570-7458.2012.01227.x].

Studham, M. E. & G. C. MacIntosh. 2013. Multiple Phytohormone Signals Control the Transcriptional Response to Soybean Aphid Infestation in Susceptible and Resistant Soybean Plants. Molecular Plant-Microbe Interactions 26(1):116–129 [DOI: 10.1094/MPMI-05-12-0124-FI].

Copyright © Ted C. MacRae 2012

Approaching the unapproachable

Yesterday I gave a talk at the Entomological Society of America’s Insect Macrophotography Symposium, focusing on techniques that I use for photographing wary insects in the field. Turnout for the symposium was awesome (I estimate ~125 people in attendance), and as the first talk I’ve given where I presented myself as a photographer I was pleased at the warm reception I got. A big thanks to my friends and colleagues who showed up to see the talk—it was great seeing your friendly faces in the crowd.

For those of you who couldn’t attend the ESA meetings this year or were unable to see my talk, I’ve attached a PDF version of the talk to this post—click on the image of the title slide below to see it. I expect I might give some version of this talk again in the future, so I would love to hear about any techniques you have found useful for approaching and photographing wary, skittish insects in their native habitats.

Copyright © Ted C. MacRae 2012

Persistence Pays

For the past three years I’ve crisscrossed the country in search of some of North America’s rarest tiger beetles, each time hoping to get that “perfect” photograph of an unconfined beetle exhibiting natural behavior in its native habitat. I’ve managed to get photos of most, though there are a few that I wish I could do over, but the only one that I think really comes close to the ideal I have in my mind is this one of Cicindela formosa generosa, featured in the ESA 2013 World of Insects Calendar (and, ironically, taken only about 5 miles from my home).

A consequence of all this attention to uncommon species is that I’ve somewhat neglected getting good photographs of some of our most common tiger beetles. One of these is Cicindela repanda (Bronze Tiger Beetle), which can be found near almost any body of water throughout the bulk of eastern North America. This summer I resolved to correct that situation, but I found this to be more difficult than anticipated. The first time I tried to photograph the species was when I encountered them in late July on a wide, open beach along the Mississippi River on a hot, summer day. I found the beetles almost completely unapproachable due to the extreme heat and lack of any cover that could be used to my advantage. I had better luck in mid-August when I attracted some individuals to an ultraviolet light that I had setup one night at a spot further north along the river. Those photos were acceptable technically but lacking otherwise, primarily because the beetles didn’t assume any of the charismatic poses associated with the thermoregulatory behaviors exhibited by active beetles in the middle of a hot summer day. Finally, at the end of August, I encountered the species yet again on a small patch of sandy/muddy river bank along the Mississippi River just south of St. Louis. It was another hot day—quite hot actually—but with the help of some features of terrain I was finally able to get that photo of the species that I’ve been wanting.

Cicindela repanda (Bronze Tiger Beetle) | St. Louis Co., Missouri

I like this photo for a number of reasons. The beetle is nicely profiled while paused “tall” on its front legs (a common posture on hot days as they try to lift themselves up off the hot soil surface), the angle is low, and the subject and foreground are well focused in front of a nicely blurred backdrop of rocks. It is these rocks that actually helped me get this photo. I had chased several individuals down on the open sand for some time, but since the day was as hot as my first attempt and I wasn’t having any better luck. Every now and then one of the beetles that I was “working” would fly up into this rockier area, and I noticed that I was able to get closer to these beetles because I was able to stay lower as I made my approach. I began preferentially working beetles towards the rocks and finally got one that settled down and started showing normal searching behaviors despite the fact that I was already in fairly close range. At that point, it became a matter of waiting for the beetle to “lower his guard” while I assumed a shooting position, and as soon as it began acting normal I slowly closed in and began taking shots.

Getting close is a process, as these successive shots demonstrate.

This collage shows the four shots immediately preceding the final photo and how each shot brought me a little closer to the beetle (and that final composition that I wanted). The beetle was still in search mode as it crawled up the side of one rock and I began taking photos, but upon reaching the top it paused and lifted itself up high on its front legs. I knew I would have 5, 10, maybe 15 seconds at the most to capture this pose before it began moving again, so I closed in slowly but assertively and fired a shot every couple of seconds until I got the one that I wanted. At that moment, the beetle flew away, and although I tried for another 20 minutes or so I was unable to get another beetle back up on the rocks for more shots. How fleeting success can be!

Copyright © Ted C. MacRae 2012