Just released from ESA (Entomological Society of America):
Approaching the Unapproachable: Tips and Tricks for Field Photography of Wary Insects presented by Ted MacRae. Learn valuable field photography techniques from Ted MacRae, Senior Research Entomologist at Monsanto Company. Ted specializes in photographing tiger beetles in their natural habitats. These colorful beetles are fast runners and powerful fliers, making them among the more difficult insects to approach. Ted will describe some of the techniques that he uses to obtain close-up and macro photographs of these beautiful beetles and also techniques for field photography of other insects as well.
There’s no cost and you learn right from your desktop, laptop, or smart-phone. This 60 minute webinar takes place August 8 at 2 PM Eastern Time (US Time) and will be a great investment of your time.
Register for the live Webinar, August 8th at 2 PM Eastern Time (US Time).
Make a list of your pressing questions on this topic, as we’ll allow plenty of time for you to participate in the Q & A portion of the session. You may also send in questions prior to the event and this will assure you that the presenter will address your queries.
After registering you will receive a confirmation email containing information about joining the Webinar.
System Requirements
PC-based attendees
Required: Windows® 7, Vista, XP or 2003 Server
Macintosh®-based attendees
Required: Mac OS® X 10.5 or newer
For the past two years I’ve been working to refine my “blue-sky” technique for insect macrophotographs. This refers to careful balancing of camera and flash settings to achieve full-flash illumination of the subject while still allowing enough ambient illumination from the sky to produce a natural looking blue background. The use of flash, of course, is almost a necessity in insect macrophotography, as it’s nearly impossible to take hand-held photographs of insects, especially small ones, using only ambient light—there just isn’t enough of it to adequately illuminate the subject while using fast shutter speeds to prevent motion blur and high aperture settings to achieve acceptable depth-of-field. Flash illumination, however, has a drawback (actually several, but let’s focus on one)—if there isn’t something else close enough behind the subject to reflect light from the flash, the background will be jet black. In some cases this is perfectly fine, and it is almost always preferred over a cluttered background of jumbled branches and foliage. However, it usually doesn’t work well with darkly colored insects, and to me it gives the undesirable impression that the photo was taken at night. I suppose I could carry around colored cards to place behind the subjects that I photograph, but as a photographer who prides himself on the ability to take in situ field photographs of insects in their native habitats, something about the ‘artificiality’ of colored cards prevents me from resorting to them. A leaf placed behind the subject may be an acceptable alternative, but is usually possible only with quite small subjects (due to the size of the leaf needed) and is virtually impossible in dry, western habitats.
cf. Eremochrysa punctinervis | Gloss Mountains, Major Co., Oklahoma
It’s hard to recommend specific camera settings for blue sky background, as they must be determined experimentally in each situation. The above photo of what I take to be Eremochrysa punctinervis (a green lacewing in the family Chrysopidae—identification via Frank & Slosser 1996) was taken with a 100mm macro lens set at f/16 and with ISO bumped up slightly to 320 (I normally use ISO 100–200) and shutter speed decreased slightly to 1/160 sec (I normally use 1/200 to 1/250 sec). The higher ISO makes the camera sensor more sensitive to light and the slower shutter speed allows more time for ambient light to reach the sensor. When aimed at the brightest part of the sky (next to but not right at the sun), these settings allowed sufficient light to register this beautiful shade of blue on the camera sensor. The ambient light alone is still not sufficient to illuminate the subject—if the photograph had been taken with these settings but without flash, the background would still be blue, but the subject and branch on which it is sitting would be nearly black! Only a flash pulse occurring while the shutter is open can provide enough light to fully illuminate the subject when the aperture setting is that high. In essence, the photo combines two exposures—a flash-illuminated subject and an ambient-illuminated sky.
Same photo before cloning out antennal shadowing
One problem that can be encountered when using this technique is the effect of wind. Holding the subject up against the sky exposes it to even the slightest of breezes, which can cause movement of delicate body parts such as the long antennae of this subject. What looks like blurring of the antennae is actually shading of the sky by the antennae as they fluttered in the wind. The antennae themselves were “frozen” by the very short flash pulse—much shorter than the 1/160 sec exposure, but they blocked enough light from the sky during the 1/160 sec exposure to darken the part of the background over which they moved. In the case of the finished photo shown at the beginning of the post, it was a relatively simple matter to use Photoshop’s cloning tool to remove the shadowing. Nevertheless, even more desirable is to avoid the need for such post-processing manipulations to begin with—waiting for a pause in the wind or moving to a more protected location would have obviated the need for PS cleanup.
REFERENCE:
Frank, W. A. & J. E. Slosser. 1996.An Illustrated Guide to the Predaceous Insects of the Northern Texas Rolling Plains. Texas Agricultural Experiment Station, Cotton DVD, Publication #MP-1718, 24 pp.
Megaloxantha bicolor palawanica, photographed with oversized, double-concave diffuser
This jewel beetle is, of course, Megaloxantha bicolor palawanica me beetle on several occasions while testing out different diffuser designs for my Canon MT-24EX twin flash unit. In the most recent one, I had tried combining SoftBoxes with my oversized concave diffuser and was pleased enough with the result that I thought I might try it in the field. Well, let’s just say the extensions for the flash heads and SoftBoxes attached to them was far too clumsy for field use, and I abandoned the idea after just a couple of hours. Back to the drawing board.
Despite the problems with using the SoftBoxes in the field, I still wasn’t ready to give up on the idea of double diffusion, and I had also learned that extending my oversized diffuser out over the subject (leaving it “open”) produced better lighting than curling it back (as I had been doing). Curling the diffuser back only served to turn it into a convex diffuser, which results in more specular highlighting because the center of the diffuser is closer to the subject than the edges. A concave diffuser provides more even lighting because all parts of the diffuser are roughly the same distance from the subject. Just about that time, I saw a DIY diffuser design by Piotr Nascrecki that, in principle, resembled Alex Wild‘s tent diffuser. It was, however, much larger—like mine, and thus amenable for use with a 100mm macro lens (the macro lens I use most commonly). This resemblance to Alex’s diffuser did make me notice one missing feature—double diffusion layers. That’s when I thought, why not do the same with an oversized diffuser rather than fussing with separate diffusers attached to the flash heads? I had some Bogen Imaging filter sheets on hand (#129 Heavy Frost), so I picked up some 1-mm steel wire at the hardware store, found a Bic pen in the drawer that I could cut in half, and built the diffuser as shown in Piotr’s post. I then secured a second filter sheet above the first sheet by taping the two together along their sides, being sure to ‘bow’ the upper sheet above the bottom sheet to achieve the double diffusion effect. Here is the result (please excuse the iPhone shots):
Canon 50D with MT-24EX twin flash and oversized, double-concave diffuser.
Better view of the double diffusion layers and Piotr’s “Bic pen” attachment system.
I have big hopes that this will finally be the diffuser I’ve been looking for. For as quick a test shot as the jewel beetle photo above was, the lighting is great and the colors are vibrant—both achieved with typical post-processing. My only complaint is the slightly greater “hot spot” intensity in the lower parts of the highlights in the eyes. This is due to the flash heads sitting near the base of the diffuser, and (as Piotr recommends) a second set of Kaiser shoes will allow me to move the flash heads not only more towards the center of the diffuser but also further above it to help spread out the light throw and even out the highlights. I’ll need to play around positioning the flashes to figure out the best positions depending on the size and distance of the subject—sitting up higher as they are puts them more on “top” than in “front” of the subject, so they will need to be directed downward more than I am used to doing. Even more important, however, is field usability, and I really think this diffuser will prove to be convenient and easy to use in the field—no more gawky arms attached to the camera, the diffuser attaching quickly and easily and, just as importantly, coming off easily and storing flat in the backpack, and large enough to do the job while not so oversized that it gets in the way. Piotr says this diffuser also works well with the 65mm macro lens, so I will certainly be testing that out as well.
The order Coleoptera (beetles) is, of course, the largest single group of animals on earth, and by most accounts the Curculionidae (weevils) and their close relatives are the largest family-level group within the order. At 60,000 species and counting, weevils account for approximately one out of every 20 described life forms, and as a result their diversity of forms, colors and life histories are as staggering as their numbers. Among the small slice of the group that I have seen, Megabaris quadriguttatus is without question the most colorful, but species in the related genus Eurhinus (both genera belong to the curculionid subfamily Bardinae, which I point out here for reasons discussed below) must rank as among the shiniest of all weevils. Twenty-three species, all colored brilliant metallic green, blue, purple or red, are known from this exclusively Neotropical genus (Vaurie 1982), one of which has also recently established in southern Florida (Ulmer et al. 2007). The individual featured in this post was seen April 2012 in northern Argentina near La Escondida (Chaco Province) and compares well with Eurhinus adonis (ID courtesy Charles O’Brien, Green Valley, AZ). Vaurie (1982) records that species from southern Brazil, Bolivia, Paraguay and Argentina (although only from Missiones Province in the latter) and says that nothing is known of its biology.
Eurhinus cf. adonis on Solidago chilensis | Chaco Province, Argentina
This is certainly among the most challenging insects that I’ve ever photographed. Overblown specular highlights are a constant challenge in flash macrophotography of bright, shiny, metallic beetles, and yellow flowers are prone to blown highlights as well. Add on top of that my desire for a blue sky rather than the typical black background and the usual difficulties of hand-held, field photography of an actively moving subject, and you’ve got a quadruple challenge. Adequate diffusion of the flash is critical, and although the diffusers I was using at the time weren’t perfect, they were enough in combination with intentional underexposure of the photograph to further minimize the chance of blown highlights (underexposed photographs can be relatively easily “fixed” during post-processing, as all of the information is still there, while overexposed photographs can rarely be fixed because the information is gone). Bumping up the ISO (in this case 400) also helps—higher sensitivity to light by the sensor not only allows light from the sky to register and create a blue background, but also further reduces flash duration and the risk of blown highlights. No amount of camera settings, however, can address the final challenge—getting the subject well composed and in focus within the frame. For that, the three “P”s (patience, practice, and persistence) are the only advice I can offer.
What’s in a name? That which we call a Eurhinus by any other name would be as shiny!
This genus of weevils was involved in one of the more interesting nomenclatural problems that I’ve encountered. The genus was originally given the name Eurhin by Illiger in 1807, but Schönherr in 1824 changed it to Eurhinus—believing (incorrectly) that Eurhin was not a properly formed name. Unfortunately, the name Eurhinus had already been used by Kirby in 1819 for a different genus of weevils in the subfamily Apioninae. The rules of zoological nomenclature, of course, prohibit the same name being used for two different genera, and several attempts were made during the following years to provide a replacement name for Schönherr’s Eurhinus. None gained acceptance, however, and eventually Schönherr in 1833—still considering justified his correction of Eurhin to Eurhinus—proposed the name Eurhynchus for Kirby’s Eurhinus. Remarkably, the name Eurhynchus also had been used previously (for a genus of birds). Nevertheless, the change gained acceptance, and both of Schönherr’s names remained in use for the next century and a half—Eurhinus in the subfamily Baridinae and Eurhynchus in the subfamily Apioninae, with both credited to Schönherr. Strict application of the rules of nomenclature would require that the name Eurhinus be transferred back to the apionine genus and credited to Kirby and the name Eurhin resurrected for the baridine genus and credited to Illiger. However, as pointed out by Zimmerman & Thompson (1983) this would not only destroy more than a century’s worth of nomenclatural stability but also complicate the formation of family-group names such as tribes—since the two original names each have the same root (Eurhin-), tribal names based on them would be identical (Eurhinini). To resolve these issues, a formal application was submitted to the International Commission of Zoological Nomenclature (ICZN) to preserve Schönherr’s long accepted usage of Eurhinus and Eurhynchus. To do this, the ICZN would not only have to declare Schönherr’s correction of Eurhin to Eurhinus justified, but also suppress the original use of the name Eurhynchus (as a genus of birds) in order to allow Schönherr’s subsequent use for the apionine genus to stand. Fortunately, suppressing the first use of Eurhynchus had no impact on stability, since an older name was already in use for the genus of birds and the younger name had not been used since its original description. The authors of the application also noted the support of several contemporary weevil specialists (including Charles O’Brien) and that Patricia Vaurie, in her revision of the genus one year earlier (Vaurie 1982), had used the original name Eurhin with reluctanceon the then-correct advice of her contemporaries. It was a classic case of priority versus stability, and while the ICZN typically is rather conservative in favoring priority, they were clearly swayed in this case by the interests of stability and impact on formation of family-group names.
Vaurie, P. 1982. Revision of Neotropical Eurhin (Coleoptera, Curculionidae, Baridinae). American Museum Novitates 2753:1–44.
Zimmerman, E.C. & R. T. Thompson. 1983. On family group names based upon Eurhin, Eurhinus and Eurhynchus (Coleoptera). Bulletin of Zoological Nomenclature 40:45–52.
One of the comments on my post Diffuser comparisons for 100mm macro lens was by Stephen Barlow, one of the original “concave diffuser” advocates, who claimed that the “dead” appearance of Photo #4 was an artifact of post-processing and not really a problem with the diffusion method itself. Heeding this comment, I reprocessed Photo #4 to see if this was really all that was needed to give it a “livelier” look by rather aggressively bumping up the brightness and contrast by 30% each (to correct for underexposure), then reducing the saturation by 10% (to correct for the effect on color caused by increased brightness and contrast), adjusted levels to a set point of 240 to add some more “high end,” and reduced highlights and shadows just a bit (10% each). Following is the original and then the reprocessed version of Photo #4:
Original post-processing
Additional post-processing.
There is no question that this additional reprocessing has greatly improved the photo. However, after I did this I got to thinking—why not try combining the two diffusers that gave the best results? Recall that the diffusion method in Photo #5 (SoftBoxes on flexible arm extenders) easily “won the vote” over Photo #4 (open concave diffuser) by a 2:1 margin (35 to 17). This may have been at least partly a result of the less than flattering post-processing of the original version of #4, but still the overall lighting effect on Photo #5 caused by the diffusion method used was quite dramatic. The only downside of the #5 method was the persistence of hot spots (albeit muted) from the flash heads and a dark background with lots of shadowing caused by light drop off (since the flash heads were mounted on the lens rather than extenders). Double diffusers are nothing new, the idea being that the first diffuser spreads the light out more before it hits the second diffuser than does a bare flash head, allowing even further diffusion of the light the reaches the subject (and background) for truly even lighting. I reasoned that using SoftBoxes on flexible arm extenders plus the concave diffuser would not only accomplish double diffusion but also allow controlled placement of the flash heads close to the specimen to maximize apparent light size and minimize light drop off. To test this I re-shot the same beetle with the same camera settings, and here is the result:
Flash heads mounted on flexible arms, diffused by SoftBoxes + open concave diffuser
My personal opinion is that this photo combines the best of both methods. While loss of light can be a problem with double diffusion, my use of extenders to place the flash heads close to the subject minimizes, or perhaps even completely negates this problem. Additionally, while subtle hot spots are still apparent, they are not nearly as apparent as in Photo #5 (SoftBox diffusers on extenders w/o concave diffuser—refresh your memory here) due to the additional diffusion, which also dramatically reduces shadowing as a result of better light throw. The hot spots are also more subtle than in #4 because of the larger apparent light size (a combination of closer flash head placement and the SoftBoxes), and is it just me or are the colors more vibrant and life-like in this photo compared to #4 (even reprocessed)? The flat colors were my biggest criticism of Photo #4, and even heavy-handed reprocessing, while helpful, didn’t completely bring it “back to life.” In contrast, the double-diffused photo required only typical post-processing to achieve a more than acceptable result—I have to believe that, all other things being equal, a photo that requires less post-processing is better than one that requires more.
Of course, using a setup like this in the studio is one thing—using it in the field is another. Both the extenders and the oversized concave diffuser are likely to make things a little clumsier in the field, and the two combined may be more clumsiness than I care to deal with. Nevertheless, the results from my test shots are certainly promising enough to give it an honest effort. Have I finally found a viable solution to diffusion in long-lens, full-flash macrophotography? We’ll find out this summer!
Amblycheila cylindriformis larval burrow | Major Co., Oklahoma
Step 1. Go to your favorite grassland habitat in the western half of the Great Plains anywhere from Texas north to South Dakota and look for barren soil amongst the vegetation. Clay banks near streams or in ravines and even vertical clay bluff faces are also good (although I have not myself observed the latter). “My” spot is in the Glass Mountains of northwestern Oklahoma, where talus slopes in mixed-grass prairie beneath flat-topped mesas and the ravines that cut through them provide just enough slope for this species’ liking.
Burrow diameter of ~8mm identifies this as a 3rd instar larva.
Step 2. Look for large, almost perfectly round burrow entrances that go straight down from the surface. By large, I mean approximately 6–8 mm in diameter—as large a burrow as any tiger beetle in North America will make. Many other insects create burrows, but tiger beetle burrows are generally recognizable by their almost perfectly circular shape and clean, beveled edge. Look closely, and the burrow will be seen to actually be slightly D-shaped to match the shape of the tiger beetle larva’s head—the large, sickle-shaped, upward-facing jaws resting against the flat part of the D. In the case of this species, they tend to be found in clusters of several burrows in close proximity to each other. The burrow in these photos was found at the upper edge of a drainage ravine on the upper part of the talus slopes (see diagram in this post).
Dig around the burrow, carefully excavating along the grass stem, until the larva is reached.
Step 3. Try this first—chew the end of a long, narrow grass stem (frayed and sticky will be easier for the larva to grab hold of) and stick it down the burrow until it hits bottom, tap lightly a few times to entice a bite, then yank (and I mean yank!) the stem out. With luck, the larva will come flying out of the burrow and land somewhere on the ground in front of you. (By the way, if you have never done this, you are missing one of the greatest treats that insect collecting has to offer. If you have done it, you owe it to yourself to show this to somebody else who has not ever seen it—their shocked reaction at the sight of the flying larva is beyond priceless!) Larvae are not always in the mood to bite, however, so if the so-called “fishing” technique does not work then you will have to dig. Stick the grass stem back down the burrow and begin excavating around the burrow, carefully prying away the soil adjacent to the burrow to prevent it from falling into and obscuring the burrow. Keep excavating as you follow the grass stem down until, at least, you reach the larva. In the photo above you can see in the lower right-center area the burrow with the grass stem protruding from it and the larva placed on a clump of soil in front of the shovel (for sense of scale). It seems I had an easy time of it with this larva, as literature sources report larval burrows extending down to depths of a meter or more.
Amblycheila cylindriformis 3rd instar larva.
Step 4. Behold the beast! There is nothing more that can be said—these larvae are ginormous! This particular larva measured a full 62 mm from the tips of its mandibles to the tip of its abdomen—that’s 2½ inches! No other tiger beetle larva in North America reaches this size, except perhaps the related A. hoversoni (South Texas Giant Tiger Beetle).
The distinctly smaller 2nd pair of eyes confirm this is not Tetracha or Cicindela (sensu lato)…
Step 5. If size alone isn’t enough, you can confirm that the larvae does indeed belong to the genus Amblycheila by looking at its eyes—their are two pairs, and the 1st pair (closest to the mandibles) are distinctly larger than the 2nd pair. This isn’t clearly visible in the photo above because I doused the larva with water to remove the mud and dirt that encrusted it upon removal from its burrow.
…and the distinctly separated hooks on the 5th abdominal segment confirm it is Amblycheila.
Step 6. Another way to distinguish larvae of the genus Amblycheila is by looking at the hooks on the hump of the 5th abdominal segment, best done with a hand lens (or, even better, with an MP-E65 lens!). All tiger beetle larvae have several pairs of large hooks that the larva uses to brace itself against the wall of its burrow when capturing prey to prevent the struggling prey from pulling the tiger beetle larva out of its burrow. Larvae in the genus Omus, restricted to the Pacific region of North America, have three pairs of hooks (referred to as the outer, middle, and inner hooks), while all other North American tiger beetle genera have two (having lost the outer pair). In Amblycheila and Tetracha the hooks are simple and thornlike, while larvae of all other North Americangenera have much longer middle hooks that are curved and sickle-shaped (e.g., Cylindera celeripes in this post). Amblycheila larvae can be distinguished from Tetracha larvae by the middle and inner hooks on each side being distinctly separated rather than touching at the base (e.g., Tetracha floridana in this post). There is also a cluster of short, stout hairs around the base of each hook in Amblycheila that is missing in Tetracha (e.g., Tetracha virginica in this post).
The numerous stout setae are also characteristic of the genus.
Step 7. Lastly, don’t forget to look at the hump in lateral profile—it is as alien a structure as any in the insect world. In the case of Amblycheila larvae, the bed of hairs posterior to the hooks is comprised of much shorter, stouter, and more densely placed hairs than larvae of Tetracha.
I really wish I could just buy three Canon Speedlite 580EX II flash units, mount one directly on the camera, run the other two wirelessly on each side as slaves, put a nice big soft box diffuser on each of them, and be done with it! I’m beginning to think that’s the only way I’m going to get the kind of full flash insect macro photographs that I want with larger subjects that require the use of my 100mm macro lens. You know what I mean—nice, even, diffuse, vibrant light that comes at the subject from multiple directions (eliminating those annoying specular highlights in the eyes that result from more unidirectional lighting) and with enough power to allow minimal flash pulse durations (resulting in maximum motion freeze). But I can’t—the money is not in the budget, and even if it was I’d have to think seriously about the logistics of carrying and setting up in the field three Speedlites every time I wanted to photograph an (often moving) insect.
Thus, I continue trying to come up with some kind of system that makes the most of my Canon MT-24EX twin flash unit. It’s not that I don’t like this flash unit—I love it because of its light weight (good for field use) and the front-of-the-lens mounting feature that, with its dual heads, gets the flash heads closer to the subject but avoids the “flat” lighting effect of typical ring flash units. In addition, for those shooting insect macro photographs with Canon’s shorter focal length MP-E65 macro lens, the twin flash unit is probably the best choice of all, since the lens is right on top of the subject and it is relatively easy to place diffusing materials between the subject and the flash heads—Alex (Myrmecos) with his tracing paper diffuser and Kurt (Up Close with Nature) with his concave foam diffuser are two of the more successful designs out there. I use my MP-E65 lens a lot, but I use my 100mm macro lens a lot more because many of the beetles I photograph are best photographed at magnification ranges between 0.5–1.0X and, thus, are a little too large for the 65mm lens. The longer lens-to-subject distance of the 100mm lens may be helpful for working with skittish subjects, but it also creates challenges for the MT-24EX because of its relatively low power (more light drop off) and small flash heads (more specular highlighting). For the past couple of years I’ve been using a large sheet of polypropylene foam jury-rigged to the front of the lens, and while it too has functioned fairly well, I keep thinking that if I can just get the flash heads closer to the subject—each fitted with a good diffuser—then it should be possible to achieve results similar to what can be done with the 65 mm lens.
The photos below show the results of some of the ideas I’ve been working on. My main idea was to use extenders that would allow adjustable placement of the flash heads relatively close to the subject and diffuse the light from them with a modified version of the Sto-Fens+Puffers that I have tried in the past. Here is an example of the system mounted on my camera using cheap, flexible arms mounted on a plate attached to the bottom of the camera. If I decide to use this system in the field I would want to purchase much sturdier extenders (e.g. Really Right Stuff), but at only $25 these flexible arms are perfect for proof-of-concept testing. For the modified Sto-Fens+Puffers, I completed the modifications shown by Dalantech (No Cropping Zone) (I was planning to do this when I first tried the Sto-Fens+Puffers but soon found that I preferred the concave and tent designs by Kurt and Alex, at least for use with the 65mm lens). At any rate, to test the ideas I selected a very large (for long subject-to-lens distance), very shiny (for maximum specular highlighting potential) beetle from my collection (Megaloxantha bicolor palawanica, a stunning jewel beetle from Palawan, Philippines) and set it up for “face shots” that simulate my favorite pose for beetles in the field. Keep in mind that this was not intended to be a test of lighting for pinned specimens in the studio—that is not my interest, and there are much better approaches for doing that—but rather a proxy for the kind of lighting and diffusion I might achieve in the field. Here are the results:
#1 – flash heads mounted on lens, diffused by modified Sto-Fens+Puffers
The example above show the results obtained when using the modified Sto-Fens+Puffers with the flash heads mounted directly to the front of the lens. I didn’t try this shot without diffusers, but I doubt it would be much worse than this—specular highlighting is bad because of the small apparent light size, and overall the lighting is not very even with dark shadows and harsh highlights. This shot is a perfect example of the problems inherent in using the twin-flash with a long macro lens.
#2 – flash heads mounted on flexible arms, diffused by modified Sto-Fens+Puffers
This second shot shows the results when the modified Sto-Fens+Puffers are mounted on the flexible arm extenders and positioned as close to the subject as possible to maximize apparent light size. This was supposed to be the system that gave me the results I was looking for, but honestly I am not impressed. The highlights in the eyes are certainly larger than in the previous photo, and the overall lighting is not quite as uneven, but still the highlights are harsh and fairly sharply defined. Considering the greater difficulty in positioning the flash heads compared to lens-mounted, I have to consider the marginal improvement in lighting not worth the effort.
#3 – flash heads mounted on lens, diffused with modified Sto-Fens+ Puffers and concave diffuser (closed)
This third shot has the modified Sto-Fens+Puffers once again mounted on the lens, but also attached is my trusty concave diffuser. Honestly this combination of diffusers provides much better overall lighting and softening of the highlights compared to the previous shot, even though the flash heads are mounted on the lens rather than positioned close to the subject. Apparently the concave diffuser, though further away from the subject, still has larger apparent size and thus allows light to be transmitted to the subject from a larger apparent area. I have not normally used another diffuser between the flash heads and the concave diffuser, but my impression from this shot is that the modified Sto-Fens+Puffers do a good job of dispersing light before it hits the concave diffuser to soften the “hot spots” behind it and provide somewhat more even lighting across its surface.
#4 – flash heads mounted on lens, diffused with modified Sto-Fens+ Puffers and concave diffuser (open)
When I use the concave diffuser, I normally pull the corners back and attach them to the tops of the flash heads with Velcro to minimize light blow back (although how effective it is I really don’t know). Just for kicks, I decided to try some shots with the concave diffuser not pulled back, but left open and extending out over the subject. I did this because that actually more closely approximates how smaller versions of concave diffusers are used with the 65mm lens. The effect was not only remarkable diffusion of light, with specular highlights and hot spots almost completely lacking, but also much better lighting behind rather than just on the front of the specimen. That said, the quality of the light lacks vibrancy and seems somewhat “dead,” perhaps because of the great distance between the flash heads and the diffuser and the MT-24EX units relatively limited power. The large diffuser extending far out in front of the lens might cause problems with bumping and skittish subjects, but I am intrigued enough by this result to continue with some field testing to see what I think.
#5 – flash heads mounted on flexible arms, diffused by SoftBoxes
The final shot shows the results of another promising setup—this one again uses the flash heads mounted on flexible arm extenders to get them close to the subject, but instead of the modified Sto-Fens+Puffers I fitted each flash head with a mini SoftBox. This was not easy, as the SoftBox is designed for much larger flash heads than those of the MT-24EX, so I took another set of Sto-Fen diffusers, cut off the face, then hot-glued the SoftBox to the open Sto-Fen. Thus modified it was a simple matter to “snap” the SoftBoxes in place over the flash heads. Despite the term ‘mini’ these Soft Boxes still provide a much larger area for light transmission than the modified Sto-Fens+Puffers, and this much larger apparent light size has a dramatic effect on the overall lighting and diffusion. I’m tempted to say I like this one best. However, I do have to consider ease of function in the field—the lens-mounted Sto-Fen+Puffers and concave diffuser, either open or closed, would certainly be easier and involve no further cost (for better extenders than the cheap flexible arms I now have), but if SoftBoxes on flash heads placed close to the subject gives better results than I may have to go with it.
Will you please help me decide? I setup this little poll so you can tell me which of the systems you thought gave the most pleasing result in terms of vibrant, evenly diffused light. I can’t (to my knowledge) tell who’s voting (and if there is a way don’t tell me because I don’t want to know), so don’t let privacy concerns prevent you from adding your vote—the more voters that participate, the better information I get to help me with my decision.
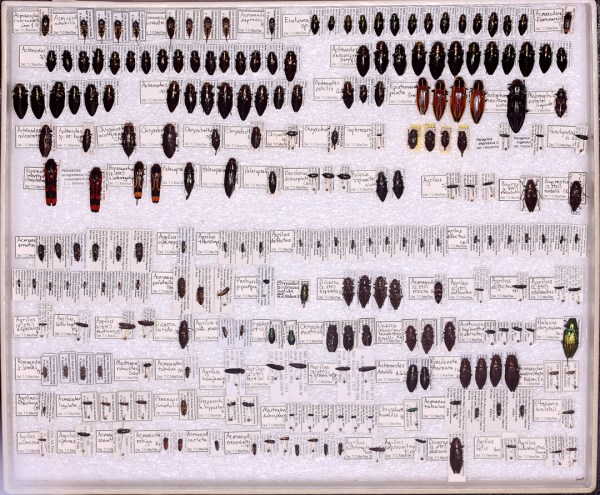
I’ve been working on identifying Buprestidae accumulated from a variety of sources over the past year—mostly exchanges and gifts, before beginning the processing specimens collected during this past season. Once identified, and combined with specimens gleaned from material submitted by other collectors for identification (I generally only retain examples of species that are poorly represented in my collection or specimens that represent and will serve as vouchers for significant new distributional records), they make for a very pretty box of Buprestidae! It’s kind of nice to keep them collected together like this for a little while, but I’ll soon incorporate them into the main collection where they will more securely protected and to free up the temporary box now containing them for new material as it moves through the process of labeling and identification. (Incidentally, I think I might like to do a series a posts over this winter covering my version of the specimen curation process).
There are some very cool Buprestidae in this box—88 species in all, that originated from a remarkable variety of locations across the U.S., Mexico/Central America, and South America. Do you see any species of particular interest?
236 specimens representing 88 species of Buprestidae
Approaching the Unapproachable: Tips and Tricks for Field Photography of Wary Insects presented by Ted MacRae. Learn valuable field photography techniques from Ted MacRae, Senior Research Entomologist at Monsanto Company. Ted specializes in photographing tiger beetles in their natural habitats. These colorful beetles are fast runners and powerful fliers, making them among the more difficult insects to approach. Ted will describe some of the techniques that he uses to obtain close-up and macro photographs of these beautiful beetles and also techniques for field photography of other insects as well.