Beautiful box of Buprestidae

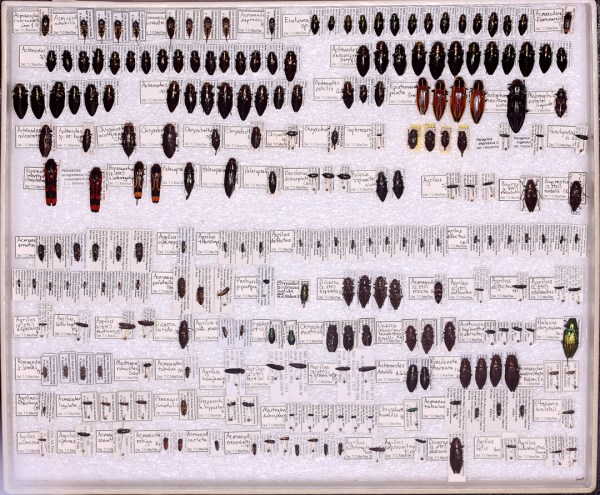
I’ve been working on identifying Buprestidae accumulated from a variety of sources over the past year—mostly exchanges and gifts, before beginning the processing specimens collected during this past season. Once identified, and combined with specimens gleaned from material submitted by other collectors for identification (I generally only retain examples of species that are poorly represented in my collection or specimens that represent and will serve as vouchers for significant new distributional records), they make for a very pretty box of Buprestidae! It’s kind of nice to keep them collected together like this for a little while, but I’ll soon incorporate them into the main collection where they will more securely protected and to free up the temporary box now containing them for new material as it moves through the process of labeling and identification. (Incidentally, I think I might like to do a series a posts over this winter covering my version of the specimen curation process).

There are some very cool Buprestidae in this box—88 species in all, that originated from a remarkable variety of locations across the U.S., Mexico/Central America, and South America. Do you see any species of particular interest?

236 specimens representing 88 species of Buprestidae

236 specimens representing 88 species of Buprestidae

Copyright © Ted C. MacRae 2012

Approaching the unapproachable

Yesterday I gave a talk at the Entomological Society of America’s Insect Macrophotography Symposium, focusing on techniques that I use for photographing wary insects in the field. Turnout for the symposium was awesome (I estimate ~125 people in attendance), and as the first talk I’ve given where I presented myself as a photographer I was pleased at the warm reception I got. A big thanks to my friends and colleagues who showed up to see the talk—it was great seeing your friendly faces in the crowd.

For those of you who couldn’t attend the ESA meetings this year or were unable to see my talk, I’ve attached a PDF version of the talk to this post—click on the image of the title slide below to see it. I expect I might give some version of this talk again in the future, so I would love to hear about any techniques you have found useful for approaching and photographing wary, skittish insects in their native habitats.

Copyright © Ted C. MacRae 2012

Persistence Pays

For the past three years I’ve crisscrossed the country in search of some of North America’s rarest tiger beetles, each time hoping to get that “perfect” photograph of an unconfined beetle exhibiting natural behavior in its native habitat. I’ve managed to get photos of most, though there are a few that I wish I could do over, but the only one that I think really comes close to the ideal I have in my mind is this one of Cicindela formosa generosa, featured in the ESA 2013 World of Insects Calendar (and, ironically, taken only about 5 miles from my home).

A consequence of all this attention to uncommon species is that I’ve somewhat neglected getting good photographs of some of our most common tiger beetles. One of these is Cicindela repanda (Bronze Tiger Beetle), which can be found near almost any body of water throughout the bulk of eastern North America. This summer I resolved to correct that situation, but I found this to be more difficult than anticipated. The first time I tried to photograph the species was when I encountered them in late July on a wide, open beach along the Mississippi River on a hot, summer day. I found the beetles almost completely unapproachable due to the extreme heat and lack of any cover that could be used to my advantage. I had better luck in mid-August when I attracted some individuals to an ultraviolet light that I had setup one night at a spot further north along the river. Those photos were acceptable technically but lacking otherwise, primarily because the beetles didn’t assume any of the charismatic poses associated with the thermoregulatory behaviors exhibited by active beetles in the middle of a hot summer day. Finally, at the end of August, I encountered the species yet again on a small patch of sandy/muddy river bank along the Mississippi River just south of St. Louis. It was another hot day—quite hot actually—but with the help of some features of terrain I was finally able to get that photo of the species that I’ve been wanting.

Cicindela repanda (Bronze Tiger Beetle) | St. Louis Co., Missouri

I like this photo for a number of reasons. The beetle is nicely profiled while paused “tall” on its front legs (a common posture on hot days as they try to lift themselves up off the hot soil surface), the angle is low, and the subject and foreground are well focused in front of a nicely blurred backdrop of rocks. It is these rocks that actually helped me get this photo. I had chased several individuals down on the open sand for some time, but since the day was as hot as my first attempt and I wasn’t having any better luck. Every now and then one of the beetles that I was “working” would fly up into this rockier area, and I noticed that I was able to get closer to these beetles because I was able to stay lower as I made my approach. I began preferentially working beetles towards the rocks and finally got one that settled down and started showing normal searching behaviors despite the fact that I was already in fairly close range. At that point, it became a matter of waiting for the beetle to “lower his guard” while I assumed a shooting position, and as soon as it began acting normal I slowly closed in and began taking shots.

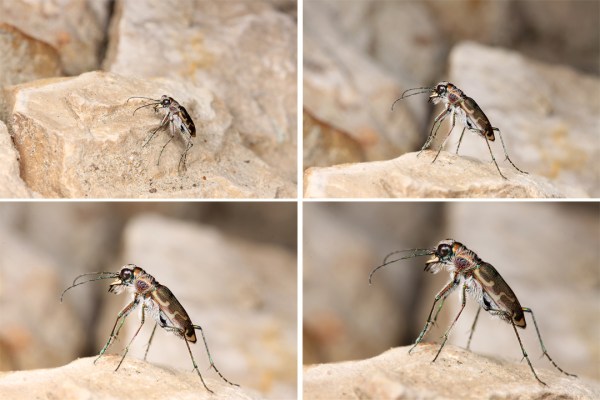
Getting close is a process, as these successive shots demonstrate.

This collage shows the four shots immediately preceding the final photo and how each shot brought me a little closer to the beetle (and that final composition that I wanted). The beetle was still in search mode as it crawled up the side of one rock and I began taking photos, but upon reaching the top it paused and lifted itself up high on its front legs. I knew I would have 5, 10, maybe 15 seconds at the most to capture this pose before it began moving again, so I closed in slowly but assertively and fired a shot every couple of seconds until I got the one that I wanted. At that moment, the beetle flew away, and although I tried for another 20 minutes or so I was unable to get another beetle back up on the rocks for more shots. How fleeting success can be!

Copyright © Ted C. MacRae 2012

Hand-held caddisflies

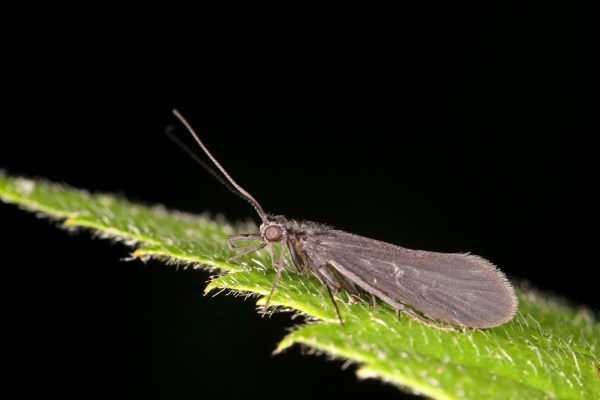
Chimarra sp. (Trichoptera: Philopotamidae) | Sam A. Baker State Park, Missouri

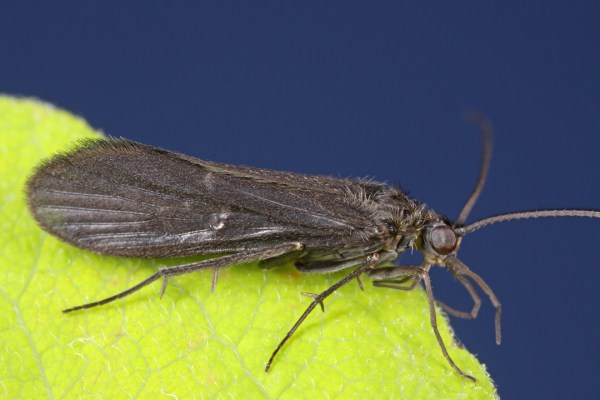
I recently found a folder in my files with a number of photos taken way back in April during a visit to Sam A. Baker State Park in the Ozark Highlands of southeastern Missouri. I never got around to posting them at the time, but there are some interesting photo series in the folder. One includes these photographs of an adult caddisfly (order Trichoptera). I remember seeing these insects in fair numbers resting on the foliage of shrubs alongside Big Creek and thinking they were some kind of archaic family of moths. Admittedly, it wasn’t until I got the photos up on the computer and saw the lack of any coiled proboscis for mouthparts, prominent maxillary and labial palps, and hairy rather than scaled wings that I realized what these were. My mistake is understandable—trichopterans are quite closely related to the order Lepidoptera, the two groups together forming an “ironclad” monophyletic clade (Wheeler et al. 2001).

The distinct palps, lack of proboscis and ”hairy” wings identify this insect as a caddisfly rather than a moth.

It was the beginning of this past season that I began practicing “hand-held” technique for insect macrophotography in earnest. I don’t use a tripod, so shooting insects resting on foliage requires that I brace my body to minimize movement. This is fairly easy if I can sit or crouch but very difficult if I have to stand. Moreover, even if I can manage to eliminate body movement, the plant on which the insect is resting often moves because of wind. What is really needed is a way to “lock” the relative positions of the camera and subject—movement is fine as long as both camera and subject are moving together. That’s where hand-holding the subject comes in… well, handy! I’ve learned to carry a small folding scissors in my waist pack when I am in the field, and by very gently grasping the petiole of the leaf on which the insect is perched with my left-hand thumb and forefinger and snipping the petiole with the scissors, I can detach the leaf without disturbing the insect and then hold it in any position and against any background that I desire. To take the photograph, I hold the camera in my right and and rest the lens on my left wrist or the base of my left thumb and then fine tune the position of the insect on the leaf while composing through the viewfinder. In this manner I not only lock the subject-lens distance but also precisely control the composition and background. This works best with the MP-E 65mm lens—its working distance of only 4″ at 1X and even less at higher magnifications is perfectly suited for this technique. I do also use this technique with my 100mm lens, but it is more difficult to do because of the longer working distance of the lens and resulting need to rest the camera further back on the left forearm. At any rate, these photos represent some of my earliest efforts using what I call the “left wrist” technique.

Among caddisflies, the blackish body and wings are characteristic for this genus.

I thank Dr. Robert Sites, University of Missouri-Columbia, for identifying the individual in these photos to the genus Chimarra in the family Philopotamidae (he also noted that male genitalic characters would be needed for species determination). Ferro and Sites (2007) listed three species of caddisflies in this genus from Sam A. Baker State Park (C. feria, C. obscura, and and unidentified Chimarra sp.).

REFERENCE:

Ferro, M. L. & R. W. Sites. 2007. The Ephemeroptera, Plecoptera, and Trichoptera of Missouri State Parks, with Notes on Biomonitoring, Mesohabitat Associations, and Distribution. Journal of the Kansas Entomological Society 80(2):105–129.

Wheeler, W.C, M. Whiting, Q.D. Wheeler & J.M. Carpenter. 2001. The phylogeny of extant hexapod orders. Cladistics 17: 113-169.

Copyright © Ted C. MacRae 2012

Beetle Collecting 101: How to pin a beetle

It has been a long time since I initiated my Beetle Collecting 101 series (more than two years!), and to date the first issue—Beetle Collecting 101: Dress for Success—remains the one and only lesson that I’ve posted. I really had intended to follow that up with nittier-grittier posts on the actual mechanics of collecting beetles and processing the specimens for long-term preservation, but I didn’t and don’t know why other than to say, well… life happens. It’s never too late to fix something, however, so as a long overdue follow up I thought I would give a short video lesson on how to pin a beetle—specifically a cerambycid (longhorned) beetle. Featured in this short (4:31) video is the lovely Megacyllene decora (amorpha borer), which I found back in early September at a site in Missouri’s southeastern lowlands. Click the image to be directed to the video.

Copyright © Ted C. MacRae 2012

How to deal with a crappy photo of a beautiful beetle

One thing I’ve discovered after trying my hand at insect macrophotography for the past three years is that I take a lot more photos than I can possibly post. As a result, I tend to focus my efforts on more recent photos, especially those that have some kind of interesting natural history story to tell. Photos that don’t get posted soon after I took them tend to accumulate in my virtual “not yet posted” files, and periodically I need to browse through them to re-acquaint myself with any that I may have since forgotten about. Not all of these “other” photos are bad or uninteresting—they just happened to be taken at a time when I had other photos that I was more interested in using. Admittedly, however, there truly are some rather ugly photos in these archives, and the older they are the more frequently I find myself asking, “Why in the heck did I even keep that photo?” (hopefully this indicates improvement in my standards of what constitutes a photo worth keeping).

Cicindela limbalis | nr. Laramie, Wyoming

There is, however, a lesson here to be learned, and that is don’t be too quick to send to the recycle bin a photo that at first sight appears not worth keeping. Take, for example, this photograph of Cicindela limbalis (Common Claybank Tiger Beetle). This pretty little species is broadly distributed in Canada and the northern U.S. from New England across the Great Plains to the eastern edge of the Rocky Mountains. Different populations show differing degrees of maculation, and here in Missouri the species is nearly immaculate. I found the individual in the above photo in Wyoming’s Medicine Bow National Forest as an example of the more completely maculated forms. However, since it was the only individual I saw in that location I didn’t try to photograph it in the field. Instead, I captured it and photographed it later in the “studio” (my hotel room). Sadly, this was in September 2010 when I was still a rank beginner in terms of insect macrophotography, and as a result I was far less versed on such details as lighting and composition than I am now. I’m ashamed to say that I thought this photo was “good enough.”

Of course, by today’s standards that is one crappy photo! If it wasn’t the sole photo that I have from that population I wouldn’t hesitate to throw it away. However, since I’ve been putting some effort recently into honing my Photoshop skills, I thought I would see if I could “rescue” from this crappy photo a halfway decent one. I did this as follow:

  • I opened the “Levels” tool, clicked on the “Set White Point” button, and touched the cursor to an area of the upper background. This not only eliminated most of the gray tinge in the background but also brightened up the beetle quite a bit. I brightened the beetle even more by pulling the left slider button in the “Input Levels” box a little more to the right (12). In the case of this photo, such levels adjustments were sufficient, but in some cases I might also slightly reduce shadowing using the “Shadows/Highlights” tool (2–10% is usually enough) or adjust color using the “Adjust Hue/Saturation” tool (whether you increase or decrease saturation, a light touch is best).
  • With the background brightened up, the debris spots were even more visible and needed to be cleaned up. This was easily accomplished with the “Spot Healing Brush” tool. I keep the size setting as small as possible for each spot while still encompassing the entirety of the spot. Debris spots next to or on the surface of the beetle are better dealt with using the “Clone Stamp” tool—this tool is a little more involved than the Spot Healing Brush, since a source point needs to be selected for each spot. However, it is more effective than the Spot Healing Brush for spots that are in areas where the background is not uniform. Again, I use the smallest size possible and carefully consider the source point for each clone to achieve the best results.
  • The last major problem with this photo was its composition. If I were to take it again today, I would angle the front of the beetle higher in the photo and not clip the middle and hind tarsi or antennal tip as I did in this photo. There is not a lot (though there is a little) that can be done about the clipping, but I used the “Straighten” tool to change the angle of the beetle by clicking on the tip of the abdomen and dragging the cursor to somewhere between the lower front leg and antenna. This resulted in a more pleasing pose for the beetle, but of course it also created triangular areas of blank canvas on each side that had to be dealt with. To do this, I cropped the edges of the photo to remove as much of the blank canvas as I could without cropping off any more of the beetle (I did end up cropping a little bit of the left hind leg), then used the Clone Stamp tool to fill the remaining blank areas with white background (this is much more difficult when the background is not as uniform as in this photo). Careful cloning is required in areas that are close to the beetle to prevent unintended alterations, and in this case I even had to clone in a fake lower tarsus for the middle leg and antennal tip for the left antenna to fill gaps that I could not crop. Cloning in new body parts is not always possible, and even when it is possible it’s not easy; however, with care and practice reasonable results can be achieved. In the case of this beetle it was not too difficult since the body parts that needed to be cloned were just short extensions of already blurred parts.

Lastly, I used typical “Unsharp Mask” settings to sharpen the photo, and here is the final result:
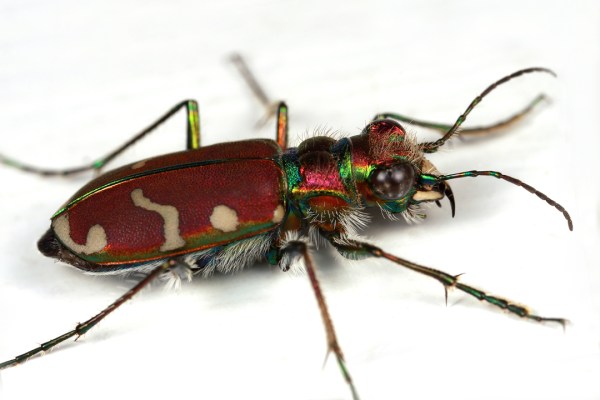
This photo won’t win any awards, but it is a completely serviceable illustration of the species.

This is still not a great photo—in addition to the clipping, the focus is a tad too deep and the beetle has assumed that dreaded “ground hugging” pose that I so detest with confined subjects. Nevertheless, I wouldn’t be ashamed to use this photo if none better were available.

What alternative techniques would you have used on reworking this photo?

Copyright © Ted C. MacRae 2012
Post processing—then and now

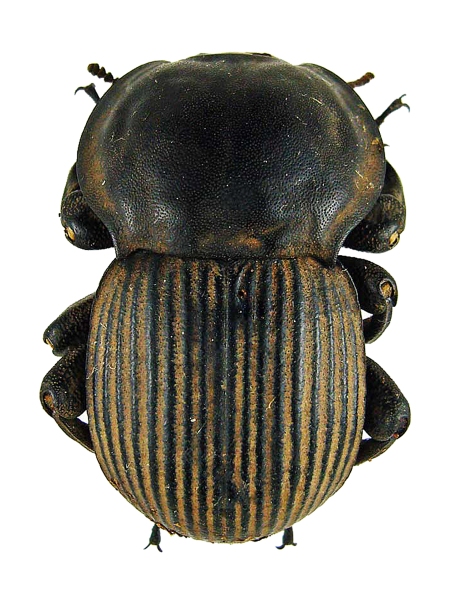
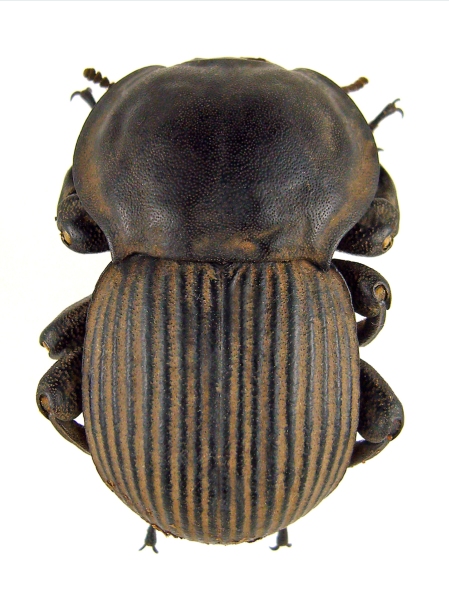
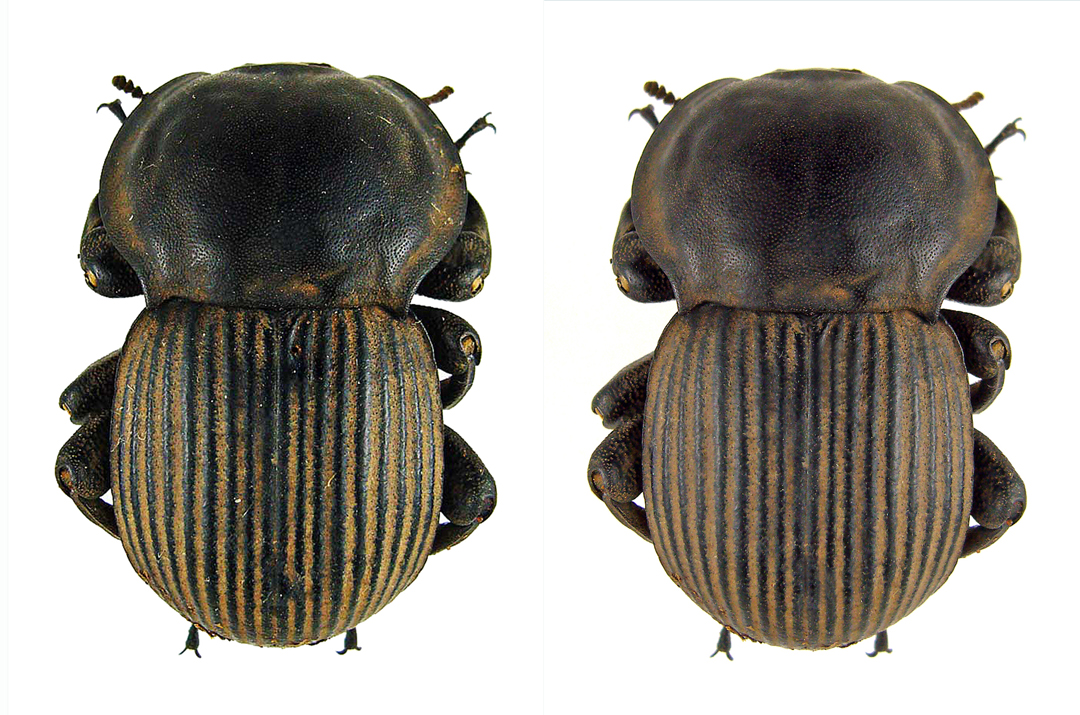
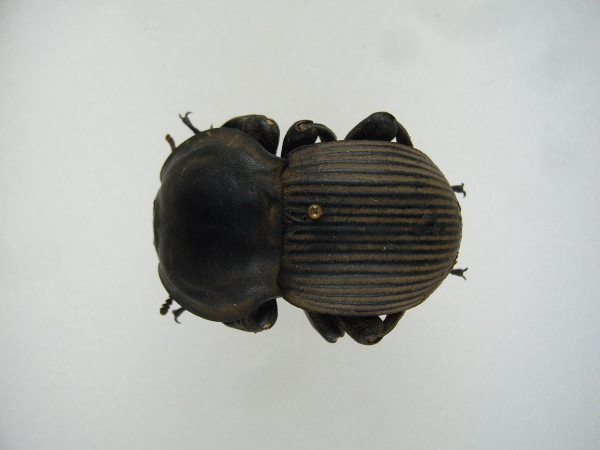
I recently happened upon one of my first attempts at post processing a photograph of a pinned insect specimen. The subject was Anomalipus elephas (large armoured darkling beetle), a tank of an insect (this example measuring 32 mm in length) belonging to the family Tenebrionidae. At the time, I was quite pleased with the results of my crude post processing efforts and proudly posted the “enhanced” photo in full-sized glory for all to behold. Since then, I’ve gained some experience with post processing of photos, and when I saw the processed photo this time I knew that there was considerable room for improvement. I thought it might be interesting to give the photo another PP whack and compare the two efforts from then and now.

Here is the original photo—keep in mind that the photo was taken with a small (though fairly decent) point-and-shoot camera (Panasonic DMC-FX3) a few months before I made the move to my current dSLR setup. I pinned the specimen to a styrofoam board, illuminated it with two 23w compact fluorescent light bulbs, and took the photo with the camera set on its “macro” setting. For the original post processed version (using Adobe Photoshop Elements version 6.0), I rotated and cropped the photo, then increased brightness and contrast (I don’t remember the values for each), used the clone tool to remove the pinhead (I’d just figured out how to do this), and increased sharpness using unsharp mask. This is all well and good (although I think the added contrast was a little excessive); however, I did make two big mistakes. The first was using the eraser tool to create a white background—a tedious process, especially around the perimeter of the subject to avoid “clipping” any of the subject’s body. The second was leaving the numerous small pieces of debris clinging to the subject. Debris on pinned (and even live) specimens is now a pet peeve of mine—I find it detracts greatly from the appearance of the photo, yet it is remarkably easy to remove in all but the most extreme of cases. At any rate, here is the result of that original attempt:

For the latest attempt, I rotated and cropped the original photo as before. Next, I created a white background, not with the “Eraser Tool” but rather by opening “Levels”, clicking on “Set White Point”, and touching the darkest part of the background. Voilá—a beautiful white background with no clipped subject edges! The subject still needed to be brightened up (two 23w fluorescent bulbs don’t put out that much light); however, instead of directly adjusting brightness I set “Lighten Shadows” to a value of +30% (a rather heavy handed setting) to also reduce shadows around the subject’s legs. Then I used the “Clone Stamp Tool” to clone out the pinhead, but this time I didn’t stop there—I continued using the tool to clone out all of the tiny little pieces of debris on the subject surface. Using the clone stamp tool effectively requires some practice, but eventually one learns to adjust the size and define the source set point to achieve almost perfect results. Lastly, I increased sharpness with “Unsharp Mask” (118%, 1.0 pixels, 8 levels). That’s it—took me all of about 3 or 4 minutes to post process the original photo to achieve the following result:

To compare the two post-processed images directly click here. Of course, my current camera setup is capable of much higher quality photographs than the point-and-shoot used for the subject of this post; however, the sequence of post processing  steps that I use is essentially the same (if less heavy handed). One final note—I am not a Photoshop expert, and perhaps some of the processes I have described can be done even more effectively or easily than in the manner I have described. I would welcome any comments or tips that you think might offer a better way to post process photos of pinned specimens.

Copyright © Ted C. MacRae 2012
Consolation Crossidius

Rewind back to Day 2 of this year’s Annual Fall Tiger Beetle Trip at Gloss Mountain State Park in northwestern Oklahoma—these were actually the first non-Missouri beetles that I photographed on the trip. Crossidius pulchellus is a longhorned beetle (family Cerambycidae) that occurs commonly on flowers of broom snakeweed (Gutierrezia sarothrae) and relatives throughout the Great Plains and southern Rocky Mountains.

Crossidius pulchellus on flowers of Gutierrezia sarothrae | Major Co., Oklahoma. The dense vestiture (covering of hairs) of the beetles is made more conspicuous by backlighting the beetles with the sun.

I find it rather ironic that Crossidius pulchellus was the first western beetle that I encountered, since my original plans for this year’s late-season trip centered on looking specifically for longhorned beetles in the genus Crossidius (see last year’s Crossidius coralinus fulgidus for an extraordinarily beautiful representative of this genus). Unlike the vast majority of the family that develop as larvae in dead wood, species in this diverse, exclusively western North American genus bore through the roots living, perennial shrubs belonging to the genera Gutierrezia, Chrysothamnus/Ericameria, and Haplopappus (family Asteraceae)—the “goldenrods” of the west, they bloom in widespread, yellow-flowered profusion as summer turns to fall. A wide variety of insects are attracted to these blooms, most of which—bees, flies, wasps, moths, etc.—are opportunistic pollinators. Crossidius beetles, however, are intimately associated with the plants, seemingly spending their entire, brief adult lives either perched, feeding, or mating upon the flowers. Even at night, rather than leaving the plants to search for protected hiding spots, they simply bury themselves deeper amongst the flowers and await the next morning’s first, warming rays of sunlight.

Sampling the diversity of Crossidius that springs forth each year across the west requires carefully timed travel to multiple localities spread widely across rough terrain. As longhorned beetles go, the genus exhibits an astounding level of polytopism (geographically-based variation) that in many respects resembles that exhibited by North American tiger beetles. This has resulted in the description of a relatively large number of species, most of which can be further divided into numerous recognizable subspecies and even local morphs. The discontinuous distribution of their host plants across the broken western topography and resulting isolation of local populations have contributed to this variability, further complicated by hybridization among species occurring together in a given locality (Linsley & Chemsak 1961). I got a taste of the diversity of these beetles during last year’s fall tiger beetle trip as I looped through Colorado, Idaho, and Utah. Although my plans to look for them this year didn’t work out, my appetite remains whetted. There is always next year!

REFERENCE:

Linsley, E. G. & J. A. Chemsak. 1961. A distributional and taxonomic study of the genus Crossidius (Coleoptera, Cerambycidae). Miscellaneous Publications of the Entomological Society of America 3(2):26–64, 3 color plates.