2014 Great Plains Collecting Trip iReport

During the past year or so I’ve followed up my longer (one week or more) insect collecting trips with a synoptic “iReport”—so named because they are illustrated exclusively with iPhone photographs. It may come as a surprise to some, but iPhones actually take pretty good pictures (especially if you pay attention to their strengths and weaknesses), and their small, compact size makes it easy to take lots of photos while trying to use time in the field wisely. I find the iPhone to be a great tool for documenting the general flavor of a trip and for taking quick photos of subjects before getting out the big rig. I will, of course, feature photographs taken with the ‘real’ camera in future posts.

For this trip, I teamed up with Jeff Huether for the third time since 2012. Our quarry for this trip was longhorned beetles (family Cerambycidae) in the genus Prionus. Larvae of these beetles are subterranean, with some species feeding on roots of woody plants and others on roots of grasses and other herbaceous plants. Among the latter are an array of species occurring in the Great Plains, many of which have been very uncommonly collected. However, in recent years lures have been produced that are impregnated with prionic acid—the principal component of sex pheromones emitted by females in the genus. Originally produced for use in commercial orchards (which are sometimes attacked by P. laticollis in the east and P. californicus in the west), these lures are proving themselves to be useful for us taxonomist-types who wish to augment the limited amount of available material of other, non-economic species in the genus. While Prionus was our main goal, rest assured that I did not pass on the opportunity to find and photograph other beetles of interest.

I began the trip by driving from St. Louis to Wichita, Kansas to meet up with Jeff, who had flown there from his home in upstate New York. Our plan was to visit sites in southeastern Colorado and northeastern New Mexico, where several of the Prionus spp. that we were looking for were known to occur. Before doing this, however, we stopped in Hardtner, Kansas to see “Beetle Bill” Smith and tour his amazing natural history tribute, Bill and Janet’s Nature Museum.

"Beetle" Bill Smith, founder of Bill & Janet's Nature Museum, Hardtner, Kansas.

“Beetle Bill” Smith, founder of Bill & Janet’s Nature Museum, Hardtner, Kansas.

After the tour (and a delicious lunch at his house of fried crappie prepared by his wife Janet), we headed west of town and then south just across the state line into Oklahoma to a spot where Bill had found a blister beetle (family Meloidae) that Jeff was interested in finding. During lunch I mentioned a jewel beetle (family Buprestidae) that I had looked for in the area several times, but which had so far eluded me—Buprestis confluenta. Emerald green with a dense splattering of bright yellow flecks on the elytra, it is one of North America’s most striking jewel beetles and is known to breed in the trunks of dead cottonwoods (Populus deltoides). Bill mentioned that he had collected this species at the very spot where we were going, and when we arrived I was enticed by the sight of a cottonwood grove containing several large, dead standing trunks—perfect for B. confluenta.

Buprestis spp. love large, dead, barkless cottonwood trunks.

Buprestis spp. love large, dead, barkless cottonwood trunks.

I searched for more than one hour without seeing the species, though I did find a few individuals of the related (and equally striking) B. rufipes on the trunks of the large, dead trees. Once that amount of time passes I’m no longer really expecting to see what I’m looking for, but suddenly there it was in all of its unmistakable glory! It would be the only individual seen despite another hour of searching, but it still felt good for the first beetle of the trip to be one I’d been looking for more than 30 years!
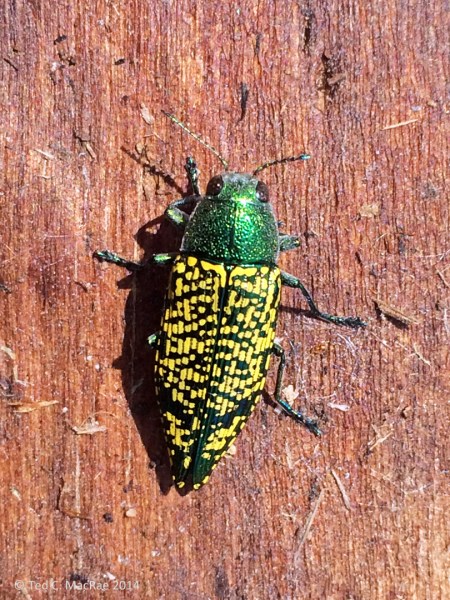
Buprestis (Knulliobuprestis) confluenta, on large, dead Populus deltoides trunk | Woods Col., Oklahoma| USA: Oklahoma

Buprestis confluenta, on the trunk of a large, dead cottonwood (Populus deltoides) | Woods Col., Oklahoma| USA: Oklahoma

I usually wait until near the end of a collecting trip to take the requisite selfie, but on this trip I was sporting new headgear and anxious to document its maiden voyage. My previous headgear of choice, a vintage Mambosok (impossible to get now), finally disintegrated after 20 years of field use, and on the way out-of-town I picked up a genuine Buff® do-rag. I know many collectors prefer a brim, but I don’t like they way brims limit my field of vision or get in the way when I’m using a camera. Besides, I’m usually looking down on the ground or on vegetation, so sun on my face is not a big issue. And do I be stylin’ or wut?

A "selfie" makes the trip official.

A “selfie” makes the trip official.

We made it to our first locality in southeast Colorado by noon the next day—the vast, dry grasslands north of Las Animas. Jeff had collected a blister beetle of interest here on an earlier trip, but as I looked out across the desolate landscape I wondered what on Earth I could find here that would be even remotely interesting to me.
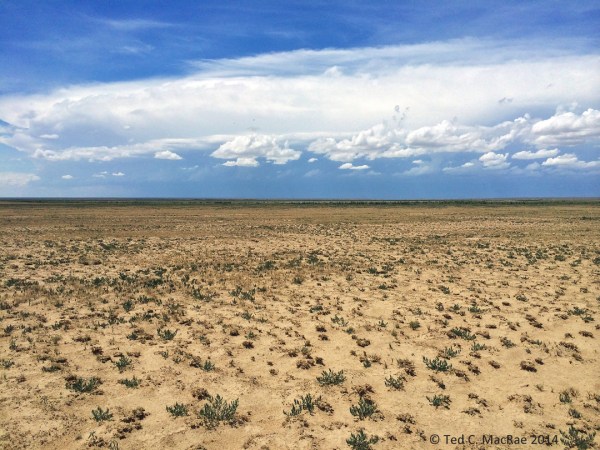
Shortgrass prairie habitat for Prionus integer.

Shortgrass prairie habitat for Prionus integer.

Letting Jeff have some time to look for his blister beetle, I started down the roadside and after a short time found a live female Prionus sp. (later determined to represent P. integer). The only female Prionus I had ever collected before was P. heroicus, a giant species out in Arizona, and that was almost 30 years ago, so I wasn’t immediately sure what it was. Eventually I decided it must be Prionus, and a quick stop to kick the dirt while Jeff looked for his beetle turned into an intense search for more Prionus that surely were there. I did find two male carcasses shortly thereafter, and then nothing more was seen for the next hour or so.

Prionus integer male | Bent Co., Colorado

Prionus integer male (found dead) | Bent Co., Colorado

During the time that I was searching, however, I started noticing strange burrows in the ground. I excavated a few—they were shallow but contained nothing. Nevertheless, they matched the size of the beetles perfectly—surely there was a connection?
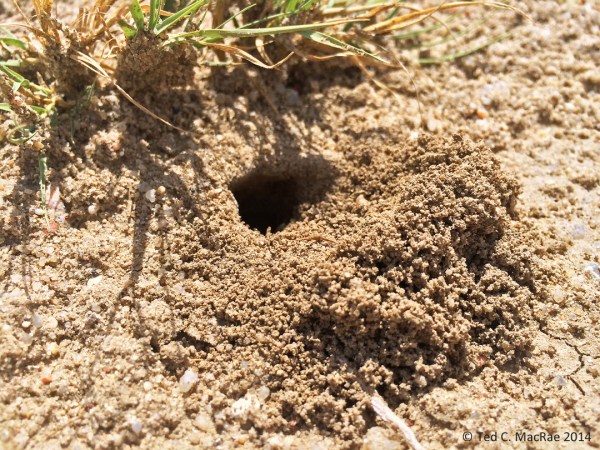
Prionus integer adult burrow.

Prionus integer adult burrow.

I wondered if Jeff knew about the beetles occurring here, but when I showed him what I had found the surprised look on his face told me this was not the case. I showed him the burrows, and we both agreed they had to be connected. I got the shovel out of the truck and walked back to the area where I had seen the live female, then sunk the shovel deep into the ground next to one of the burrows and pried up a chuck of the soil containing the burrow in its entirety. As we broke apart the soil another female was revealed, and we immediately decided to set out some traps baited with prionic acid lures. We expected the beetles to become active during dusk, so we went into town to get something to eat and then check out another nearby locality before returning to the site at dusk. While we were gone it rained heavily at the site, so we weren’t sure if or how this would affect beetle activity and their possible attraction to the traps. However, as we approached the site (slipping and sliding on the muddy 2-track), we could actually see beetles crawling on the road from afar. What we found when we got out of the car was nothing short of mind-blowing—the beetles were everywhere, crawling on the road, crawling through the grass, and overflowing in the flooded traps! The vast majority were males, as expected, but we also found a fair number of the much more rarely collected females. This was significant, as the chance to observe mating and oviposition behavior made the encounter far more informative than if we had only found and collected the much more numerous males.

Prionus integer mating pair.

Prionus integer mating pair.

The following day we headed south into northeastern New Mexico to look at some shortgrass prairie sites near Gladstone (Union Co.) where two species of Prionus had been collected in recent years: P. fissicornis (the lone member of the subgenus Antennalia) and P. emarginatus (one of eight species in the poorly known subgenus Homaesthesis, found primarily in the Great Plains and Rocky Mountains). Fresh off of our experience the previous day, we were on the lookout for any suspicious looking “burrows” as we checked the roadsides at several spots in the area but found nothing, and while a few blister beetles piqued the interest of Jeff at one site, the complete absence of woody vegetation or flowering plants in general in the stark grassland landscape made the chances of me finding any other woodboring beetles remote. Eventually I became distracted by the lizards that darted through the vegetation around us, including this lesser earless lizard (Holbrookia maculata) and a collared lizard (better photos of both forthcoming).

Holbrookia maculata (lesser earless lizard) | Union Co., New Mexico.

Holbrookia maculata (lesser earless lizard) | Union Co., New Mexico.

Despite no clues to suggest that Prionus beetles were active in the area, we set out some traps at two sites with soil exposures that seemed similar to those seen the day before. As Jeff set the last pair of traps in place, my distraction with saurian subjects continued with a dusty hognose snake (Heterodon nasicus gloydi). While photographing the animal I looked down to my side, and what did I see but a male Prionus fissicornis crawling through the vegetation! I called out to Jeff, and for the next half an hour or so we scoured the surrounding area in a failed attempt to find more. We would not be back until the next morning to check the traps, so our curiosity about how abundant the beetles might be would have to wait another 18 hours. We cast an eye towards the north and watched late afternoon thunderstorms roll across the expansive landscape and decided to check out the habitat in nearby Mills Rim.

Thunderstorms over shortgrass prairie.

Thunderstorms over shortgrass prairie.

The rocky terrain with oak/pine/juniper woodlands at Mills Rim was a dramatic contrast to the gently rolling grasslands of the surrounding areas. We came here mostly out of curiosity, without any specific goal, but almost immediately after getting out of the car a huge Prionus male flew up to us—almost surely attracted by the scent of the lures we were carrying. Within a few minutes another male flew in, and then another. Because of their huge size and occurrence within oak woodland habitat, we concluded they must represent P. heroicus, more commonly encountered in the “Sky Islands” of southeastern Arizona. We stuck around to collect a few more, but as dusk approached we returned to the surrounding grasslands to set out some lures to see if we could attract other Prionus species. The frontal system that had waved across the landscape during the afternoon had left in its wake textured layers of clouds, producing spectacular colors as the sun sank inexorably below the horizon.

Sunset over shortgrass prairie.

Sunset over shortgrass prairie.

This attempt to collect grassland Prionus beetles would not be successful, and as dusk progressed we became distracted collecting cactus beetles (Moneilema sp., family Cerambycidae) from prickly pear cactus plants (Opuntia sp.) before darkness ended our day’s efforts. This did not mean, however, that all of our efforts were done—there are still night active insects, and in the Great Plains what better nocturnal insect to look for than North America’s largest tiger beetle, the Great Plains giant tiger beetle (Amblycheila cylindriformis, family Cicindelidae—or subfamily Cicindelinae—or supertribe Cicindelitae, depending on who you talk to)?! We kept our eyes on the headlamp illuminated 2-track as we drove back to the highway and then turned down another road that led into promising looking habitat. Within a half-mile of the highway we saw one, so I got out to pick it up and then started walking. I walked another half-mile or so on the road but didn’t see anything except a few Eleodes darkling beetles (family Tenebrionidae), then turned around and walked the habitat alongside the road on the way back. As I walked, tiny little rodents—looking like a cross between a mouse and a vole—flashed in and out of my headlight beam as they hopped and scurried through the vegetation in front of me. Most fled frantically in response to my attempted approach, but one, for some reason, froze long enough under my lamp to allow me this one photo. When I posted the photo on my Facebook page, opinions on its identity ranged from kangaroo rat (Dipodomys sp.) silky pocket mouse (Perognathus flavus) to jumping mouse (Zapus sp.). Beats me.
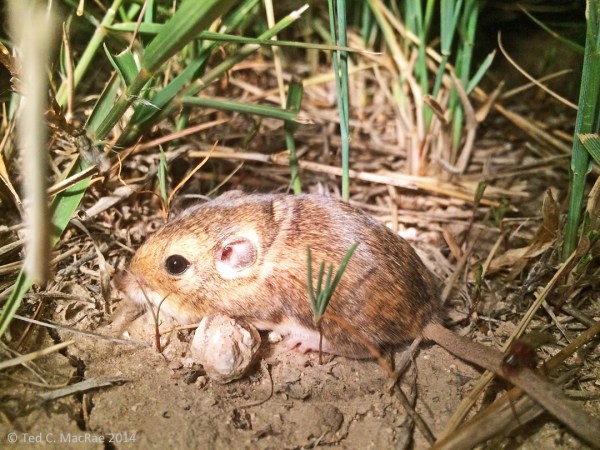
silky pocket mouse? Zapus sp., jumping mouse? | Union Co., New Mexico.

Kangaroo rat? Silky pocket mouse? Jumping mouse? | Union Co., New Mexico.

Almost as if by command, it rained during the early evening hours where we had set the traps, and the following morning we were rewarded with traps brimming with Prionus fissicornis males. Not only were the traps full, but males were still running around in the vicinity, and we even found a few females, one of which was in the act of ovipositing into the soil at the base of a plant.

Prionic acid-bated traps w/ Prionus fissicornis males.
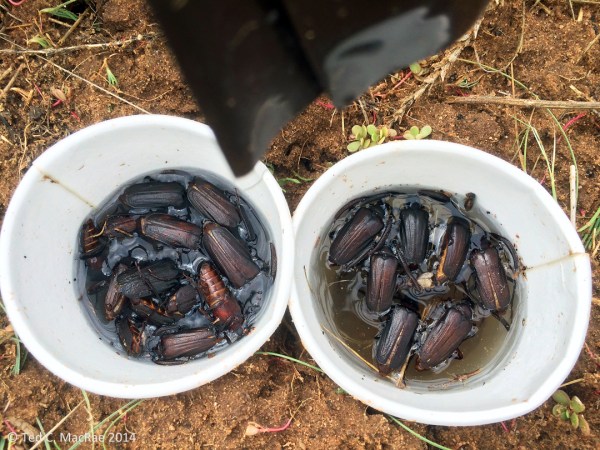
Prionic acid-bated traps w/ Prionus fissicornis males.
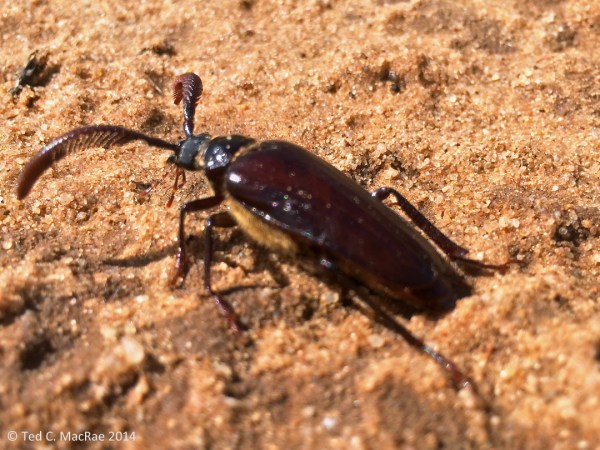
Prionic acid-bated traps w/ Prionus fissicornis males.

Prionic acid-bated traps w/ Prionus fissicornis males.

Prionus fissicornis male | Harding Co., New Mexico.

Prionus fissicornis male | Harding Co., New Mexico.

Prionus fissicornis oviposition hole.

Prionus fissicornis oviposition hole.

Eventually P. fissicornis activity subsided, and we decided to go back to the area around Mills Rim to see what beetles we might find in the woodland habitats. We also still were not sure about the Prionus beetles we had collected there the previous day and whether they truly represented P. heroicus. The scrubby oaks and conifers screamed “Beat me!”, and doing so proved extraordinarily productive, with at least a half-dozen species of jewel beetles collected—including a nice series of a rather large Chrysobothris sp. from the oaks that I do not recognize and a single specimen of the uncommonly collected Phaenops piniedulis off of the pines.
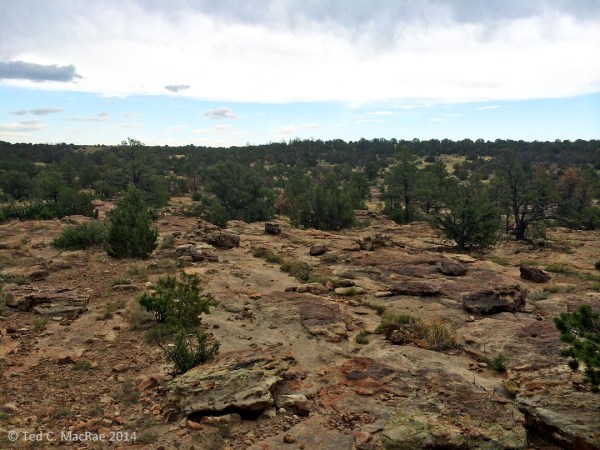
Oak/juniper woodland at Mills Canyon, habitat for Prionus heroicus.

Oak/juniper woodland at Mills Canyon, habitat for Prionus heroicus.

Not only is the scenery at Mills Rim Campground beyond spectacular, it also boasts some of the most adoringly cute reptiles known to man—such as this delightfully spiky horned lizard (I prefer the more colloquial name “horny toad”!). I’m probably going to regret not having photographed this fine specimen with the big camera.
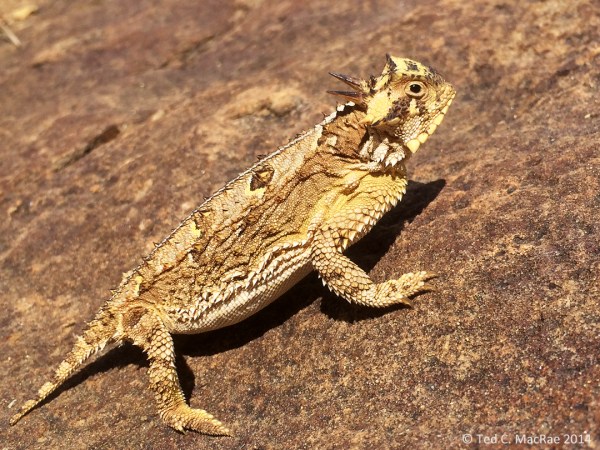
Phrynosoma cornutum (Texas horned lizard) | Harding Co., New Mexico.

Phrynosoma cornutum (Texas horned lizard) | Harding Co., New Mexico.

Fresh diggings beside a rock always invite a peek inside. You never know who might be peeking out.
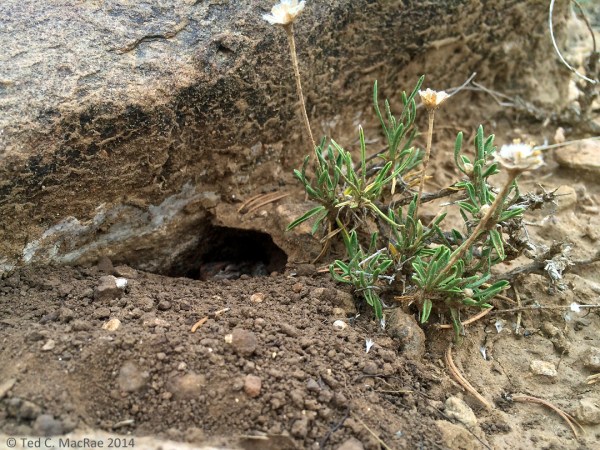
Who's home?

Who’s home?

Peek-a-boo!

Peek-a-boo!

The trip having reached the halfway point, we debated whether to continue further south to the sand dunes of southern New Mexico (with its consequential solid two-day drive back to Wichita) or turn back north and have the ability to collect our way back. We chose the latter, primarily because we had not yet had a chance to explore the area around Vogel Canyon south of Las Animas, Colorado. We had actually planned to visit this area on the day we encountered P. integer in the shortgrass prairie north of town, and a quick visit before going back to check the traps that evening showed that the area had apparently experienced good rains as shown by the cholla cactus (Cylindropuntia imbricata) in full bloom.

Cylindropuntia imbricata | Otero Co., Colorado.

Cylindropuntia imbricata | Otero Co., Colorado.

Whenever I see cholla plants I can’t help myself—I have to look for cactus beetles (Moneilema spp.). It had rained even more since our previous visit a few days ago, and accordingly insects were much more abundant. Several Moneilema adults were seen on the cholla, one of which I spent a good bit of time photographing. The iPhone photo below is just a preview of the photos I got with the big camera (which also included some very impressive-sized cicadas—both singing males and ovipositing females). The cactus spines impaled in the camera’s flash control unit serve as a fitting testament to the hazards of photographing cactus insects!
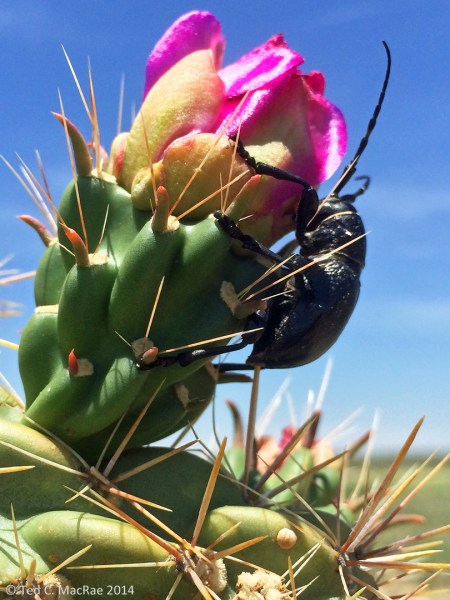
Moneilema sp. on Cylindropuntia imbracata } Otero Co., Colorado.
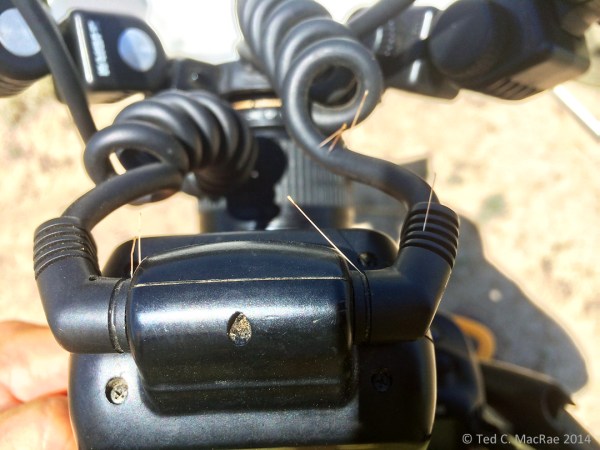
Moneilema sp. on Cylindropuntia imbracata } Otero Co., Colorado.

The hazards of photographing cactus beetles.

The hazards of photographing cactus beetles.

Later in the afternoon we hiked down into the canyon itself, and while insects were active we didn’t find much out of the ordinary. We did observe some petroglyphs on the sandstone walls of the canyon dating from the 1200s to the 1700s—all, sadly, defaced by vandals. Despite the rather uninspiring collecting, we stayed in the area for two reasons: 1) Jeff wanted to setup blacklights at the canyon head in hopes of collecting a blister beetle that had been caught there on an earlier trip, and 2) I had noted numerous Amblycheila larval burrows in the area (and even fished out a very large larva from one of them) and wanted to search the area at night to see if I could find adults. Jeff was not successful in his goal, and for a time I thought I would also not succeed in mine until we closed up shop and started driving the road out of the canyon. By then it was after 11 p.m. and we managed to find about a half-dozen A. cylindriformis adults. This was now the third time that I’ve found adults of this species, and interestingly all three times I’ve not seen any beetles despite intense searching until after 11 p.m and up until around midnight.

Lithographs on canyon wall | Mills Canyon, Colorado.

Lithographs on canyon wall | Mills Canyon, Colorado.

The next morning we found ourselves with two days left in the trip but several hundred miles west of Wichita, where I needed to drop Jeff off for his flight back home before I continued on home to St. Louis. I had hoped we could make it to the Glass Mountains just east of the Oklahoma panhandle to see what Prionus species might be living in the shortgrass prairies there (and also to show Jeff this remarkable place where I’ve found several new state records over the past few years). As we headed in that direction, I realized our path would take us near Black Mesa at the western tip of the Oklahoma pandhandle, and having been skunked on my first visit to the area last year due to dry conditions but nevertheless intrigued by its very un-Oklahoma terrain and habitat I suggested we stop by the area and have a look around before continuing on to the Glass Mountains. We arrived in the area mid-afternoon and headed straight for a rock outcropping colonized by scrub oak (Quercus sp.) and pinyon pine (Pinus sp.)—very unusual for western Oklahoma—that I had found during my previous trip.

The author looks pensively out over the Black Mesa landscape.

The area around Black Mesa couldn’t be more unlike the perception that most people have of Oklahoma.

I wanted to beat the oaks for buprestids—surely there would be a state record or two just sitting there waiting for me to find them, but as I started walking from the car towards the oaks the approach of a loud buzz caught my attention. I turned around to see—would you believe—a large Prionus beetle circling the air around me and was fortunate to net it despite its fast and agile flight. I hurried back to the car to show Jeff what I had found; we looked at each other and said, “Let’s collect here for a while.” The beetle had apparently been attracted to the lures in the car, so we got them out, set them up with some traps, and went about beating the oaks and watching for beetles to fly to the lure. Sadly, no  jewel beetles were collected on the oaks, although I did find evidence of their larval workings in some dead branches (which were promptly collected for rearing). Every once in a while, however, a Prionus beetle would fly in, apparently attracted to the lure but, curiously, never flying directly to it and falling into the trap. Many times they would land nearby and crawl through the vegetation as if searching but never actually find the trap. However, just as often they would approach the trap in flight and not land, but rather continue circling around in the air for a short time and before suddenly turning and flying away (forcing me to watch forlornly as they disappeared in the distance). Based on their very large size, blackish coloration and broad pronotum, we surmised (and later confirmed) these must also be P. heroicus, despite thinking (and later confirming) that the species was not known as far east as Oklahoma. Not only had we found a new state record, but we had also recorded a significant eastern range extension for the species. And to think that we only came to Black Mesa because I wanted to beat the oaks!

Prionus heroicus male

Prionus heroicus male

Bite from Prionus heroicus male.

Proof that Prionus heroicus males can bite hard enough to draw blood!

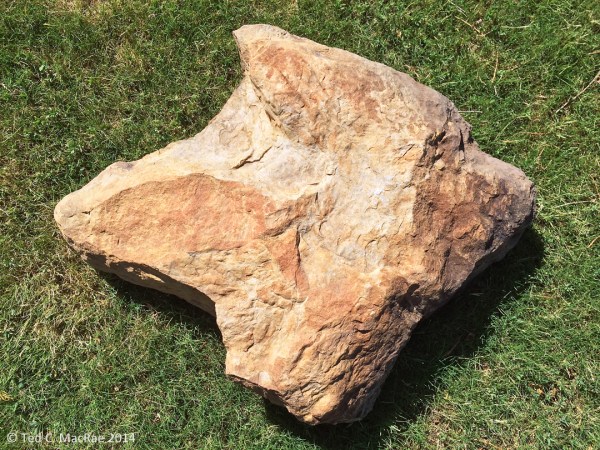
We each collected a nice series of the beetles, and despite never witnessing the beetles actually going to the traps a few more were found in the traps the next morning after spending the night in a local bed & breakfast. I also found a dove’s nest with two eggs hidden in the vegetation, and as we were arranging for our room at the bed & breakfast a fellow drove up and dropped off a freshly quarried dinosaur footprint (the sandstone, mudstone, and shale deposits around Black Mesa are the same dinosaur fossil bearing deposits made more famous at places like Utah’s Dinosaur National Monument).

Dove's nest w/ eggs.

Dove’s nest w/ eggs.

Dinosaur fossil footprint

Freshly quarried dinosaur fossil footprint

By the way, if you ever visit the area, the Hitching Post at Black Mesa is a great place to stay. A longhorn skull on the barn above an authentic 1882 stagecoach give a hint at the ambiance, and breakfast was almost as good as what my wife Lynne can do (almost! 🙂 ).

Longhorn skull on barn at our Bead and Breakfast.
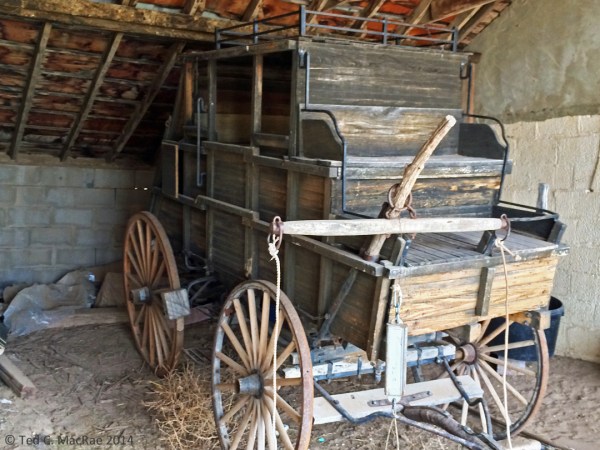
Longhorn skull on barn at our Bead and Breakfast.

132-year-old stagecoach - model!

132-year-old stagecoach – model!

After breakfast we contemplated the long drive that lay between us and our arrival in Wichita that evening—our longer than expected stay in the area had virtually eliminated the possibility to collect in the Glass Mountains. Nevertheless, there was one more thing that I wanted to see before we left—the dinosaur footprints laying in a trackway along Carrizo Creek north of the mesa. I only knew they were in the area based on a note on a map, but as there were no signs our attempt to find them the previous day was not successful. Armed with detailed directions from the B&B owners, however, we decided to give it one more shot. Again, even after we found the site I didn’t see them immediately, I suppose because I was expecting to see distinct depressions in dry, solid rock. Only after the reflections of light from an alternating series of small puddles—each measuring a good 10–12″ in diameter—did I realize we had found them. Recent rains had left the normally dry creek bed filled with mud, with the footprints themselves still filled with water.

Dinosaur tracks | vic. Black Mesa, Oklahoma.

Dinosaur tracks | vic. Black Mesa, Oklahoma.

It is not surprising that I would be so excited to find the tracks, but what did surprise me was the effect they had on me. Seeing the actual signs of near mythical beasts that lived an incomprehensible 100 million years ago invites contemplation and reminds us that our time here on Earth has, indeed, been short!
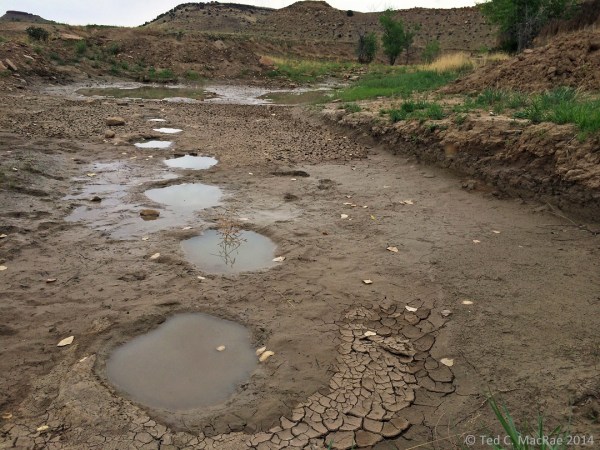
Dinosaur tracks | vic. Black Mesa, Oklahoma.

Dinosaur tracks | vic. Black Mesa, Oklahoma.

By this time, we had no choice but to succumb to the long drive ahead. We did manage to carve out a short stop at the very first locality of the trip in an effort to find more Buprestis confluens (finding only a few more B. rufipes), but otherwise the day was spent adhering to our goal of reaching Wichita before nightfall. Jeff was home and sipping tea before lunchtime the next day, while I endured one more solid day of driving before making it back to St. Louis in time for dinner with the family. At that point, the trip already could have been considered a success, but how successful it ultimately ends up being depends on what beetles emerge during the next season or two from these batches of infested wood that I collected at the various spots we visited.
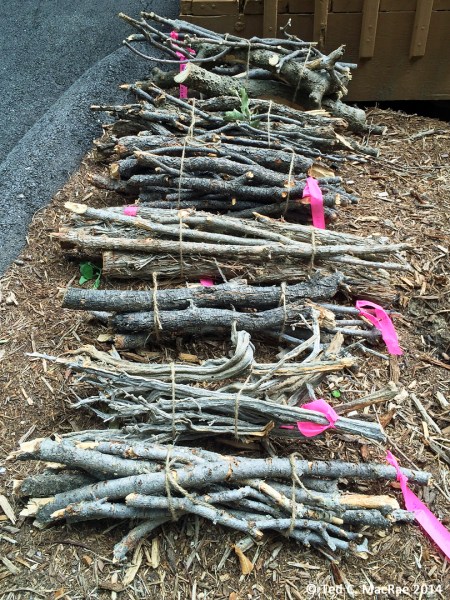
Wood collected for rearing wood-boring beetles.

Wood collected for rearing wood-boring beetles.

If you like this Collecting Trip iReport, you might also like the iReports that I posted for my 2013 Oklahoma and 2013 Great Basin collecting trips as well.

© Ted C. MacRae 2014

Sunset beetles

Acmaeodera immaculata? | vic. Vogel Canyon, Colorado.

Acmaeodera immaculata? (family Buprestidae) | vic. Vogel Canyon, Colorado.

Regular readers of this blog know that I am fond of natural sky backgrounds for insects found during the day on flowers and foliage. Not only does the sky provide a clean, uncluttered background that allows the subject to stand out, it also gives the photo a more appropriate temporal flavor—i.e., photographs of diurnal insects should look like they were taken during the day. It’s a little bit tricky setting the camera to allow flash illumination of the subject while still allowing the sky to register as well, but I find such photographs more pleasing and interesting than those with a jet-black background, typical in flash macrophotography, and far more pleasing than those with a jumble of sticks and weeds cluttered behind the subject. These days my daytime insect photos almost always incorporate a blue-sky background (examples here and here) unless: 1) I actually photographed the subject at night (examples here and here); or 2) I wish to highlight an intensely white or delicately structured subject (examples here and here).

Aulicus sp. | vic. Black Mesa, Oklahoma

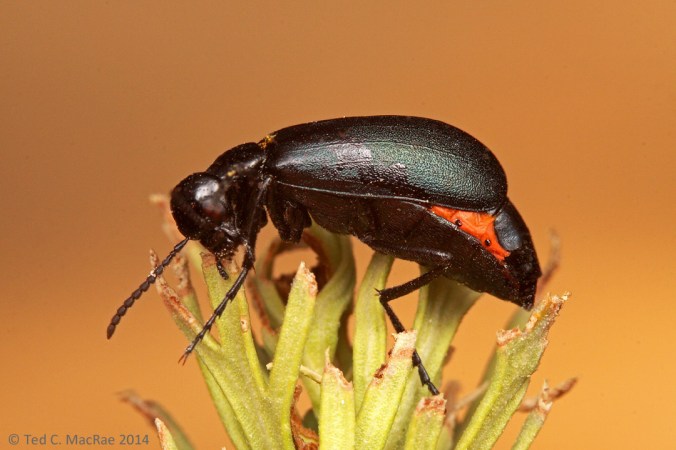
Trichodes oresterus? (family Cleridae) | vic. Black Mesa, Oklahoma

But what about in between day and night—specifically, sunset? Incorporating a sunset sky into a flash-illuminated macrophotograph is even trickier than incorporating a blue midday sky because the central problem—low light levels—is magnified. Blue sky photographs challenge the fast shutter speeds and high f-stops usually needed for macrophotographs, but relatively minor adjustments to ISO, shutter speed, and f-stop are usually sufficient to allow the sky to register while still being able to maintain depth of field and minimize motion blur. At sunset, however, because there is much less illumination of the sky, more aggressive settings are often required to allow the sky to register on the camera sensor—settings that can sometimes result in too much motion blur or insufficient depth of field. These problems can be mitigated to some degree with the use of a tripod (and very cooperative subjects), but for dedicated “hand-held” enthusiasts like myself this is not an option. Why bother? Because the results can be spectacular! The setting sun often creates stunning colors not seen at other times of the day and offer a change of pace from blue skies, which, like black backgrounds, can start looking rather monotonous if used exclusively in one’s portfolio.

Linsleya convexa | vic. Vogel Canyon, Colorado

Linsleya convexa (family Meloidae) | vic. Vogel Canyon, Colorado

The photos featured in this post were taken during several sunsets on a trip earlier this past summer through Colorado and Oklahoma. I especially like the jewel beetle (Acmaeodera immaculata?) photograph—technically it has good focus and depth of field and a pleasing composition, but I really like the color coordination between the beetle, flower, and sky. The checkered beetle (Trichodes oresterus?) photograph is also very pleasing, especially the detail on the beetle, although the color of the sky is only somewhat different than a more typical daytime blue. The blister beetle (Linsleya convexa) photograph is probably the most problematic technically due to slight motion blur and being slightly off-focus at the eye—not surprising since of the three this photo had the lowest light conditions. However, the color contrast between the sky and subject make this a nevertheless striking image.

If you have experience with ambient light backgrounds in flash macrophotography, your comments on approaches you’ve taken to deal with reduced light situations will be most welcome.

© Ted C. MacRae 2014

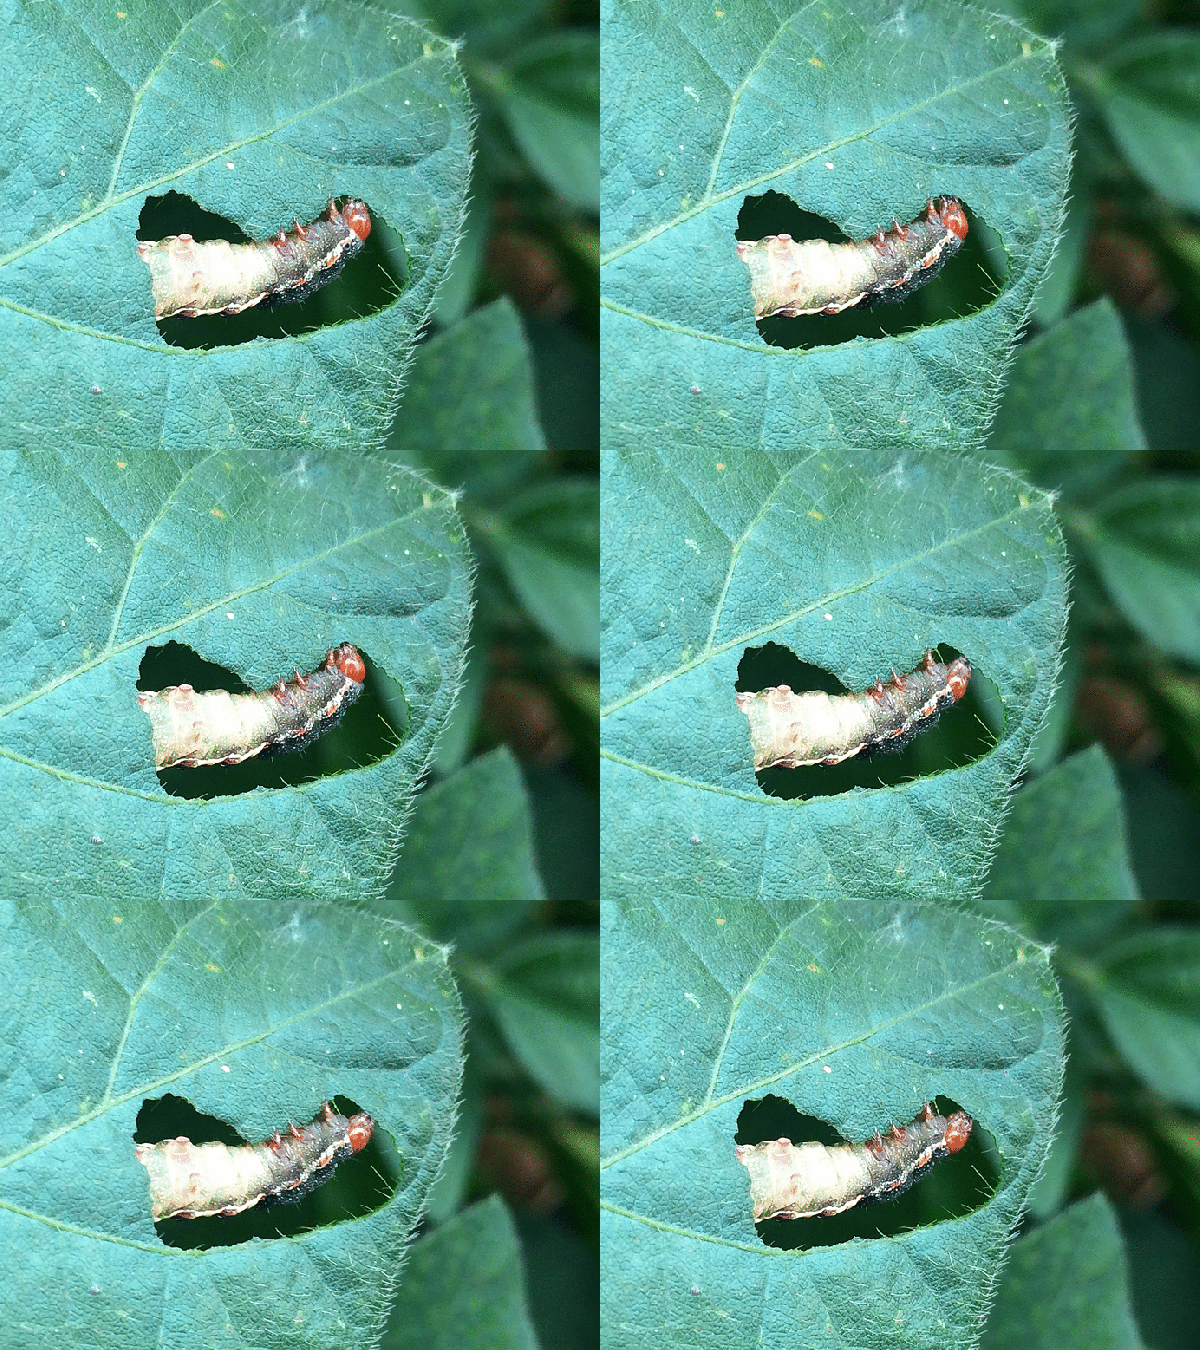
Southern armyworm feeding on soybean

Southern armyworm (Spodoptera eridania) late-instar larva feeding on soybean.

Southern armyworm (Spodoptera eridania) late-instar larva feeding on soybean.

Here is another animated gif that I made recently, this one showing a late-instar larva of southern armyworm (Spodoptera eridania) feeding on soybean (Glycine max). This polyphagous species is widely distributed from the southern U.S. through the northern half of South America and feeds on a variety of weeds, especially pigweed (Amaranthus spp.) and pokeweed (Phytolacca americana). It also occasionally attacks vegetable, fruit, and ornamental crops; however, in recent years it has become increasingly important on cultivated soybean in Brazil and Argentina, especially in regions where cotton is also cultivated. As a result, they have become one of the insects that I deal with regularly in my own research. More information on this and other armyworm species that affect soybean can be found in my earlier post, Quick Guide to Armyworms on Soybean.

Like many other lepidopteran caterpillars that feed on foliage, late-instar larvae become “feeding machines” that remain active both day and night as they try to cram as much nutrition into their expanding bag of a body as possible in preparation for an adult life focused solely on finding mates and laying eggs. Large larvae actively feeding during the day can be rather conspicuous, and as a result they often secrete themselves on the undersides of the leaves while feeding to make themselves less visible to predators. As they feed, however, a “window” opens up that gradually eliminates their cover. Rather than remaining in the same spot and feeding until they are completely exposed, however, larvae will move when the feeding hole reaches a certain size and find another place to conceal themselves before resuming feeding. Different caterpillar species have different exposure tolerances, and as a result, this combines with slight differences also in preferred tissue types to create recognizable differences in the damage patterns resulting from feeding by different species.

For those interested, making these animated gifs is really simple and allows those of us without expensive macro-video gear to simulate short videos of insect behavior. I make my animated gifs at GIFMaker.me—all you do is take a series of photos, touch them up in photo editing software (I use Photoshop Elements to adjust levels, color and sharpness), upload them to the site in the sequence desired, and click “Create Now”. It couldn’t be easier! You don’t even need a “real” camera—I took the photos for this gif with my iPhone using the “burst” function to take a rapid sequence of photos (all you do is hold your finger down on the shutter button for the desired length of time).

© Ted C. MacRae

A time of reckoning

The sun shall be turned to darkness and the moon to blood, before the day of the Lord comes, the great and magnificent day.

A "super moon" watches over a parasitized hornworm caterpillar.

A “super moon” watches over a parasitized hornworm caterpillar.

I’m not normally one to quote Bible passages, but this line from Acts 2:20 seems appropriately ominous for the predicament of this poor hornworm caterpillar. The white objects on its back are the cocoons of tiny parasitic wasps in the family Braconidae who spent their entire lives inside the body of the growing caterpillar slowly eating away the inner tissues of the caterpillar, eventually consuming all but the most essential of its internal organs before exiting the skin and spinning their tiny, silken cocoons. Inside the cocoons the tiny grubs transformed into adult wasps, chewed their way out through the tip of the cocoon, and flew off to mate and find more hornworm caterpillars to parasitize. Its unwelcome guests now gone, this poor caterpillar has nothing to do but to sit and await its inevitable demise (which I suspect the caterpillar will not regard as such a “great and magnificent day”).

I found this caterpillar resting on a vine climbing a tree along the Mississippi River in southeast Missouri after setting up an ultraviolet light nearby and noticing the softly glowing cocoons. I was going to photograph it in situ, but I’ve learned that choice of background can have a dramatic effect on insect photographs, and the jumble of weeds and tree bark that would have comprised the background had I photographed the caterpillar where it sat seemed decidedly boring. I looked up and saw the blood red moon (a so called “super moon”) rising above the river in the eastern sky and decided to give it a try. The above photograph is actually a composite of two photographs—one of the caterpillar taken with flash and fairly normal camera settings, and another of the moon itself with aperture, shutter speed, and ISO all adjusted for very low light conditions (at least to the extent possible without a tripod). While this may not qualify in some people’s minds as a “real” photograph, it is nevertheless a true representation of what I actually saw, as I also made a number of attempts to capture both the insect and the moon in a single exposure. Since it is impossible to have both the insect (very close) and the moon (very far) in focus at the same time, the resulting photograph has a different, though still striking, effect, as shown in the photograph below:

IMG_6919_enh_1080x720

A more surrealistic version of the above photograph, with both caterpillar and moon captured in a single exposure.

This second photograph is actually much harder to take, as the moon does not appear in the viewfinder as the small, discrete, fuzzy-edged object resulting in the image, but rather as a large, blinding light that is difficult to place within the composition and know exactly where it will end up (at least, without a lot of trial and error). Add to that the fact that my camera image and histogram display panel is, at the moment, not functional, forcing me to “guess” if I had the right settings (in a situation where I’m well outside of my ‘normal’ settings for flash macrophotography). I’m a little surprised that I ended up with any usable photographs at all!

I’ve tried this type of photography with the sun as well—those interested to see how those photographs turned can find them at Sunset for another great collecting trip and Under Blood Red Skies.

© Ted C. MacRae 2014

Proof that it’s possible to ship large, pinned beetles safely!

Miscellaneous Buprestidae from Dan Heffern

Miscellaneous Buprestidae from Dan Heffern

Those who have followed this blog for awhile know that I’ve been on a bit of a rant during the past few months about the way pinned insect specimens are packed and shipped. This has been prompted primarily by the receipt of several damaged insect shipments, some of the more egregious examples of which are shown here and on Facebook. In all of these cases, damage could have been prevented had the specimens simply been packed and shipped using standard best practices.

I do not wish, however, to give the impression that every insect shipment I receive is damaged. The photo above represents a shipment I just received from Dan Heffern, who is kindly gifting to me some of the excess Buprestidae that he has in his collection in order to make room for his more beloved Cerambycidae. This shipment was especially prone to damage because of the number of large, heavy-bodied specimens it contains. Nevertheless, it arrived safe and sound because of the attention paid by Dan to securing the specimens in place. Note the liberal use of brace pins around each specimen—the larger the specimen, the more brace pins. In addition, the pinning box features a double-foam layer. Double-foam holds specimens much more securely in place than does a single layer, and while I didn’t mention it in my original post it’s a good idea for shipments containing large, heavy-bodied specimens. One drawback of double-foam is that it pushes labels on the pin up close to the specimen, but re-positioning labels on pins is certainly better than having to reattach broken body parts on specimens!

My thanks to Dan for this fine shipment and for paying such great attention to its packing to ensure receipt in the best condition possible!

© Ted C. MacRae 2014

Mrs. Monday Jumper

Phidippus princeps female | Howell Co., Missouri

Phidippus princeps female | Howell Co., Missouri

In my previous post, Monday Jumper, I featured a photo of a strikingly colored jumping spider (family Salticidae) that apparently represents an adult male Phidippus princeps. Far too skittish to attempt photographing in the field, I placed him in a vial and photographed him later in the hotel room but still only got one photo that was good enough to post. Shortly after gathering him up, I came across another jumping spider that proved far more cooperative for field shots. This was no doubt due in large part to the fact that she had just captured a fat, juicy caterpillar. I find predaceous insects to be far less skittish when they are involved in the act of consuming prey. This not only makes them easier to approach and photograph, but also adds a desirable natural history element to photos that is sometimes missing in “portrait-only” photographs.

Somber coloration, large abdomen, and small carapace contrast distinctly with the male

Somber coloration, large abdomen, and small carapace contrast distinctly with the male

I say “she” because of the classic female characters exhibited—relatively large and rounded abdomen (males tend to have a smaller and more tapered abdomen), smaller carapace, somber coloration, and absence of a “boxing glove” aspect to the pedipalps. Like the male I had just collected, she was on the foliage of an oak sapling, and as I began taking photographs I noticed in the preview screen the brilliant, metallic blue chelicerae that are a hallmark of the large salticid genus Phidippus. I had also presumed the male I had just collected belonged to this same genus based on gestalt, but I could have never imagined that the two individuals actually represented male and female of the very same species. Such appears to be the case, however, as a thorough perusal of the salticid galleries at BugGuide leads me to believe that the individual featured here is the adult female of Phidippus princeps.

Check out those metallic blue chelicerae!

Check out those metallic blue chelicerae!

These photos still may not approach the technical and aesthetic perfection exhibited by master salticid portraitist Thomas Shahan, but I think they do represent an improvement over my first attempt at photographing a feeding female. The first two photos are fine, but the third suffers from the focus being a little too “deep”, which seems to be my most frequent macrophotography mistake on higher mag shots. If you have any tips on how to overcome this particular problem I am all ears!

© Ted C. MacRae 2014

The importance of post-processing

One of the most frustrating realizations I had when I began photographing insects was the fact that photographs didn’t come out of the camera “ready-to-go”—i.e., they still needed to be processed to some degree to make them look good. Even worse, this required processing is to large degree subjective based on the taste of the individual photographer, and as such a “quick manual” describing the exact process in a way that beginners can understand doesn’t exist. Essentially, I didn’t know that when I decided to become an insect photographer, that I would also have to become proficient at photo processing. This frustrates me a lot less now because I’ve finally worked out a process for doing this that works for me and that I am comfortable with, and having done so I also realize that every photographer has to go through this process for themselves to make their photographs look the way they want them to look. That said, I wish I’d had access to some easy tutorials when I was trying to figure out the process that could have saved me some stumbling time before arriving at a process I liked. With that in mind, I thought I would share a quick overview of how I deal with post-processing in the hopes that somebody else mind find a useful tip or two here as they try to figure out their own process. This is not meant to be an exhaustive description of all the post-processing tools that I might use, but rather the typical adjustments that are needed for almost all of the photographs that I take. To illustrate the process, I use a rather basic shot of a cricket that I photographed last week in northeastern Missouri. You can click on each photo to access a larger and better see the issues discussed and resulting enhancements.

Straight from the camera (JPG converted from original RAW file).

The photo above is basically how the shot came out of the camera. These days I shoot only in RAW format, as this allows the maximum amount of data to be retained regardless of how many times the file is accessed. The image above is a JPG converted directly from the unaltered RAW file, and you can see that it looks rather flat and could benefit from levels and color adjustments as well as sharpening and some general “cleaning up” of sensor dust artifacts and debris on the subject. Since I use a Canon body, I have the Digital Photo Professional software that came with the camera, and I also have Photoshop Elements. For my purposes, I’ve found it most convenient to do certain enhancements directly to the RAW file in DPP, generate a TIFF format version of the file from the edited RAW file, and then do the final enhancements to the TIFF file. Since TIFF is also a “loss-less” format, I can then use the enhanced TIFF to generate JPGs of whatever size and resolution on an as-needed basis without worrying about data loss in the full-sized, fully enhanced version of the photo. I think this is preferable to shooting JPGs directly or generating them directly from the RAW file because JPGs are not loss-less files, and as a result every time a JPG is accessed or modified there is a loss of data. Sure, you can go back to the original RAW file and generate a new JPG, but any enhancements made after the first conversion will have to be repeated. Another advantage to making adjustments in DPP is that they are reversable—the original, unaltered RAW file can always be recovered without the need to create multiple backups representing different stages of enhancement.

After initial processing (JPG converted from edited RAW file).

So, what enhancements do I do in DPP? First I open the tool palette and adjust the white balance—in this case it was a full flash photo, so I select “Flash” from the drop-down menu. Then I select the RGB tab and adjust the upper and lower levels on the histogram. The general approach is to cut off data-lacking areas at either extreme, but there is also a lot of subjectivity in deciding what “looks right”. I then open the Stamp Tool (I find cloning adjustments easier and more effective in DPP than in PS) and clone out dust marks in the background (I know, I need to clean my sensor) and debris on the subject. On that last point, there are purists who will argue that this is an “unnatural” alteration. I take a much less conservative position on such alterations, since in my opinion the entire photograph itself is the result of interpretation—not just of the photographer, but of the equipment used and settings chosen. If debris on the subject is an important aspect of the subject’s natural history, then it should remain. However, in most cases, dirt flecks on the subject are not an important part of the story and provide an unnecessary detraction from the aesthetic appearance of the photo. If any cropping is necessary I prefer to do this also in DPP since this is reversible should I change my mind at some point in the future. The second photo above shows what the image looks like after this initial round of post-processing in DPP. At this point, the RAW file is ready to be converted to TIFF format for final post-processing in PS.

After additional processing in Photoshop (jpg converted from edited TIFF).

After additional processing in Photoshop (jpg converted from edited TIFF).

Because I’ve done much of the levels adjustment and cloned out any flaws in DPP, the original TIFF needs only minor adjustments. I generally like to start with “Autocorrect” and see what it does, as this function usually does a good job of toning down highlights and shadows and especially giving a more natural color to blue sky backgrounds such as in this photo. If I don’t like the result from Autocorrect, I hit Ctrl+Z and adjust levels and color manually until I like the result. I find that most photos still benefit from a little bit of brightening and increased contrast (usually ~10% each), and this often also serves to add a little color saturation that is generally sufficient but can sometimes be too much. If the latter occurs, it’s an easy matter to adjust the saturation back down a little bit. After the levels and color are fully adjusted the only thing left to do is apply unsharp mask to sharpen up the photo and bring out the detail—remember to zoom the image to 100% to get the best view of how the settings affect the appearance of the photo, as the settings that you will need depend greatly on the size of the image. Once these adjustments are made, I save a new version of the file (I like to append the file name with “_enh”). The third photo above represents the final enhanced version, and it is this file that I will use to generate JPGs of whatever size I need on an as-needed basis. The original TIFF can be retained if desired, but since an identical version can always be generated anew from the enhanced RAW file this is not essential.

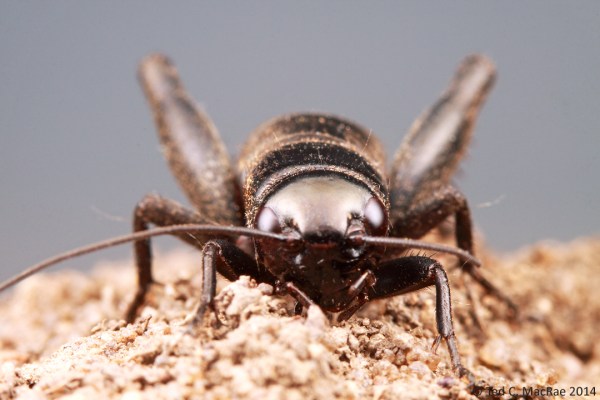
The head slightly narrower than the pronotum and early spring occurrence of this large nymph make me think this is the northern woods cricket (Gryllus vernalis).

The head slightly narrower than the pronotum and early spring occurrence of this large nymph in northeastern Missouri make me think this is the northern wood cricket (Gryllus vernalis).

I hope you’ve found one or tips of use in this little tutorial, which I end with the above frontal portrait of the subject shown in the previous photos. Based on its all black color, the head slight narrower than the pronotum, and its early spring occurrence as a late-instar nymph in northern Missouri, I take this to be a northern wood cricket, Gryllus vernalis, but of course I am open to being corrected by somebody more knowledgeable about crickets than I.

Copyright © Ted C. MacRae 2014

Beetle Collecting 101: How to rear wood-boring beetles

I’ve been collecting wood-boring beetles for more than three decades now, and if I had to make a list of “essential” methods for collecting them I would include “beating,” “blacklighting,” and “rearing.” Beating is relatively straightforward—take a beating sheet (a square piece of cloth measuring 3–5 ft across and suspended beneath wooden, metal, or plastic cross members), position it beneath a branch of a suspected host plant, and tap the branch with a stick or net handle. Many wood-boring beetles tend to hang out on branches of their host plants, especially recently dead ones, and will fall onto the sheet when the branch is tapped. Be quick—some species (especially jewel beetles in the genus Chrysobothris) can zip away in a flash before you have a chance to grab them (especially in the heat of the day). Others (e.g., some Cerambycidae) may remain motionless and are cryptically colored enough to avoid detection among the pieces of bark and debris that also fall onto the sheet with them. Nevertheless, persistence is the key, and with a little practice one can become quite expert at efficiently collecting wood-boring beetles using this method. Blacklighting is even easier—find the right habitat (preferably on a warm, humid, moonless night), set up a blacklight in front of a white sheet, crack open a brew, and wait for the beetles to come!

Rearing, on the other hand, takes true dedication. One must not only learn potential host plants, but also how to recognize wood with the greatest potential for harboring larvae, retrieve it from the field, cut it up, place it in rearing containers, and monitor the containers for up to several months or even years before hitting pay dirt (maybe!). Despite the considerable amount of effort this can take, the results are well worth it in terms of obtaining a diversity of species (usually in good series), some of which may be difficult to encounter in the field, and identifying unequivocal larval host associations. I have even discovered two new species through rearing (Bellamy 2002, MacRae 2003)! Moreover, checking rearing containers can be a lot of fun—in one afternoon you can collect dozens or even hundreds of specimens from places far and wide, depending on how far you are willing to travel to collect the wood. Because of the effort involved, however, the more you can do to ensure that effort isn’t wasted on uninfested wood and that suitable conditions are provided to encourage continued larval development and adult emergence from infested wood the better. It is with this in mind that I offer these tips for those who might be interested in using rearing as a technique for collecting these beetles.

I should first clarify what I mean by “wood-boring” beetles. In the broadest sense this can include beetles from any number of families in which the larvae are “xylophagous,” i.e., they feed within dead wood. However, I am most interested in jewel beetles (family Buprestidae) and longhorned beetles (family Cerambycidae), and as a result most of the advice that I offer below is tailored to species in these two families. That is not to say that I’ll turn down any checkered beetles (Cleridae), powderpost beetles (Bostrichidae), bark beetles (family Scolytidae), or even flat bark beetles sensu lato (Cucujoidea) that I also happen to encounter in my rearing containers, with the first two groups in particular having appeared in quite good numbers and diversity in my containers over the years. Nevertheless, I can’t claim that my methods have been optimized specifically for collecting species in these other families.

First, you have to find the wood. In my experience, the best time to collect wood for rearing is late winter through early spring. A majority of species across much of North America tend to emerge as adults during mid- to late spring, and collecting wood just before anticipated adult emergence allows the beetles to experience natural thermoperiods and moisture regimes for nearly the duration of their larval and pupal development periods. Evidence of larval infestation is also easier to spot once they’ve had time to develop. That said, there is no “bad” time to collect wood, and almost every time I go into the field I am on the lookout for infested wood regardless of the time of year. The tricky part is knowing where to put your efforts—not all species of trees are equally likely to host wood-boring beetles. In general, oaks (Quercus), hickories (Carya), and hackberries (Celtis) in the eastern U.S. host a good diversity of species, while trees such as maples (Acer), elms (Ulmus), locust (Gleditsia and Robinia), and others host a more limited but still interesting fauna. In the southwestern U.S. mesquite (Prosopis) and acacia (Acacia) are highly favored host plants, while in the mountains oaks are again favored. Everywhere, conifers (PinusAbies, JuniperusTsuga, etc.) harbor a tremendous diversity of wood-boring beetles. To become good at rearing wood-boring beetles, you have to become a good botanist and learn not only how to identify trees, but dead wood from them based on characters other than their leaves! Study one of the many good references available (e.g., Lingafelter 2007, Nelson et al. 2008) to see what the range of preferred host plants are and then start looking.

I wish it were as simple as finding the desired types of trees and picking up whatever dead wood you can findm but it’s not. You still need to determine whether the wood is actually infested. Any habitat supporting populations of wood-boring beetles is likely to have a lot of dead wood. However, most of the wood you find will not have any beetles in it because it is already “too old.” This is especially true in the desert southwest, where dead wood can persist for very long periods of time due to low moisture availability. Wood-boring beetles begin their lives as eggs laid on the bark of freshly killed or declining wood and spend much of their lives as small larvae that are difficult to detect and leave no obvious outward signs of their presence within or under the bark. By the time external signs of infestation (e.g., exit holes, sloughed bark exposing larval galleries, etc.) become obvious it is often too late—everything has already emerged. Instead, look for branches that are freshly dead that show few or no outward signs of infestation. You can slice into the bark with a knife to look for evidence of larval tunnels—in general those of longhorned beetles will be clean, while those of jewel beetles will be filled with fine sawdust-like frass that the larva packs behind it as it tunnels through the wood. Oftentimes the tunnels and larvae will be just under the bark, but in other cases they may be deeper in the wood. Broken branches hanging from live trees or old, declining trees exhibiting branch dieback seem to be especially attractive to wood-boring beetles, while dead branches laying on the ground underneath a tree are not always productive (unless they have been recently cut).

One way to target specific beetles species is to selectively cut targeted plant species during late winter, allow the cut branches to remain in situ for a full season, and then retrieve them the following winter or early spring. These almost always produce well. Doing this will also give you a chance to learn how to recognize young, infested wood at a time that is perfect for retrieval, which you can then use in searching for wood from other tree species in the area that you may not have had a chance to cut. I have cut and collected branches ranging from small twigs only ¼” diameter to tree trunks 16″ in diameter. Different species prefer different sizes and parts of the plant, but in general I’ve had the best luck with branches measuring 1–3″ diameter.

Once you retrieve the wood, you will need to cut it into lengths that fit into the container of your choice (a small chain saw makes this much easier and quicker). In the field I bundle the wood with twine and use pink flagging tape to record the locality/date identification code using a permanent marker. I then stack the bundles in my vehicle for transport back home. Choice of container is important, because moisture management is the biggest obstacle to rearing from dead wood—too much moisture results in mold, while too little can lead to desiccation. Both conditions can result in mortality of the larvae or unemerged adults. In my rearing setup, I use fiber drums ranging from 10-G to 50-G in size (I accumulated them from the dumpster where I work—mostly fiber drums used as shipping containers for bulk powders). Fiber drums are ideal because they not only breath moisture but are sturdy and may be conveniently stacked. Cardboard boxes also work as long as they are sturdy enough and care is taken to seal over cracks with duct tape. Avoid using plastic containers such as 5-G pickle buckets unless you are willing to cut ventilation holes and hot-glue fine mesh over them. While breathable containers usually mitigate problems with too much moisture, desiccation can still be a problem. To manage this, remove wood from containers sometime later in the summer (after most emergence has subsided), lay it out on a flat surface such as a driveway, and hose it down real good. Once the wood has dried sufficiently it can be placed back in the container; however, make sure the wood is completely dry or this will result in a flush of mold. I generally also wet down wood again in late winter or early spring, since I tend to hold wood batches through two full seasons.

I like to check containers every 7–15 days during spring and summer. Some people cut a hole in the side of the container that leads into a clear jar or vial—the idea being that daylight will attract newly emerged adults and facilitate their collection. I’ve tried this and was disappointed in the results—some of the beetles ended up in the vial, but many also never found their way to the vial and ended up dying in the container, only to be found later when I eventually opened it up. This is especially true for cerambycids, many of which are nocturnal and thus probably not attracted to daylight to begin with. My preference is to open up the container each time so that I can check the condition of the wood and look for evidence of larval activity (freshly ejected frass on the branches and floor of the container). I like to give the container a ‘rap’ on the floor to dislodge adults from the branches on which they are sitting, then dump the container contents onto an elevated surface where I can search over the branches and through the debris carefully so as not to miss any small or dead specimens. I use racks of 4-dram vials with tissue packed inside each and a paper label stuck on top of its polypropylene-lined cap as miniature killing jars. Specimens from a single container are placed in a vial with a few drops of ethyl acetate, and I write the container number and emergence date range on the cap label. Specimens will keep in this manner until they are ready to be mounted weeks or months (or even years) later. If the vial dries out, a few drops of ethyl acetate and a few drops of water followed by sitting overnight is usually enough to relax the specimens fully (the water relaxes the specimens, and the ethyl acetate prevents mold if they need to sit for a while longer).

I store my containers in an unheated garage that is exposed to average outdoor temperatures but probably does not experience the extreme high and low temperatures that are experienced outdoors. In the past I wondered if I needed more heat for wood collected in the desert southwest, but I never came up with a method of exposing the containers to the sun without also having to protect them from the rain. Metal or plastic containers might have eliminated this problem, but then breathability would again become an issue. I would also be concerned about having direct sun shining on the containers and causing excessive heat buildup inside the bucket that could kill the beetles within them. Now, however, considering the success that I’ve had in rearing beetles from wood collected across the desert southwest—from Brownsville, Texas to Jacumba, California, this seems not to be a big issue.

If anybody else has tips for rearing wood-boring beetles that they can offer, I would love to hear from you.

REFERENCES:

Bellamy, C. L. 2002. The Mastogenius Solier, 1849 of North America (Coleoptera: Buprestidae: Polycestinae: Haplostethini). Zootaxa 110:1–12 [abstract].

Lingafelter, S. W. 2007. Illustrated Key to the Longhorned Woodboring Beetles of the Eastern United States. Special Publication No. 3. The Coleopterists Society, North Potomac, Maryland, 206 pp. [description].

MacRae, T. C. 2003. Agrilus (s. str.) betulanigrae MacRae (Coleoptera: Buprestidae: Agrilini), a new species from North America, with comments on subgeneric placement and a key to the otiosus species-group in North America. Zootaxa 380:1–9 [pdf].

Nelson, G. H., G. C. Walters, Jr., R. D. Haines, & C. L. Bellamy.  2008.  A Catalogue and Bibliography of the Buprestoidea of American North of Mexico.  Special Publication No. 4. The Coleopterists Society, North Potomac, Maryland, 274 pp. [description].

Copyright © Ted C. MacRae 2014