How to pack and ship pinned insect specimens

Even though I don’t work in a museum, sending and receiving pinned insects is a routine activity for me. As a collector of beetles with some expertise in their identification, I’ve had opportunity to exchange with or provide IDs to other collectors from around the world. Of course, the extreme fragility of dried, pinned insect specimens makes them vulnerable to damage during shipment, especially when shipped overseas. While properly labeled, pinned insect specimens have no monetary value, the scientific information they represent is priceless, and every attempt should be made to protect them from damage during shipment. Sadly, despite our best efforts damage is sometimes unavoidable, as even packages marked “Fragile” can be subject to rough or careless handling. More often than not, however, I have received shipments in which the contents suffered damage that could have been avoided had the sender paid more attention to packing the shipment in a manner that gave it the best possible chance of arriving safely. Here I offer some general tips on the best way to pack and ship pinned insect specimens for shipment. While these remarks are broadly applicable to pinned insects in general, they are given from the perspective of a someone who collects beetles—specimens of which are relatively small to moderate in size, hard-bodied, and compact in form. Insects from other groups, especially those with large, fragile species such as Lepidoptera and Orthoptera, may require additional precautions to minimize the risk of damage.

  1. Select a sturdy specimen box with a firm pinning bottom. The size of the box should be selected appropriate for the number of specimens—i.e., do not select a large box for only a few specimens or tightly pack too many specimens in too small a box,  Modern polyethylene foams used in pinning trays seem sufficiently firm to hold pinned specimens during shipment as long as they are at least ¼” thick—thicker foams, of course, will hold even more firmly but often “push” the labels on the pinned specimens up against each other, necessitating additional labor to reset them. The box should have a tight-fitting lid that can be set firmly in place. Pin the specimens into the box, making sure the pins are set completely through the foam and taking care not to overpack the specimens within the box too tightly (body parts, especially antennae and tarsi, should never overlap) that could result in damage to them or adjacent specimens during removal. Ideally the specimens should fill the box completely, but if they do not then fill the empty space with blank pins to avoid large, blank areas of foam bottom without pins. Here is an example of a filled specimen box:

    Pinned insects in specimen box ready for packing.

    Pinned insects in specimen box ready for packing.

  2. Use brace pins for large or heavy specimens. This is one of the most common mistakes I see! In the example above, several of the larger species are surrounded by brace pins to keep them from rotating on their pins and damaging neighboring specimens. At least two pins should be used—I place them against the elytra on each side behind the hind legs, and very long or heavy specimens should be further braced by additional pins on each side of the thorax to further ensure they are fully immobilized. Although not shown in this example, specimens with very heavy heads (large mandibles, etc.) should be even further immobilized with additional pins at the head. Here is a closeup view of some of the specimens in the above box that have been further secured with brace pins:

    Large specimens are further immobilized with brace pins.

    Large specimens are further immobilized with brace pins.

  3. Use an inner lid with padding to hold it firmly against the specimens. An inner lid lies on top of the specimens underneath the specimen box lid to keep the specimens securely seated in the foam and prevent them from “working” their way out. Some specimen boxes designed for shipping, such as the examples shown in these photos, come with an inner lid that is hinged on a long side. If the specimen box lacks an inner lid, one should be fashioned from cardboard or heavy card stock. The advantage of an attached inner lid is that it will not move inside the box, so if an inner lid must be fashioned it is essential to trim it so that it fits precisely within the box to minimize the potential for movement. I like to draw an outline on the cardboard with the specimen box and cut on the lines, then shave off extra material from each side to shape it to the inside perimeter of the box. Either way, make a “pull tab” out of adhesive tape and attach it to the inner lid to allow easy removal during unpacking. If the inner lid when set in place does not seat firmly against the outer lid, extra padding material such as paper towels should be placed on top of the inner lid to ensure that it sits firmly against the specimens when the outer lid is set in place. The specimen box with inner lid in place, pull tab attached, and extra padding placed on top is shown below:
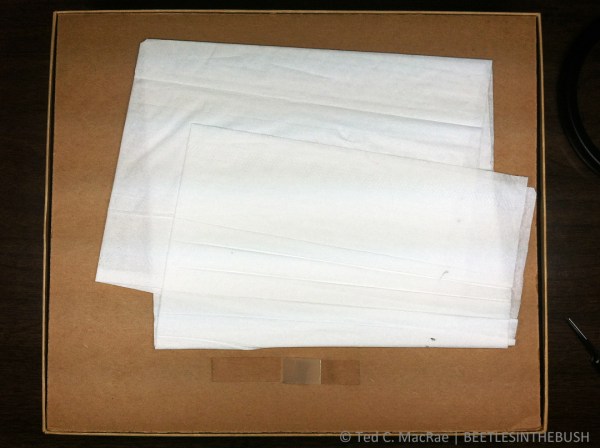
    Cover the inner lid with padding to secure it firmly against the specimens.

    Cover the inner lid with padding to secure it firmly against the specimens.

  4. Seal closed specimen box with tape or rubber bands. The outer lid of the specimen box should be secured in place so that it does not “work” its way loose. Some people use tape, which is effective but must be cut if the box is opened for inspection, leaving the lid unsecured afterwards. I prefer to use sturdy rubber bands, which can be removed for inspection and then easily replaced afterwards. Some specimen boxes come equipped with metal tabs or hoops that fit through slots on the outer lid and that can be bent over to secure the lid in place. In my experience, these often break off after repeated use, so rubber bands or tape are a good insurance policy for such boxes. Another common practice is to wrap specimen boxes in packing paper or place them inside plastic, Zip-Lock bags. This was necessary in the days when excelsior shavings were often used as a packing material around the specimen box, which contained shavings that could work their way into the specimen box and cause damage. With the ready availability of modern packing materials such as foam peanuts there should no longer be any reason to use excelsior shavings. Still, wrapping or sealing inside a plastic bag can’t hurt if it is desired. A closed specimen box with rubber bands securely in place is shown in the photo below:

    Specimen box sealed with rubber bands

    Specimen box sealed with rubber bands

  5. Place an address label on the specimen box. This will ensure that the shipment does not get tossed into the “dead mail” pile if the outer address label is lost or destroyed (I’ve left the label off in these examples to ensure privacy of the recipient).
  6. Secure multiple specimen boxes tightly together. If multiple specimen boxes are shipped together, they should be secured tightly together so that they cannot “bump” into each other during shipment. As mentioned before, tape works but might end up being cut for inspection, so I prefer to use large rubber bands. String can also be used to tie the boxes together, but unless the inspection agent is handy with knots the boxes may not get tied back together. The two specimen boxes included in the shipment I used for this example, secured tightly together, are shown below:

    Multiple boxes should be bound tightly together.

    Multiple boxes should be bound tightly together.

  7. Pack specimen box inside an oversized shipping boxShipping box size selection is critical! The shipping box should not only be sturdy but also big enough to accommodate specimen boxes with at least 3–4 inches below and 2–3 inches on top and each side of the specimen box. This space is necessary to allow the packing material to function not only as cushioning but also in “shock absorption.” My preferred packing material is foam peanuts, since it doesn’t settle during shipment and the amount used can be tailored precisely to the needs of an individual box. The photo below shows the pinning boxes resting on a 4-inch layer of foam peanuts with at least 2–3 inches of space on the sides and above:
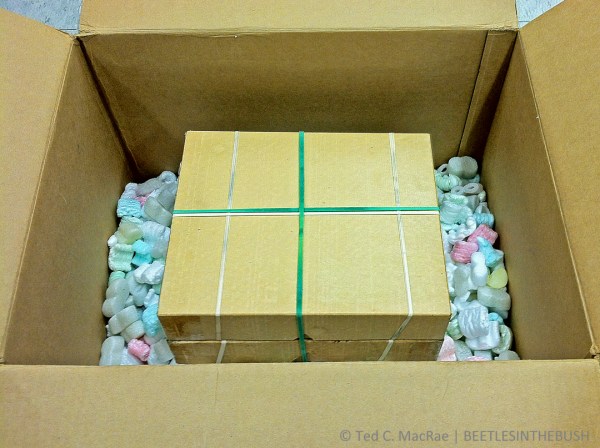
    Place specimen boxes inside a sturdy shipping box with plenty of room on all sides.

    Place specimen boxes inside a sturdy shipping box with plenty of room on all sides.

  8. DO NOT OVERPACK! This is the most common mistake people make! The packing material needs to serve two purposes: 1) provide a crush zone to protect from direct damage, and 2) provide shock absorption to protect from damage by impact jarring. The specimen box actually needs to be able to move slightly within the closed shipping box. If it cannot, energy from impacts is transmitted in full to the specimens inside, greatly increasing the risk that heavier body parts (especially the head/pronotum) will be jarred off the specimens. This not only results in damage to the broken specimen, but the dislodged body parts then act as “wrecking balls” that bounce and tumble inside the specimen box, destroying all of the specimens within their reach. After placing a 3–4-inch layer of packing in the bottom of the shipping box, I like to set the specimen box(es) on top of the foam in the center of the shipping box and fill the shipping box with additional foam peanuts to within about 1″ of the top. Avoid the temptation to fill the box to the brim, or to “settle” the foam peanuts and add a few more, as this will result in a tightly packed box that does not protect the specimens as well as a more loosely packed box. To test, close the flaps on top of the box and give the box a light up-and-down “shake”—you should feel the specimen box bounce slightly inside. If it does not, remove a small amount of packing peanuts and repeat the test. If you cannot remove enough packing peanuts without exposing the top of the specimen box inside, your shipping box is too small and you should select a larger size. The photo below shows the shipping box filled with packing peanuts to the proper level:
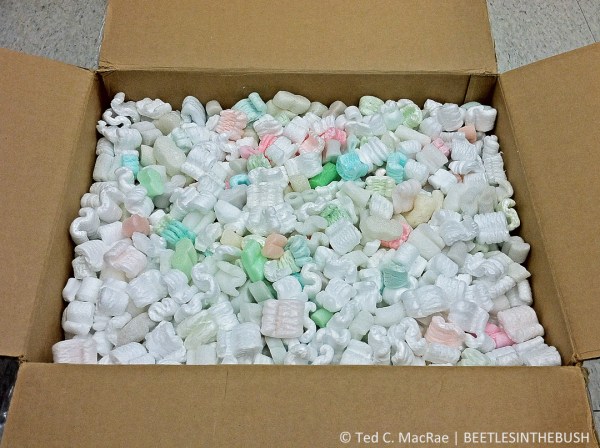
    Shipping box ''almost'' filled with packing material.

    Shipping box ”almost” filled with packing material.

  9. Label the package “FRAGILE”. Whether this is actually helpful or invites abuse by some passive aggressive handler is a matter of debate, but I am of the opinion that a majority of shipping personnel will actually treat the package with a little more respect if they see this label, especially with the disclosure that the contents are preserved insects with no commercial but extreme scientific value. Additionally, disclosure of such information may actually be required by some destination countries, so it’s a good idea to label packages as a matter of routine practice. I like to place one label on top of the shipping box and additional labels on all four sides. BioQuip Products sells moisture-activated adhesive labels as shown below, or similar labels can be designed in a word processing program and printed on blank adhesive labels; however, the latter should be covered with clear tape to prevent them from peeling off of the shipping box during transit.

    Place a fragile sticker on top and all four sides.

    Place a fragile sticker on top and all four sides.

Much of what I have written here I learned as a graduate student, based on a much more detailed article by Sabrosky (1971) that provides additional suggestions for extremely rare and valuable specimens, advice regarding the different postal classes available for international shipments, and a list of “Don’ts” under any circumstances.

Disclaimer: I am an amateur—albeit a highly practiced one, and there may be additional suggestions or advice from professional collection managers and museum curators that would be highly welcomed in the comments below  should it be offered.

REFERENCE:

Sabrosky, C. W. 1971. Packing and shipping pinned insects. Bulletin of the Entomological Society of America 17(1):6–8 [preview].

Copyright © Ted C. MacRae 2013
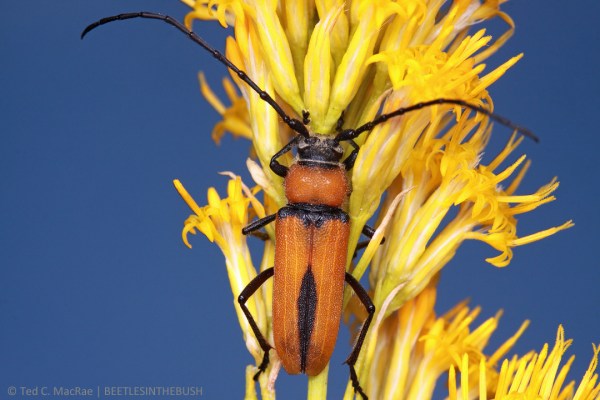
GBCT Beetle #5: Crossidius coralinus monoensis

Crossidius coralinus monoensis (male) | Mono Co., California

Crossidius coralinus monoensis (male) | Mono Co., California

After spending the first four days of our Great Basin Collecting Trip (GBCT) traveling around west-central Nevada, we dropped down into California and traveled south next to the eastern flank of the Sierra Nevada towards Mono Basin. We had two goals for the day: 1) a very localized population of Crossidius hirtipes known from “Kennedy Meadow” and described originally by Chemsak & Linsley (1959) as C. rhodopus flavescens but transferred to a subspecies of C. hirtipes in their revision of the genus (Linsley & Chemsak 1961), and 2) the stunningly beautiful C. coralinus monoensis! Before reaching the first destination, we were temporarily distracted by the inviting shores of Topaz Lake just after crossing the Nevada/California state line, where we found only a few extremely wary Cicindela oregona oregona darting across its muddy banks. We then spent a good portion of the day in a futile attempt to find C. h. flavescens—one of only two Crossidius subspecies we did not find out of the 16 species/subspecies that we had targeted for the trip. Our failure to find this subspecies was largely a consequence of going to “Kennedy Meadows” in Tuolumne Co. rather than “Kennedy Meadow” further to the south in Tulare Co.! (Note to self: pay attention not only to the name of the locality but also the county!)

Crossidius coralinus monoensis (female) | Mono Co., California

Crossidius coralinus monoensis (female) | Mono Co., California

As a consequence of the day’s distractions and diversions, we didn’t arrive at the C. coralinus monoensis locality until quite late in the day. Fortunately, we were looking for a C. coralinus subspecies rather than a C. hirtipes subspecies, as the latter seem to have the habit of retreating down from the flower heads of their host plants starting around 5 p.m. and not coming back up until mid-morning the following day. Crossidius coralinus subspecies, on the other hand, seem to stay put on the flower heads through the night, perhaps burying themselves inside the flower heads but not retreating down from the plant. As a result, they may still be found during the late afternoon and early evening hours. Because of this, we still had a chance of finding them (if they were there) despite our late arrival, and only a few minutes passed before I found a male (first photo) on flowers of gray rabbitbrush (Ericameria nauseosa). The appearance was so strikingly different that I wasn’t even sure what I had found at first—I knew it wasn’t a C. hirtipes subspecies, but the bright orange coloration and relatively smaller size were quite different from the larger, red/black C. coralinus subspecies that I had seen to that point. Once I found a female, however (second photo), I realized that we had found C. coralinus monoensis.

Mono Basin near Mammoth Lakes (7000 ft)—locality for Crossidius coralinus monoensis

Mono Basin near Mammoth Lakes (7000 ft)—locality for Crossidius coralinus monoensis

This subspecies is immediately distinguishable from the C. c. temprans we were collecting further north in Nevada (and, in fact, most other C. coralinus subspecies) by its bright orange rather than dark red coloration. We found only a handful of individuals (as we did two days later when we passed by the site again), and their average size was considerably smaller than the former as well. The subspecies does greatly resemble C. c. caeruleipennis, found still further south at much lower elevations in Owen’s Valley (and a target for the following day) but differs by its smaller average size and presence of distinctly expanded black elytral markings and apical and basal black pronotal bands.

REFERENCES:

Chemsak, J. A. & E. G. Linsley. 1959. Descriptions of some new Cerambycidae from Mexico and southwestern United States. Journal of the Kansas Entomological Society 32(3):111–114 [preview].

Linsley, E. G. & J. A. Chemsak. 1961. A distributional and taxonomic study of the genus Crossidius (Coleoptera, Cerambycidae). Miscellaneous Publications of the Entomological Society of America 3(2):25–64 + 3 color plates.

Copyright © Ted C. MacRae 2013

The Festive Tiger Beetle in Southeast Missouri

Cicindela scutellaris lecontei x s. unicolor

Cicindela scutellaris lecontei x scutellaris unicolor (male) | Holly Ridge Conservation Area, Missouri

This past spring I returned to the lowlands of southeastern Missouri in an effort to find and photograph a population of tiger beetles that seems to be unique to the area. The beetles represent Cicindela scutellaris (Festive Tiger Beetle), a widespread species that is common in dry sand habitats across the central and eastern U.S. It is also one of North America’s most polytopic species, with populations in the Great Plains, eastern U.S., Atlantic Coast, southeastern Coastal Plain, and several isolated populations on the western and southwestern peripheries of the species’ range of distribution recognized as distinct subspecies. In Missouri the species is known only from the extreme northwestern, northeastern, and southeastern corners of the state. In all of these areas the populations are found on alluvial sand deposits associated with the Missouri and Mississippi Rivers. Additional sand deposits are found in the areas between these three widely disjunct areas, but curiously the species has not yet been found in them, despite the presence of other species that occupy these same habitats such as Cicindela formosa (Big Sand Tiger Beetle).

Cicindela scutellaris lecontei x s. unicolor

Cicindela scutellaris lecontei x scutellaris unicolor (male) | Holly Ridge Conservation Area, Missouri

The populations in northern Missouri fall well within the distributional range of subspecies C. s. lecontei and are readily assignable to that taxon based on their wine-red coloration and well developed elytral markings. The population in southeastern Missouri, however, cannot be assigned either to that subspecies or to the more southern subspecies C. s. unicolor, which occurs along the southeastern U.S. Coastal Plain and is characterized by solid green coloration and no elytral markings. Individuals from southeastern Missouri are typically green, as in C. s. unicolor, but usually exhibit a distinct wine overtone from C. s. lecontei that varies greatly in its degree of development. Like C. s. lecontei, the elytra are usually marked, but never as strongly as in C. s. lecontei and sometimes not at all (as in C. s. unicolor). The two individuals shown in these photos represent the typical condition—wine blushing and elytral markings only moderately developed; however, more extreme examples can be seen in photos from fall 2008 and spring 2009 (taken during my “point-and-shoot” days, which explains my desire to photograph these beetles again). The intergradation of characters, their variable development, and the apparent presence of a wide disjunction zone between this population and C. s. lecontei to the north suggest to me that it originated from a relatively recent hybridization event between C. s. lecontei and C. s. unicolor—perhaps during the post-glacial hypsithermal that ended some 5,000 years ago.

Cicindela scutellaris lecontei x s. unicolor

Cicindela scutellaris lecontei x scutellaris unicolor (female) | Sand Prairie Conservation Area, Missouri

While I am happier with these photos than I am with those taken earlier, they don’t represent either the full range of variability seen in the population or the most aesthetically pleasing tiger beetle photographs I’ve ever taken. I made two trips to the southeast this past spring, and on each trip I was successful in finding and photographing only a single, very skittish individual—one on a sandy trail through upland forest (Holly Ridge Conservation Area) and the other along the margin of a sand blowout in a native sand prairie remnant (Sand Prairie Conservation Area). I’ll try again this coming spring and hopefully will be able to show some better photographs.

p.s. Can you tell the difference in the type of flash diffuser I used between these two trips? If so, which one do you like better?

Copyright © Ted C. MacRae 2013
GBCT Beetle #4—Crossidius hirtipes rubrescens

Crossidius hirtipes rubrescens (male) | Lyon Co., Nevada

Crossidius hirtipes rubrescens (male) | Lyon Co., Nevada

Linsley & Chemsak (1961) characterize the longhorned beetle species Crossidius hirtipes as “probably the most diverse species within the genus.” Occurring throughout the Great Basin and adjacent areas, the variability it expresses in punctation, color, elytral pattern and pubescence have resulted in the recognition of 16 named subspecies and numerous additional distinct but unnamed populations. During our Great Basin Collecting Trip (GBCT) in late August, we targeted ten of the named subspecies (representing the majority of populations found across the southern half of the species’ distribution) and succeeded in finding eight of them. I’ve already featured C. h. immaculatus, occurring across northern Nevada and northeastern California and the first beetle we found on the trip, and the photo above shows a male of what we consider to represent C. h. rubrescens—one of three C. hirtipes subspecies restricted to a very small area in west-central Nevada. Linsley & Chemsak (1961) described this subspecies from a series taken just north of Yearington on Chrysothamnus greenei (now Ericameria greenei), noting that it differs from other subspecies by its pinkish cast to its coloration and its pale appendages.

We almost did not find this subspecies.  We had stopped at several places along the road as we approached Yearington from the north and finally stopped at a spot 2.6 miles north of town with good stands of E. greenei. Although we found a few C. coralinus temprans on the plants, we did not see C. hirtipes. While we were searching we noticed a much smaller yellow-flowering asteraceous plant that at first we thought might be something in the genus Haplopappus but which I now believe represents a variety of Chrysothamnus viscidiflorus—the normal host plant for most subspecies of C. hirtipes (a plant voucher was collected and has been sent off for identification). We searched these plants as well but didn’t see any beetles on them, and after a while we decided we’d given the locality a good enough look and that we should move on. We began walking back towards the car, and as we approached the car I happened to look down and saw a mating pair of C. hirtipes sitting on a C. viscidiflorus flower. The pair split and bolted right when I saw them, but we managed to capture one of them and decided maybe we should look around a little more. The beetles were scarce, and another hour of searching produced only a handful—mostly in a small area further north of the area we had been searching. We then checked a couple of other nearby spots but found only a few host plants and no beetles, so we decided to go back to the site and search again. While none were seen in the original spot, we found much better stands of the plant in the adjacent area even further to the north and managed to collect a decent though not large series of adults before the setting sun caused the beetles to retreat and end our day. The individual in the photo above (recognizable as a male by its relatively longer antennae and immaculate elytra) was photographed as the setting sun turned the smoke-filled sky to a soft, burnt orange color that nicely compliments the color of the beetle.

REFERENCE:

Linsley, E. G. & J. A. Chemsak. 1961. A distributional and taxonomic study of the genus Crossidius (Coleoptera, Cerambycidae). Miscellaneous Publications of the Entomological Society of America 3(2):25–64 + 3 color plates.

Copyright © Ted C. MacRae 2013

Just another ‘bug on white’

“White box” photography seems to have become quite popular for insects during the past couple of years, and what used to be a rarely used technique for photographing insects has become rather commonplace. It’s really not that hard to do—all you need is a camera, a flash, an insect, and… um, a white box. Put the insect in the box (maybe cover it with a petri dish and turn the lights off for a bit of time until it settles down), direct the flash towards the interior of the box, and start shooting. It takes only a little bit of trial and error to dial in the proper flash direction and duration (or flash exposure compensation if you use ETTL), and the results can be dramatic, especially if you post-process to enhance levels, contrast, brightness, etc. You can even cheat a little and skip the white box if you have a good flash diffuser and don’t care that there might be a little bit of gray in the furthest reaches of the background (pleading guilty here)—just place the bug on white paper and shoot away.

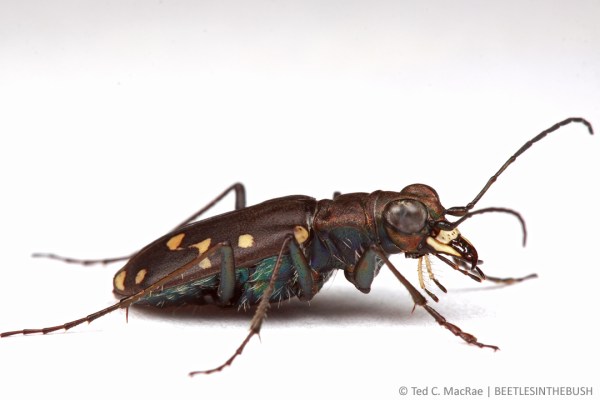
Cicindela oregona oregona | Topaz Lake, California

Cicindela oregona oregona | Topaz Lake, California

I guess I can’t complain about the new-found popularity of “bug-on-white” photography—anything that makes insects more appealing to the general public is a good thing, and the purity of the photos seems not only to enhance the appearance of the insects but actually makes them seem… well, “cleaner.” Nevertheless, I’ve only dabbled in bug-on-white photos and not gotten into the technique in a big way. The reason for this is that I still, all things being equal, prefer to photograph insects in the field in their native habitats—hopefully also exhibiting interesting natural behaviors. That is the goal, of course, but it is not always a possibility, especially when it comes to one of my favorite subject groups—tiger beetles. Photographing tiger beetles in the field is a challenge due to their extremely wary habits, swift running and rapid flight capabilities, and penchant for extreme, often hostile habitats. Many times I am up for the challenge and will spend whatever time it takes and suffer all manner of indignance to get the shot. However, there are times when there are other tasks at hand or a perfect storm of conditions makes the beetles simply impossible to approach. This was one of those times.

Cicindela oregona oregona | Topaz Lake, California


We encountered the beetle shown in these photos on the California side of Lake Topaz along its muddy southwestern banks. The beetles were not numerous—unusual for the species Cicindela oregona which can oftentimes be quite abundant along shoreline habitats throughout the western U.S. Time was at a premium, as it was supposed to be just a quick stop to see what might be found as we headed further south into Mono Co. to look for some rather spectacular longhorned beetles in the genus Crossidius unique to the area. An added difficulty was the habitat—the beetles were at the edge of a very shallowly pitched mudflat, preventing us from reaching the water’s edge without sinking deeply into the rancid mud. Between this and their scarce numbers, field photographs would have required more of an investment in time and cleanup than I was prepared to spend, so I netted a few individuals for the record and kept one alive for photographs later that night in the comfort of my hotel room.

xxx

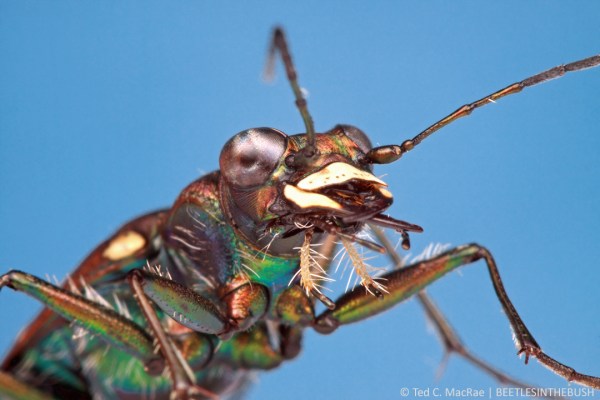
One of the nice things about bug-on-white photographs is the ability to get a variety of carefully executed compositions from the most optimum vantage point. Lateral profile shots are almost a requirement, as are shots with the head of the insect slightly turned towards the lens. Of course, I cannot photograph a tiger beetle and not take the perfectly centered, full-on face shot. In all of these cases, the ability to get the camera truly “down” on the subject’s level means that I can maximize the use of low perspective, and nowadays I don’t even bother with dorsal shots that might be good for some future field guide but that I find really quite boring in their aesthetics.

xxx

In fact, you can even take the low perspective to the extreme by actually elevating the subject and coaxing it towards the edge of its platform to allow photography from below. Compare the above frontal portrait of the beetle, taken from a particularly extreme low perspective, with the photo above it, taken at the same level as the subject. Both photographs provide an interesting and aesthetically pleasing perspective, but in very different ways despite the small change in the angle of the camera—the upper photo is pleasing due more to the symmetry of the composition, while the lower photo derives its interest in the unusual perspective that highlights the setose mouthparts and bulging eyes.

xxx

I have long wanted to photograph a tiger beetle with blue sky background (hat tip to Thomas Shahan for giving me that idea during the inaugural BugShot). Sadly, I have not succeeded in doing this. The main problem is in trying to get an extremely wary subject in just the right place at the right time. Since these beetles occur on the ground rather than being elevated on foliage (at least under normal circumstances in the U.S.), one must find a spot where the ground drops sharply enough to allow the photographer to get below the subject, and then somehow get the tiger beetle to pose right at the edge of the precipice. The above photograph is sort of a simulation of the kind of photo I am striving for, achieved in this case by (are you ready for this?) hanging a pair of blue underwear behind the subject, which is sitting on a piece of white paper placed at the edge of the table. The combination of “blue-sky” and bug-on-white techniques is interesting, but don’t think I’ll be able to rest until I have succeeded in a true field version of this photograph. If anyone manages to achieve this before I do, please let me know how you did it (in exchange for me having given you the idea :)).

Copyright © Ted C. MacRae 2013

Under Blood Red Skies

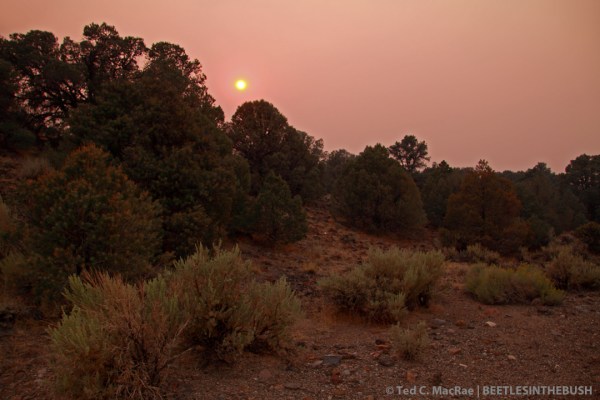
At the start of my recent Great Basin collecting trip, I found myself presented with a rather unique and unanticipated photographic opportunity. As I landed in Reno, Nevada, the then 6-day old Rim Fire was already well on it’s way to becoming the largest wildfire on record in the California Sierra Nevada. As acre after acre of the Sierra’s dramatic coniferous forest succumbed to the blaze, an enormous plum of smoke drifted northward for several hundred miles over eastern California and western Nevada, blanketing the area in a thick haze that turned the sun’s hot glare to a soft glow and limited visibility to under a mile. It was like a thick overcast foggy day, only without the cool, damp humidity. This was of little consequence to our business at hand—collecting beetles (although it did make pointless most attempts to photograph the area’s stunning landscape). At day’s end, however, a dramatic transformation took place in the sky as the sun sank lower and lower, turning to an increasingly red globe as it strained to shine through the ever thicker layer of smoke and haze. Then, for a few brief moments, the sun floated—a dark red globe under blood red skies—before the thick bottom layers of haze finally extinguished its fading light.

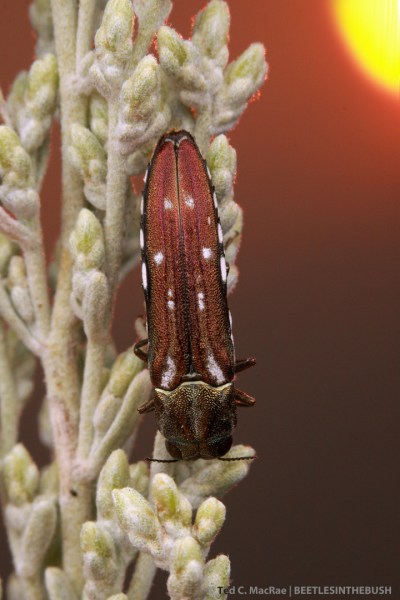
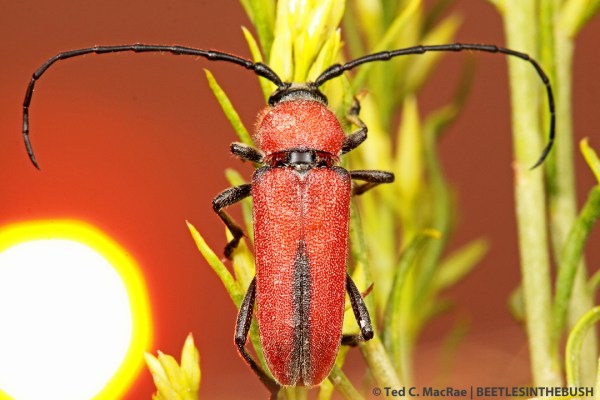
I’ve just begun trying to incorporate setting suns into my photography, having made to this point only a few attempts over Midwestern landscapes. I’m not really sure what gave me the idea, but I thought it might be fun to try incorporating the spectacular sun and unusual sky I was seeing as backgrounds in full-flash insect macrophotographs. Perhaps it seemed a logical progression from the natural sky background macrophotographs that I’ve put a lot of effort into perfecting this year. It was certainly a learning experience, but the basic principle is the same as it is for blue sky background—finding the right combination of camera and flash settings to balance flash illumination of the subject with ambient illumination of the background. The most difficult thing was, surprisingly, getting the sun in the desired position within the composition, as it does not appear through the viewfinder as the discrete ball that is seen in the photos. Rather, it appears as a large, amorphous, blinding flash that comes and goes as one pans across it, leading to a lot of guesswork regarding its actual position within the composition.

I gave a sneak preview of one of these photos in Sunset for another great collecting trip, and several of the photos I’ve shared since then have featured the remarkably colored sky in the background. Here are some other attempts that I was happy with:

Agrilus walsinghami (female) | Washoe Co., Nevada

Agrilus walsinghami (female) | Washoe Co., Nevada

Agrilus walsinghami (male) | Washoe Co., Nevada

Agrilus walsinghami (male) | Washoe Co., Nevada

Crossidius coralinus temprans (male) | Pershing Co., Nevada

Crossidius coralinus temprans (male) | Pershing Co., Nevada

Initially hot yellow (previous photo), the sun turns to soft yellow...

Initially hot yellow (previous photo), the sun turns to soft yellow…

...then yellow-red...

…then yellow-red…

...and finally blood-red!

…and finally blood-red!

Crossidius hirtipes macswainei (female) | Lyon Co., Nevada

Crossidius hirtipes macswainei (female) | Lyon Co., Nevada

Sunset over Toiyabe National Forest | Lyon Co., Nevada

Sunset over Toiyabe National Forest | Lyon Co., Nevada

Gray rabbitbrush (Ericameria nauseosa) | Lyon Co., Nevada

Gray rabbitbrush (Ericameria nauseosa) | Lyon Co., Nevada

Copyright © Ted C. MacRae 2013

GBCT Beetle #3—Crossidius coralinus temprans

On Day 2 of our late August Great Basin Collecting Trip (GBCT), we headed east from Reno towards Fallon (Churchill Co.) and surrounding areas of western Nevada. Our quarry on this day was one of the spectacular Crossidius coralinus subspecies—in this case C. c. temprans. This subspecies was described by Linsley & Chemsak (1961) from large series of specimens collected in Lassen Co., California, but also mentioned were specimens from several locations in west-central Nevada. This material was not included in the type series because of the disjunct distribution but was otherwise not distinguished from the temprans populations, and for us the drive to Churchill Co. was much more feasible logistically than Lassen Co.

Crossidius coralinus temprans (female) | Churchill Co., Nevada

Crossidius coralinus temprans (female) | Churchill Co., Nevada

The female in the photo above is the first individual I encountered at the first stop we made to look for them—a swale about 12 miles west of Fallon in which we noted thick stands of gray rabbitbrush (Chrysothamnus nauseosus) in the early stages of flowering. It was still fairly early in the day, and though we scoured the area thoroughly only a few individuals were seen. The female exhibits some of the main characteristics that set this subspecies apart from the other red/black coralinus subspecies, including the faint bluish overtones, the deep red color, the relatively fine but dense elytral punctation, and its smaller average size. Females in particular exhibit a uniform, broadly expanded black pattern on the elytra that extends along the suture to at least the basal third of the elytra and also possess broadly black humeri connected by a black basal band.

A male from Churchill Co. shows reduction of elytral markings relative to females.

A male, also from Churchill Co., shows reduced elytral markings compared to females.

We had better luck finding individuals in the area 10–15 miles south of Fallon. I’m not sure whether this was due to actual greater abundance or the fact that it was now late morning and temperatures had warmed since our first stop. Nevertheless, we found a mating pair on one of the plants that I had hoped to photograph, but the female got skittish and took flight. Normally when one partner flees the other one does as well, but for some reason the male stayed put—nicely perched on top of the plant—and allowed me to take some photographs. Because I had already disturbed the female, I was pretty sure any attempted handling of the plant to position it with the sky in the background would cause the male to flee as well, so I photographed it as it sat—messy background and all. Still, the male shows the typical characters for males of the subspecies, in particular the faintly bluish dark pattern that is slightly expanded laterally and tapers anteriorly along the suture to the basal one-third of the elytra.

Lateral profile of the male shows a hint of black at the elytral base.

Lateral profile of the male (same individual as above) shows a narrow black band at the base of the elytra.

This lateral shot of the same male was taken, in part, to get an angle that allowed for a cleaner background, but it also more clearly shows the very narrow black band at the base of the elytra that connects the humeri, though the black markings are not as broad as in the female. After photographing this male, we found a spot near Carson Lake where the rabbitbrush was common not just along the road, but in the adjacent rangelands and along dikes adjacent to the wetlands surrounding the lake. There we found pretty good numbers of adults and worked the area for a couple of hours until we had adequate series.

This male from Pershing Co., Nevada has the elytral marking reduced to a narrow sutural stripe.

This male from Pershing Co., Nevada has the elytral markings reduced to a narrow sutural stripe.

Another reason for going east on this day was to take a shot at C. hirtipes bechteli, a subspecies known from only a few localities along the I-80 corridor in north-central Nevada. The westernmost locations were close to Lovelock—a 90-minute drive from where we were, so when we finished up in the area around Fallon we headed towards Lovelock. We knew finding this subspecies was a long shot, since all of the records in Linsley & Chemsak (1961) were from mid- to late September, but since making the effort didn’t impact our ability to arrive at the first planned stop the next day at a decent hour we had nothing to loose by looking for it. We found one of the localities, but the plants at this relatively higher altitude site were still in the earliest stages of bloom, and we didn’t see any adults within about a half-mile stretch of roadside. The effort, however, was not for naught (I love saying that!), as the lateness of the hour and a heavy blanket of smoke from the nearby Rim Fire created a most beautiful blood red sky. Before the day slipped away completely, we stopped at a spot closer to Lovelock to see if we could find a C. coralinus temprans adult to photograph against this unusual backdrop and were immediately rewarded with the fine male shown in the photograph above. Sitting against this marvelous background, the male shows a much reduced black elytral marking that is sometimes the case with males of this subspecies. I hurriedly took as many shots as I could (getting that one photo that I really like is, for me, still a numbers game), but the conditions were fleeting and within a short time it became too dark to take any more.

REFERENCE:

Linsley, E. G. & J. A. Chemsak. 1961. A distributional and taxonomic study of the genus Crossidius (Coleoptera, Cerambycidae). Miscellaneous Publications of the Entomological Society of America 3(2):25–64 + 3 color plates.

Copyright © Ted C. MacRae